Build a Realtime Chat App with Directus and Astro
Directus offers realtime capabilities powered by WebSockets. You can use these with the Directus SDK to create your own realtime applications. In this tutorial, you will build a chat application using Astro and a Directus project.
Before You Start
You will need:
- A Directus project with admin access.
- Fundamental understanding of Astro concepts and dynamic island architecture.
- Optional but recommended: Familiarity with data modeling in Directus.
Set Up Your Directus Project
Enable Websockets in Directus
Directus uses websockets to enable realtime capabilities. If you are using the Directus Cloud, websockets are enabled by default. If you are self-hosting Directus, you will need to enable websockets in your directus config file.
To enable websockets, update your docker-compose.yml config file to include the following:
environment:
  WEBSOCKETS_ENABLED: true
  WEBSOCKETS_HEARTBEAT_ENABLED: true
Create a Collection
Create a new collection called messages with the following fields:
content(Type: textarea)
After which you can go to the optional fields and activate the following:
user_createddate_created
Edit Public Policy
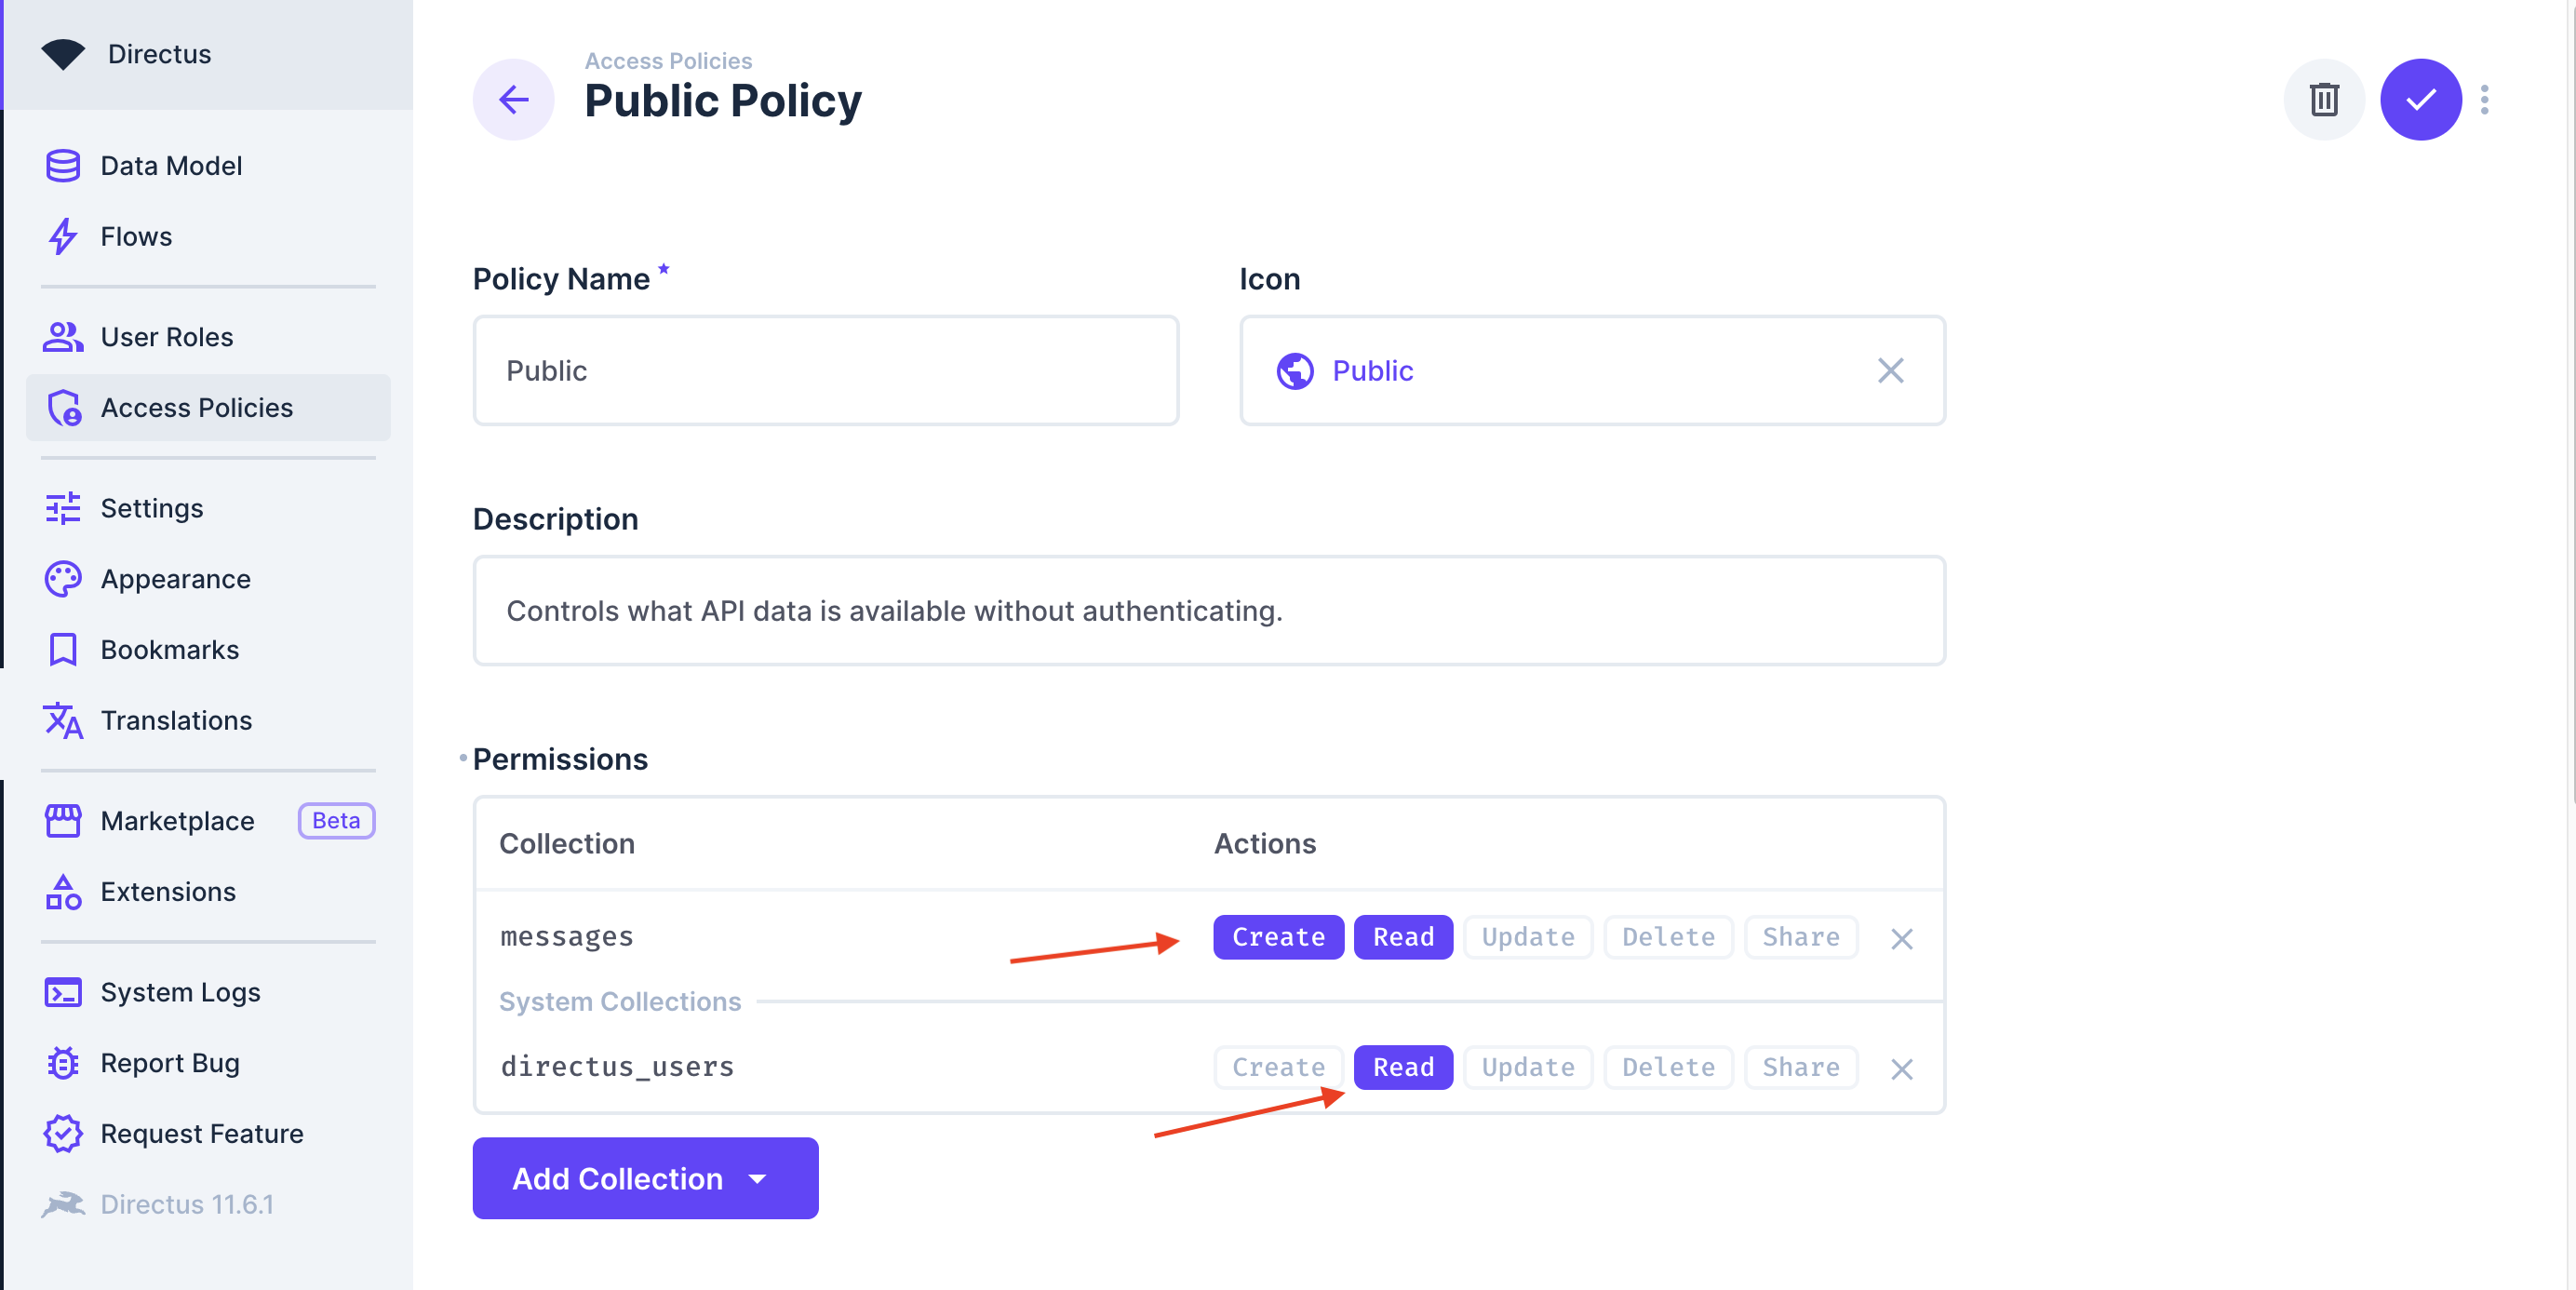
To allow unauthenticated users to view the posts collection, you need to modify the public access policy to offer read access. Ideally, in a real project, you should create a new policy and authenticate users to Directus before allowing them access to your content.
To enable access, go to Settings -> Access Policies -> Public, and under Permissions, add messages with full access for create and read.
The public policy also needs access to the directus_users collection so that the user who created the message can be displayed. To do this, add directus_users with custom read access to the public policy, and under Field Permissions, uncheck all fields except for first_name and last_name.
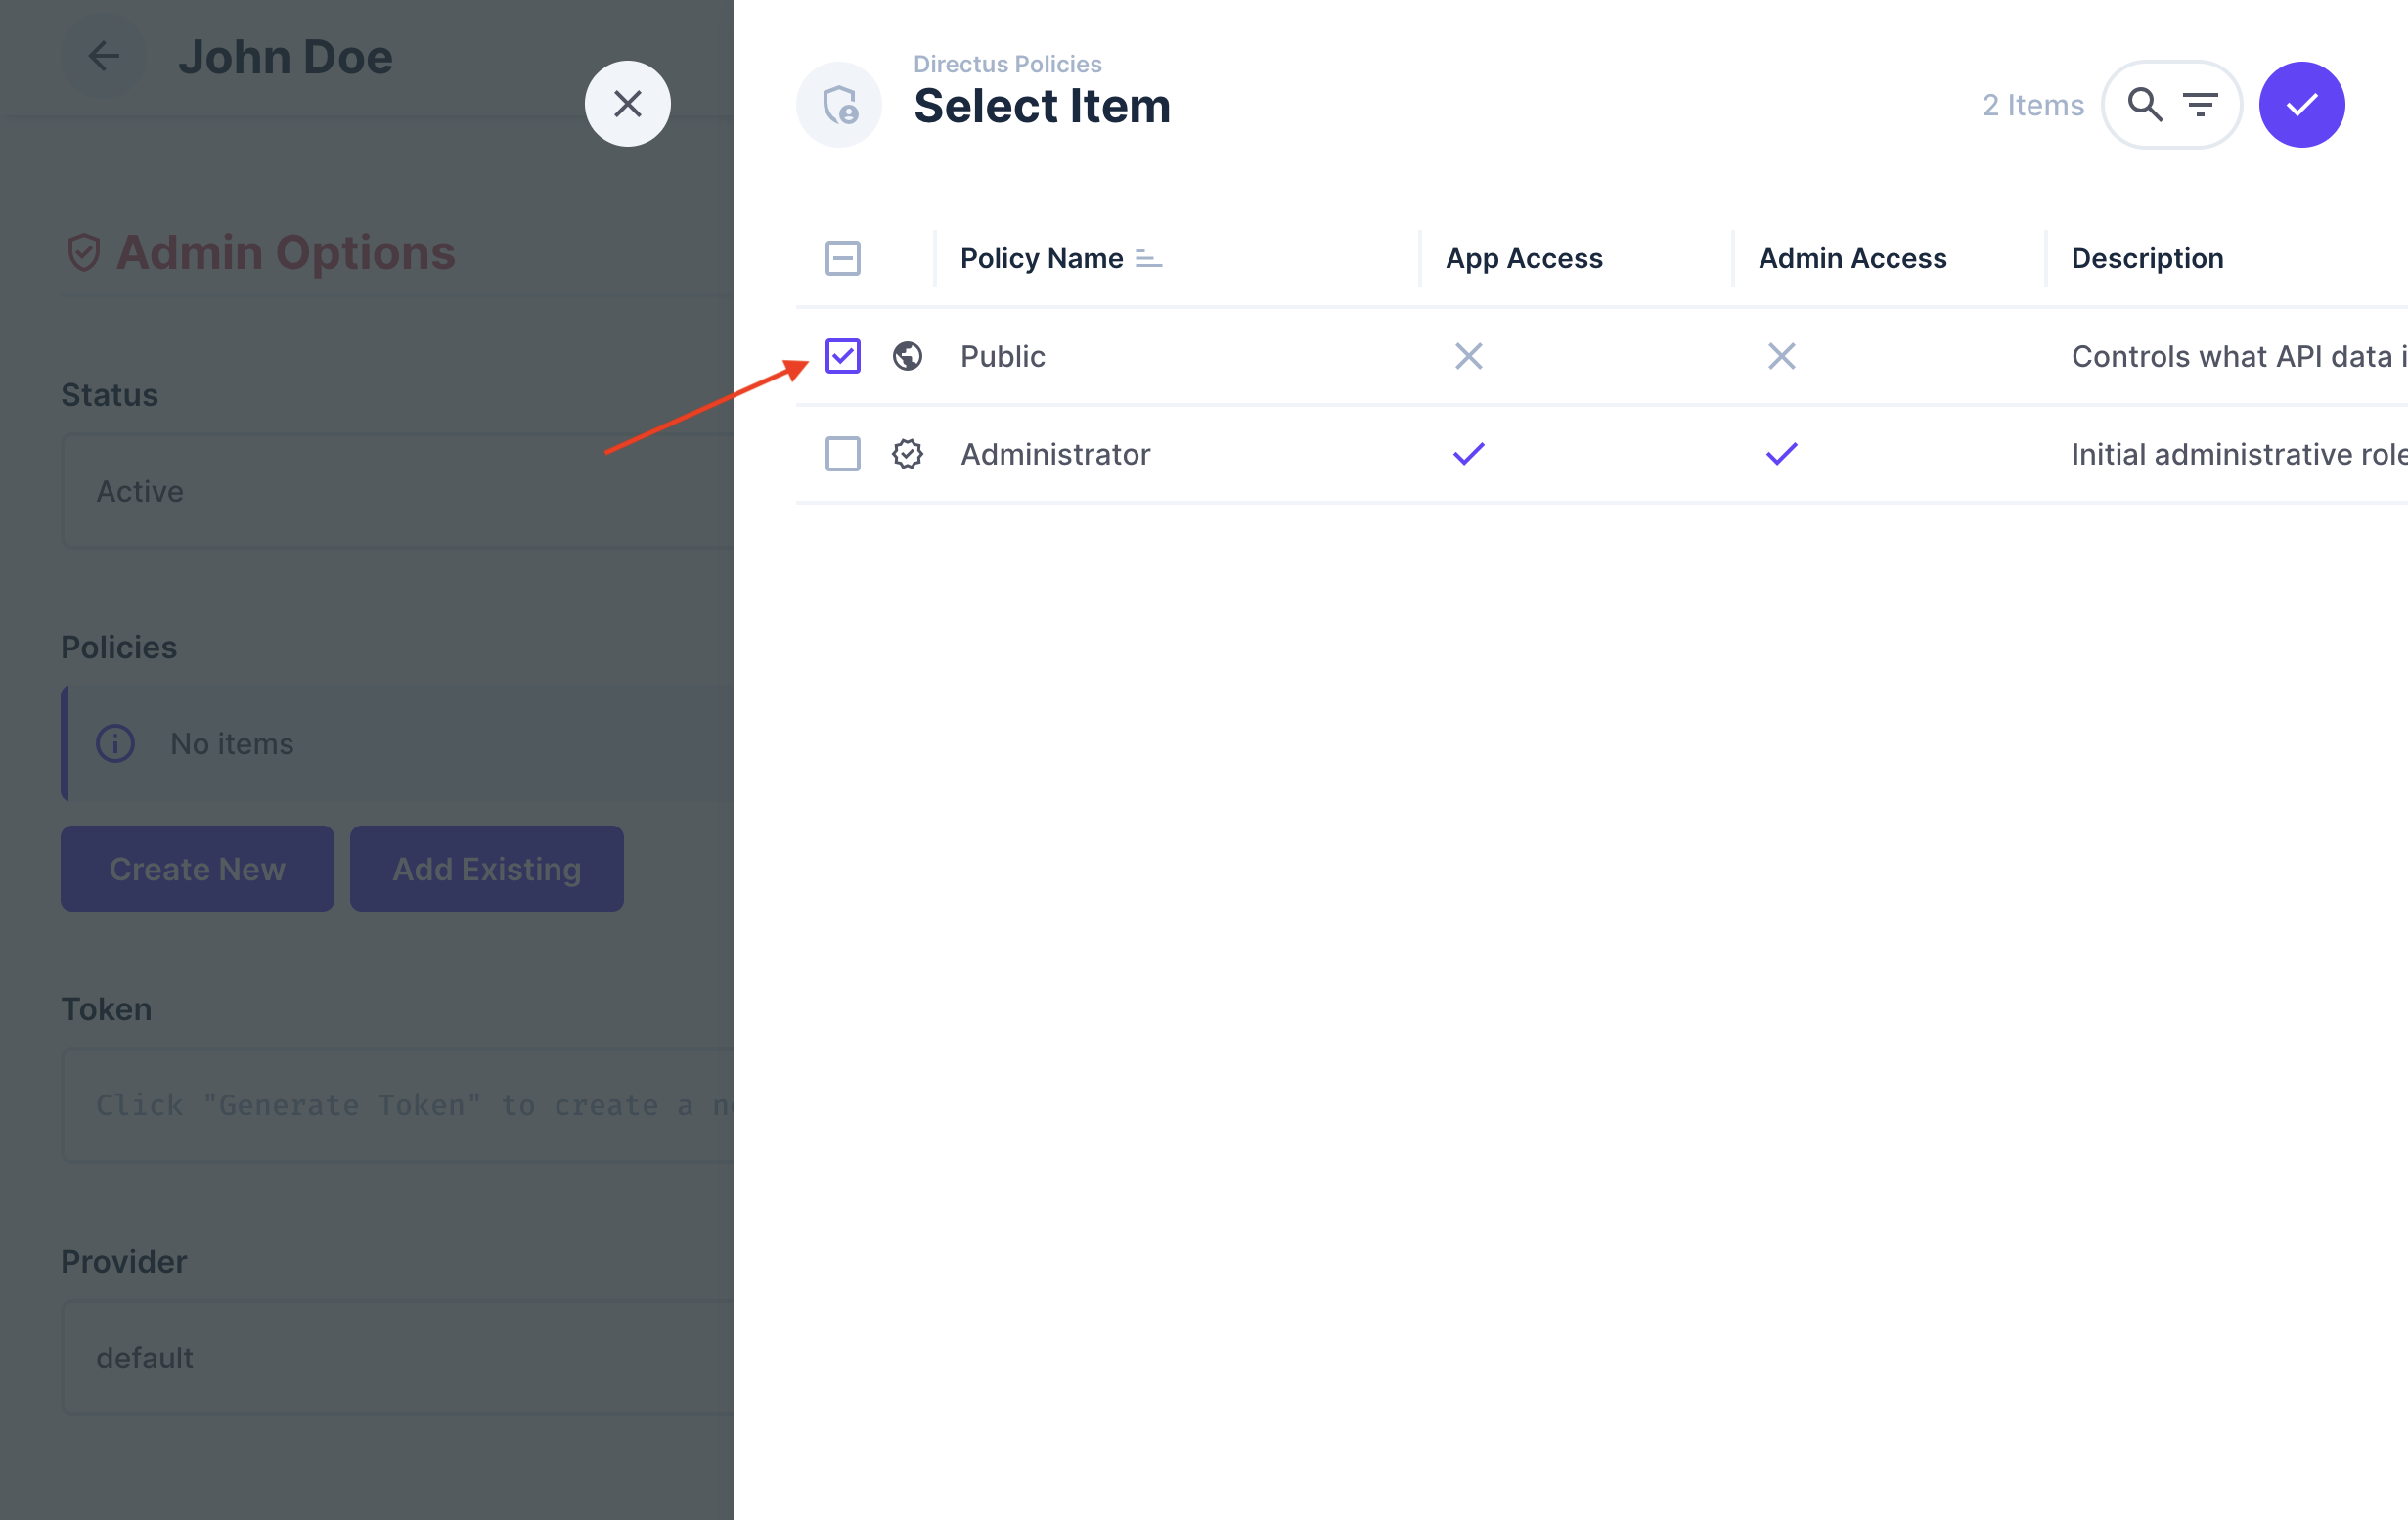
Create a User for Chatting
For messages to be sent, they need to be sent by a user. You can create a user in the Directus admin panel by going to User Directory -> Add User and create a new user. Be sure to remember the email and password you used to create the user, as you will need it to log in to the chat application later in this tutorial.
Assign the user to public policy by clicking "Add Existing" under policies and check "Public".
Set Up an Astro Project
To set up an Astro project, run the following command in your terminal:
npm create astro@latest astro-live-chat
This command will create a new Astro project with the name astro-live-chat.
During installation, when prompted, choose the following configurations:
How would you like to start your new project? A basic, minimal starter
Install dependencies? Yes
Initialize a new git repository? No
Once completed, open the directory in your desired code editor and install the Directus JavaScript SDK using the command:
npm install @directus/sdk
Run npm run dev in the terminal to start the development server at http://localhost:4321. Open the URL on your browser to be sure Astro is set up correctly.
Configure the Directus SDK
First, create a .env file in the root of your project and add the following environment variables:
PUBLIC_DIRECTUS_URL=https://your-directus-project-url.com
In the src directory, create a lib directory and inside of it, create a directus.ts file to set up your Directus client instance:
/// <reference types="vite/client" />
import { createDirectus, rest, authentication, realtime } from "@directus/sdk";

const DIRECTUS_URL = import.meta.env.PUBLIC_DIRECTUS_URL;

const client = createDirectus(DIRECTUS_URL).with(rest()).with(authentication()).with(realtime());

export default client;
The code above imports the Directus SDK and sets up the Directus client instance with authentication and realtime from the SDK.
Install Preact Framework
Since building a chat application involves interacting with the client side, a front-end framework is required. While you can use any UI framework of your choice, this tutorial will use Preact for its lightweight and easy-to-use nature.
To install Preact, run the following command in your terminal:
npx astro add preact
This command will install Preact and update your astro.config.mjs file to use Preact as the default frontend framework.
Create a Login Form Component
Before you can send messages, you need to log in to the chat application. Create a new file called LoginForm.tsx in the src/components directory and add the following code:
import { useState } from "preact/hooks";

interface LoginFormProps {
  formData: {
    email: string;
    password: string;
  };
  setFormData: (data: { email: string; password: string }) => void;
  onSubmit: (e: SubmitEvent) => Promise<void>;
}

export default function LoginForm({ formData, setFormData, onSubmit }: LoginFormProps) {
  const [errorMessage, setErrorMessage] = useState("");

  async function handleSubmit(e: SubmitEvent) {
    e.preventDefault();
    const form = new FormData(e.target as HTMLFormElement);
    const email = form.get("email");
    const password = form.get("password");

    if (!email || !password) {
      setErrorMessage("Please fill in all fields");
      return;
    }

    try {
      await onSubmit(e);
    } catch (error) {
      console.log(error);
      setErrorMessage("Invalid email or password");
    }
  }

  return (
    <form onSubmit={handleSubmit}>
     <h2>Login to start chatting</h2>
      <input
        type="email"
        name="email"
        placeholder="Email"
        value={formData.email}
        onChange={(e) =>
          setFormData({ ...formData, email: (e.target as HTMLInputElement).value })
        }
      />
      <input
        type="password"
        name="password"
        placeholder="Password"
        value={formData.password}
        onChange={(e) =>
          setFormData({...formData, password: (e.target as HTMLInputElement).value })
        }
      />
      <button type="submit">Login</button>
      {errorMessage && <p className="error">{errorMessage}</p>}
    </form>
  );
}
The code above creates a simple login form with email and password fields. It also handles form submission and displays error messages if the login fails.
Create a Chat Component
Next, create a new file called Chat.tsx in the src/components directory. This component that will handle sending and receiving messages.
In the file, add the following code:
import { useState } from "preact/hooks";
import client from "../lib/directus";
import LoginForm from "./LoginForm";

interface Message {
  id: string;
  content: string;
  user_created?: {
    first_name: string;
  };
}

export default function Chat() {
  const [refreshToken, setRefreshToken] = useState<string | undefined>(undefined);
  const [formData, setFormData] = useState({
    email: "",
    password: "",
  });

  async function submit(e: SubmitEvent) {
    e.preventDefault();
    const formData = new FormData(e.target as HTMLFormElement);
    const email = formData.get("email");
    const password = formData.get("password");

    if (!email || !password) {
      return;
    }
    // TODO: Handle via websocket here
  }
  return (
    <>
      {refreshToken === undefined ? (
        <LoginForm
          formData={formData}
          setFormData={setFormData}
          onSubmit={submit}
        />
      ) : (
        <div>
          <h2>Chat</h2>
          Sign in to start chatting
        </div>
      )}
    </>
  );
}
The code above:
- Imports the necessary dependencies, including the Directus
clientand theLoginFormcomponent. - Defines a
Messageinterface to represent the structure of a message. - Sets up state variables for the refresh token, form data, and error message.
- Defines a
submitfunction to handle form submission and log in to Directus. - Renders the
LoginFormcomponent if the refresh token is not set, otherwise renders the chat interface.
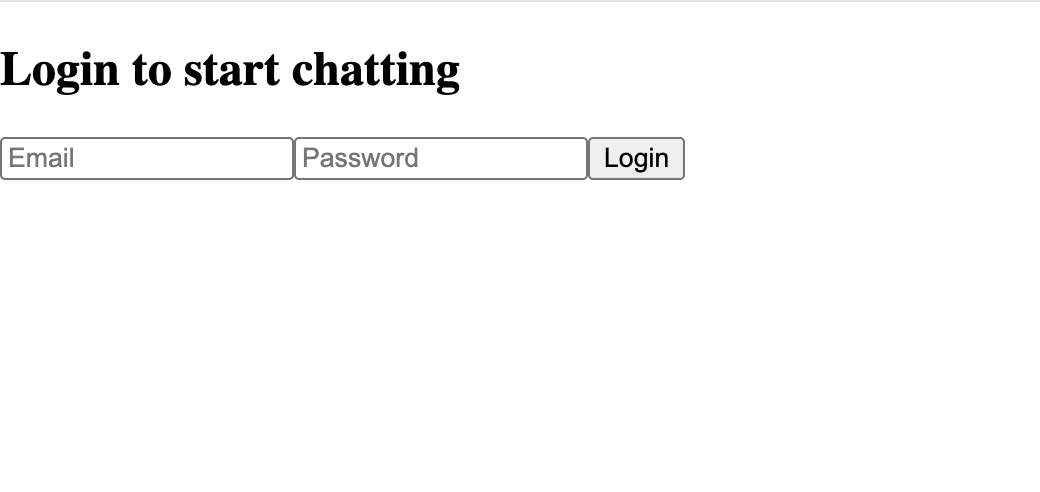
So if the user is not logged in, the login form will be displayed. If the user is logged in, the chat interface will be displayed. At the moment, the chat interface is not implemented yet. You will implement it in the later steps of this tutorial, but first, begin by rendering the Chat component in the src/pages/index.astro file.
In the src/pages/index.astro file, update the content to include the Chat component:
---
import Chat from "../components/Chat";
import Layout from "../layouts/Layout.astro";
---

<Layout>
  <Chat client:load/>
</Layout>
Adding the client:load directive to the Chat component will ensure that the component is only loaded on the client side, which is important for components that rely on client-side state and interactions.
Navigate to http://localhost:4321/ and you will be provided you with a UI that looks like this:
To authenticate the realtime client using the handshake mode, you will first need to authenticate the REST client using the email and password from the login form. Then, you can use the handshake mode to authenticate the realtime client right after calling directus.connect().
To do that, inside of the Chat.tsx file, create a initializeWebSocket function that will handle the websocket connection and authentication:
async function initializeWebSocket() {
  await client.connect();
  client.sendMessage({
    type: "auth",
    email: formData.email,
    password: formData.password,
  });

  client.onWebSocket("message", (message) => {
    try {
      console.log("Websocket message:", message);
      if(message.type === "auth" && message.status === "ok") {
        setRefreshToken(message.refresh_token);
        //TODO: Add the subscription calls here
      }
      // TODO: Receive incoming messages here
    } catch (error) {
      console.error("Error parsing websocket message:", error);
    }
  });

  client.onWebSocket("error", (error) => {
    console.log("Websocket error:", error);
  });
}
The initializeWebSocket function connects to the websocket server and sends an authentication message with the email and password. It also listens for incoming messages and errors from the websocket server.
To use the initializeWebSocket function, update the submit function to call it after successfully logging in, you should add this part just after the //TODO comment in the submit function:
// TODO: Handle via websocket here
try {
  const response = await client.login({
    email: email as string,
    password: password as string,
  });
  console.log("Login successful", response);
  initializeWebSocket();
} catch (error) {
  console.log(error);
}
This will call the initializeWebSocket function after successfully logging in to Directus, allowing you to start receiving messages in the chat application.
Subscribe to Incoming Messages
At the moment, directus.onWebSocket("message", {}) receives all messages, however, Directus SDK provides a much better approach to subscribe to specific events. In this case, you can subscribe to the messages collection to receive specific fields from any messages as they are created and uniquely identify the subscription with a UID for best practice.
To handle incoming messages, start by creating a subscribeToMessages function inside the Chat.tsx component:
const [messages, setMessages] = useState<Message[]>([]);

  async function subscribeToMessages() {
    try {
      await client.subscribe("messages", {
        event: "create",
        query: {
        fields: ["id", "content", "user_created.first_name"],

        },
        uid: "messages-subscription",
      });
    } catch (error) {
      console.error("Subscription error:", error);
    }
  }
The code above:
- Defines a
messagesstate variable to store the incoming messages. - Defines a
subscribeToMessagesfunction that subscribes to themessagescollection for thecreateevent and specifies the fields to receive. - The
uidis set tomessages-subscriptionto uniquely identify the subscription.
Next, create a function to handle incoming messages and update the messages state variable:
 const addMessageToList = (message: Message) => {
    setMessages((prev) => [...prev, message]);
  };
Now that there is a subscription function, you also need a function to receive the incoming messages and call the addMessageToList function to update the state variable. You can do this by creating a receiveMessage function that will handle the incoming messages:
 const receiveMessage = (data: any) => {
    if (
      data.uid === "messages-subscription" &&
      data.type === "subscription" &&
      data.event === "create"
    ) {
      const message = data.data?.[0];
      if (message) {
        addMessageToList(message);
      }
    } else if (data.type === "ping") {
      client.sendMessage({ type: "pong" });
    }
  };
The receiveMessage function checks if the incoming message is from the messages-subscription and if the event is create. If so, it calls the addMessageToList function to update the messages state variable. It also handles ping messages by sending a pong message back to the server to keep the connection alive.
You can now call the subscribeToMessages function, and receiveMessage in the initializeWebSocket function after the authentication:
client.onWebSocket("message", (message) => {
      try {
        console.log("Websocket message:", message);
        if(message.type === "auth" && message.status === "ok") {
          setRefreshToken(message.refresh_token);
          //TODO: Add the subscription calls here
          subscribeToMessages();
        }
        // TODO: Receive incoming messages here
        receiveMessage(message);
      } catch (error) {
        console.error("Error parsing websocket message:", error);
      }
    });
To display the messages in the chat interface, you can create a MessageList component that will render the list of messages. Create a new file called MessageList.tsx in the src/components directory and add the following code:
interface Message {
  id: string;
  content: string;
  user_created?: {
    first_name: string;
  };
}

interface MessageListProps {
  messages: Message[];
}

export default function MessageList({ messages }: MessageListProps) {
  return (
    <div className="message-list">
      {messages.map((message) => (
        <div key={message.id} className="message-item">
          <strong>{message.user_created?.first_name || "Unknown User"}: </strong>
          {message.content}
        </div>
      ))}
    </div>
  );
}
Now, you can import the MessageList component in the Chat.tsx file and render it inside the chat interface:
import MessageList from "./MessageList";
Then, render the MessageList component and pass the messages state variable as a prop:
return (
  <>
    {refreshToken === undefined ? (
      <LoginForm
        formData={formData}
        setFormData={setFormData}
        onSubmit={submit}
      />
    ) : (
      <div>
        <h2>Chat</h2>
        <MessageList messages={messages} />
      </div>
    )}
  </>
);
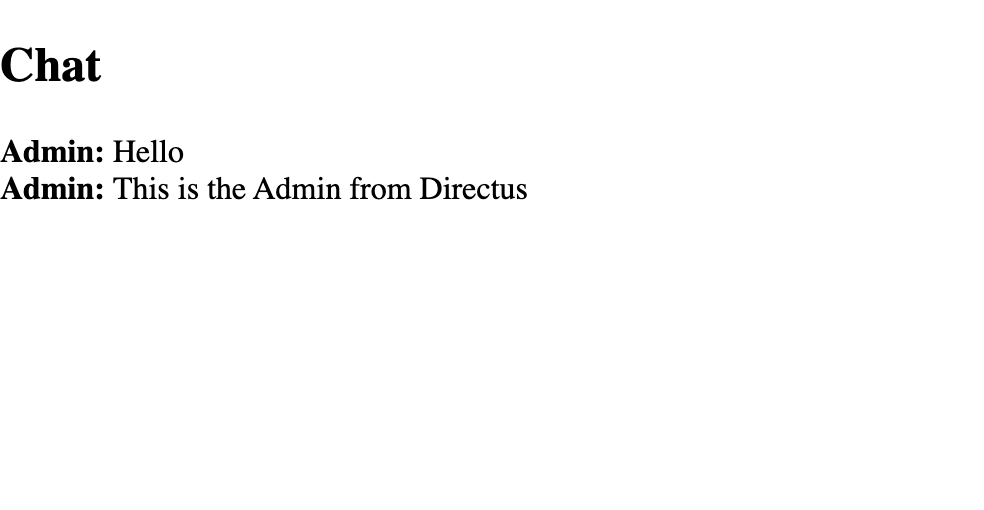
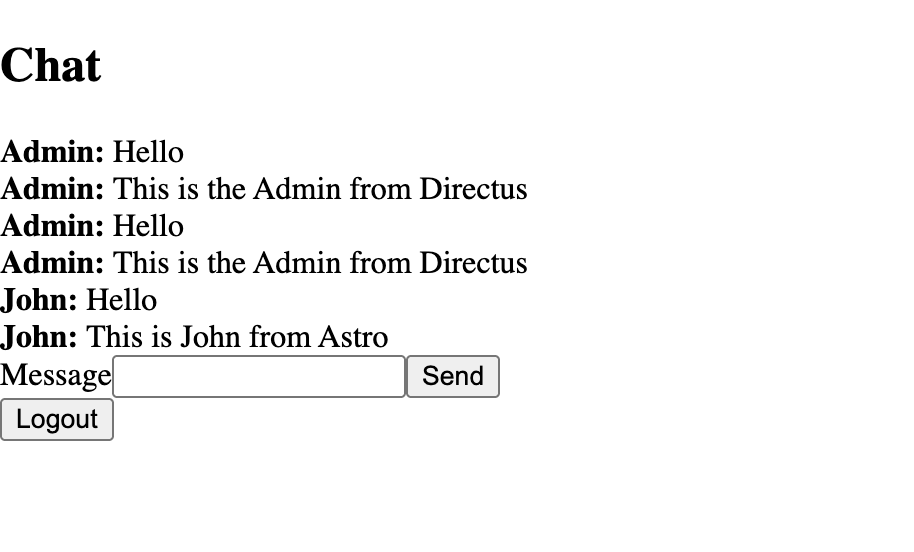
Navigate to http://localhost:4321/ and you should have a chat interface with the messages being displayed as they are created in Directus when you are logged in.
Send Messages
To send messages, you need to create a form that will allow users to enter their messages and submit them to Directus. You can create a new file called MessageForm.tsx in the src/components directory and add the following code:
interface MessageFormProps {
  newMessage: string;
  setNewMessage: (message: string) => void;
  onSubmit: () => void;
}

export default function MessageForm({ newMessage, setNewMessage, onSubmit }: MessageFormProps) {
  const handleSubmit = (e: Event) => {
    e.preventDefault();
    onSubmit();
  };

  return (
    <form onSubmit={handleSubmit}>
      <label htmlFor="message">Message</label>
      <input
        type="text"
        id="message"
        value={newMessage}
        onChange={(e) => setNewMessage((e.target as HTMLInputElement).value)}
      />
      <input type="submit" value="Send" />
    </form>
  );
}
The MessageForm component is a simple form that allows users to enter their messages and submit them. It takes the newMessage, setNewMessage, and onSubmit props to handle the message input and submission.
Next, head over to the Chat.tsx file and make some updates.
First import the MessageForm component:
import MessageForm from "./MessageForm";
Then create a new state variable called newMessage to store the message input:
const [newMessage, setNewMessage] = useState("");
Then create a function called submitMessage that will handle sending the message to Directus:
  const submitMessage = () => {
    if (!newMessage.trim()) return;
    client.sendMessage(
      JSON.stringify({
        type: "items",
        collection: "messages",
        action: "create",
        data: { content: newMessage },
      })
    );
    setNewMessage("");
  };
Also create a Logout function that will handle logging out of the chat application:
  const logout = () => {
    client.disconnect()
    setRefreshToken(undefined);
  };
Then render the MessageForm component in Chat.tsx and pass the newMessage, setNewMessage, and submitMessage props to it:
return (
  <>
    {refreshToken === undefined ? (
      <LoginForm
        formData={formData}
        setFormData={setFormData}
        onSubmit={submit}
      />
    ) : (
      <div>
        <h2>Chat</h2>
        <MessageList messages={messages} />
        <MessageForm
          newMessage={newMessage}
          setNewMessage={setNewMessage}
          onSubmit={submitMessage}
        />
        <button type="button" onClick={logout}>
          Logout
        </button>
      </div>
    )}
  </>
);
Visit http://localhost:4321/ and you should now be able to send messages in the chat application. The messages will be sent to Directus and displayed in the chat interface in realtime.

Fetching the Latest Messages On Load
Congratulations! You have successfully built a chat application using Astro and Directus. However, there is one last thing to do: fetching the latest messages when the chat application loads.
To do this, you can create a new function in Chat.tsx called fetchLatestMessages that will fetch the latest messages from Directus when the chat application loads:
const fetchLatestMessages = () => {
    client.sendMessage(
      JSON.stringify({
        type: "items",
        collection: "messages",
        action: "read",
        query: {
          limit: 20,
          sort: "-date_created",
          fields: ["id", "content", "user_created.first_name"],
        },
        uid: "get-recent-messages",
      })
    );
  };
The code above sends a message to Directus to fetch the latest 20 messages from the messages collection in Directus.
To use this function when the application loads, update the initializeWebSocket function to call fetchLatestMessages after the authentication:
//previous code here
if (message.type === "auth" && message.status === "ok") {
  setRefreshToken(message.refresh_token);
  // Fetch the most recent messages only if they are not loaded
  if (messages.length === 0) {
    fetchLatestMessages();
    subscribeToMessages();
  }
}
Finally, you need to update the receiveMessage function to handle the message events with the uid get-recent-messages to be able to process older messages and add them to the messages list.
You also need to reverse the order of the messages so that the latest messages are displayed at the top of the list.
To do this, update the receiveMessage function to handle the get-recent-messages event with an else if statement:
const receiveMessage = (data: any) => {
  if (
    data.uid === "messages-subscription" &&
    data.type === "subscription" &&
    data.event === "create"
  ) {
    const message = data.data?.[0];
    if (message) {
      addMessageToList(message);
    }
  } else if (data.type === "ping") {
    client.sendMessage({ type: "pong" });
  }else if (data.uid === "get-recent-messages") {
    data.data?.reverse().forEach(addMessageToList);
  }
};
Refresh the page and you should have the latest messages displayed when the application loads.
Handling Connection Stability
Directus Realtime uses websockets to provide a realtime connection to the server. However, websockets can be unstable and may disconnect from time to time. Behind the scenes, the Directus SDK handles reconnection automatically by sending a heartbeat or ping every 30 seconds which you already handled in the receiveMessage function by sending a pong message back,
but you can also handle connection stability in your application by using the handshake mode to re-authenticate the user and re-subscribe to the messages collection when the access token expires.
To do this, update the receiveMessage function to handle authentication events when expired and re-authenticate the user:
const receiveMessage = (data) => {
  if (
    data.uid === "messages-subscription" &&
    data.type === "subscription" &&
    data.event === "create"
  ) {
    const message = data.data?.[0];
    if (message) {
      addMessageToList(message);
    }
  } else if (data.type === "ping") {
    client.sendMessage({ type: "pong" });
  } else if (data.uid === "get-recent-messages") {
    data.data?.reverse().forEach(addMessageToList);
  } else if (data.type === "auth" && data.status === "expired") {
    console.log("Authentication expired, re-authenticating...");
    if (refreshToken) {
      try {
        client.sendMessage({
          type: "auth",
          refresh_token: refreshToken,
        });
        console.log("Re-authenticated successfully");
      } catch (error) {
        console.error("Re-authentication failed:", error);
      }
    } else {
      console.log("No refresh token available, cannot re-authenticate.");
    }
  }
};
With this in place, the application will automatically re-authenticate the user and re-subscribe to the messages collection when the access token expires.
Summary
In this tutorial, you learned how to build a chat application using Astro and Directus. You set up a Directus project with a messages collection, enabled websockets, and created an Astro project with Preact. You also created a login form, chat interface, and message form to send and receive messages in realtime.
Realtime communication in Directus is a useful feature that allows you to build dynamic applications that can respond to changes in data in real-time. By using the Directus SDK, you can easily integrate realtime capabilities into your applications and create engaging user experiences.
You can extend this chat application by adding more features such as:
- User authentication and registration
- Message timestamps
- Message reactions
- Styling the chat interface with CSS
- Adding a typing indicator
- Adding a notification system for new messages