Integrating the Directus Visual Editor with SvelteKit
The Directus Visual Editor module allows you to edit your content live on your site. This article shows you how to integrate it with an existing CMS setup using SvelteKit.
Before You Start
You will need:
- A new Directus project with admin access.
Set Up Your Directus Project
You'll need to configure CORS for this project. Update your compose.yml file as follows:
CORS_ENABLED: "true"
CORS_ORIGIN: "http://localhost:5173"
CORS_CREDENTIALS: "true"
Configure Directus with the necessary collections and permissions.
Apply the CMS Template
Use the Directus Template CLI to apply the CMS template for your project.
First, generate a static token for the admin user by going to the Users Directory. Choose the Administrative User, and scroll down to the Token field and generate a static token. Copy the token and save it. Do not forget to save the user, or you will encounter an "Invalid token" error.
Open your terminal, run the following command, and follow the prompts:
npx directus-template-cli@latest apply
Choose Community templates, and select the CMS template. Fill in your Directus URL, and select Directus Access Token as the authentication method, filling in the token created earlier.
Set Up Your SvelteKit Project
Initialize Your Project
Follow the instructions for setting up a SvelteKit project in the Create a CMS using Directus and SvelteKit. Complete the remainder of the steps in this article to create a SvelteKit project that is ready to integrate with the Directus Visual Editor.
You can get the full code for this article here to skip the setup and go straight to the integration.
Install Directus Visual Editing Package
On your terminal, run the command below to install Directus visual editing package.
npm i @directus/visual-editing
Configure the Directus Visual Editing Package
In the application, let’s initialize the Directus Visual Editor. To do that, create a visual-editor.js file inside the ./src/lib directory and add the following code to it.
// src/lib/visual-editor.js
import { apply, setAttr, remove } from '@directus/visual-editing';
import { invalidateAll } from '$app/navigation';

let isApplied = false;

export async function initializeVisualEditor() {
  if (typeof window !== 'undefined' && !isApplied) {
    try {
      await apply({
        directusUrl: 'http://localhost:8055',
        onSaved: async (data) => {
          console.log('Content saved successfully:', data);

          try {
            await invalidateAll();
            console.log('Page data refreshed successfully');
 } catch (error) {
            console.error('Failed to refresh page data:', error);
            window.location.reload();
 }
 }
 });
      isApplied = true;
 } catch (error) {
      console.error('Failed to initialize visual editor:', error);
 }
 }
}

export function cleanupVisualEditor() {
  if (typeof window !== 'undefined' && isApplied) {
    remove();
    isApplied = false;
 }
}

export { setAttr };
The code above sets up a Directus Visual Editor integration inside your SvelteKit app and also enables live editing of your content.
Integrate the Visual Editing Package
Now, let’s look at how to edit the blog webpage from Directus dashboard using the Directus Visual Editing Package using the following steps.
HeroSection
Navigate to ./src/lib/components, open the HeroSection.svelte file and replace its content with the following:
<script>
 export let data = {};
 import { initializeVisualEditor, setAttr } from '$lib/visual-editor.js';
 import { onMount } from 'svelte';

 onMount(() => {
      initializeVisualEditor();
    });
  </script>

  <section
    class="hero"
    data-directus={setAttr({
      collection: 'block_hero',
      item: data.id,
      mode: 'drawer'
 })}
 >
 {#if data.image}
 <img
 src={`http://localhost:8055/assets/${data.image}`}
        alt="Hero"
        class="hero-image"
        data-directus={setAttr({
          collection: 'block_hero',
          item: data.id,
          fields: 'image',
          mode: 'modal'
 })}
 />
 {/if}

 {#if data.headline}
 <h1
        class="headline"
        data-directus={setAttr({
          collection: 'block_hero',
          item: data.id,
          fields: 'headline',
          mode: 'popover'
 })}
 >
 {data.headline}
 </h1>
 {/if}

 {#if data.description}
 <p
        class="description"
        data-directus={setAttr({
          collection: 'block_hero',
          item: data.id,
          fields: 'description',
          mode: 'popover'
 })}
 >
 {data.description}
 </p>
 {/if}
 </section>

 <style>
 .hero {
      padding: 4rem 2rem;
      text-align: center;
      background: #f8f9fa;
 }

 .hero-image {
      max-width: 100%;
      height: 300px;
      object-fit: cover;
      border-radius: 8px;
      margin-bottom: 2rem;
 }

 .headline {
      font-size: 3rem;
      margin-bottom: 1rem;
      color: #333;
 }

 .description {
      font-size: 1.25rem;
      color: #666;
      max-width: 600px;
      margin: 0 auto;
 }
 </style>
The code above renders the hero section. It initializes the editor on mount, and uses setAttr() to tag each part of the content so it can be edited visually from the Directus interface.
RichTextSection
Open the ./src/lib/components/RichTextSection.svelte file and replace its content with the following:
<script>
 export let data = {};
 import { setAttr } from '$lib/visual-editor.js';
  </script>

  <section
    class="rich-text"
    data-directus={setAttr({
      collection: 'block_richtext',
      item: data.id,
      fields: ['headline', 'content'],
 mode: 'drawer'
 })}
 >
 {#if data.headline}
 <h2
 class="headline"
 data-directus={setAttr({
 collection: 'block_richtext',
 item: data.id,
 fields: 'headline',
 mode: 'popover'
 })}
 >
 {data.headline}
 </h2>
 {/if}

 {#if data.content}
 <div
 class="content"
 data-directus={setAttr({
 collection: 'block_richtext',
 item: data.id,
 fields: 'content',
 mode: 'modal'
 })}
 >
 {@html data.content}
 </div>
 {/if}
 </section>

 <style>
 .rich-text {
 padding: 4rem 2rem;
 max-width: 800px;
 margin: 0 auto;
 }

 .headline {
 font-size: 2.5rem;
 margin-bottom: 2rem;
 text-align: center;
 color: #333;
 }

 .content {
 font-size: 1.1rem;
 line-height: 1.8;
 color: #555;
 }

 .content :global(p) {
 margin-bottom: 1.5rem;
 }
 </style>
The code above displays a rich-text content block with a headline and HTML content, both editable via Directus Visual Editor. Each part is tagged with setAttr() so the editor knows what to hook into.
GallerySection
Open the GallerySection.svelte file and replace its content with the following:
<script>
 export let data = {};
 import { setAttr } from '$lib/visual-editor.js';

 $: galleryItems = data.items || [];
  </script>

  <section
    class="gallery"
    data-directus={setAttr({
      collection: 'block_gallery',
      item: data.id,
      fields: ['headline', 'items'],
 mode: 'drawer'
 })}
 >
 {#if data.headline}
 <h2
 class="headline"
 data-directus={setAttr({
 collection: 'block_gallery',
 item: data.id,
 fields: 'headline',
 mode: 'popover'
 })}
 >
 {data.headline}
 </h2>
 {/if}

 {#if galleryItems.length > 0}
 <div class="gallery-grid">
 {#each galleryItems as item}
 <div class="gallery-item">
 {#if item.directus_file}
 <img
 src={`http://localhost:8055/assets/${item.directus_file.id}`}
 alt={item.title || 'Gallery image'}
 class="gallery-image"
 />
 {/if}
 {#if item.title}
 <h3 class="item-title">{item.title}</h3>
 {/if}
 </div>
 {/each}
 </div>
 {/if}
 </section>

 <style>
 .gallery {
 padding: 4rem 2rem;
 }

 .gallery-grid {
 display: grid;
 grid-template-columns: repeat(auto-fit, minmax(250px, 1fr));
 gap: 2rem;
 max-width: 1200px;
 margin: 0 auto;
 }

 .gallery-item {
 text-align: center;
 }

 .gallery-image {
 width: 100%;
 height: 200px;
 object-fit: cover;
 border-radius: 8px;
 margin-bottom: 1rem;
 }

 .item-title {
 font-size: 1.25rem;
 color: #333;
 }

 .headline {
 font-size: 2.5rem;
 text-align: center;
 margin-bottom: 3rem;
 color: #333;
 }
 </style>
The code above renders a gallery block with a headline and a grid of images. We make the entire block editable in a drawer, while the headline has its own popover editor. Each gallery item shows an image and an optional title. It also safely handles empty data and uses responsive grid styling for layout.
Configure the Visual Editor on Directus
First, run this command to start the application:
npm run dev
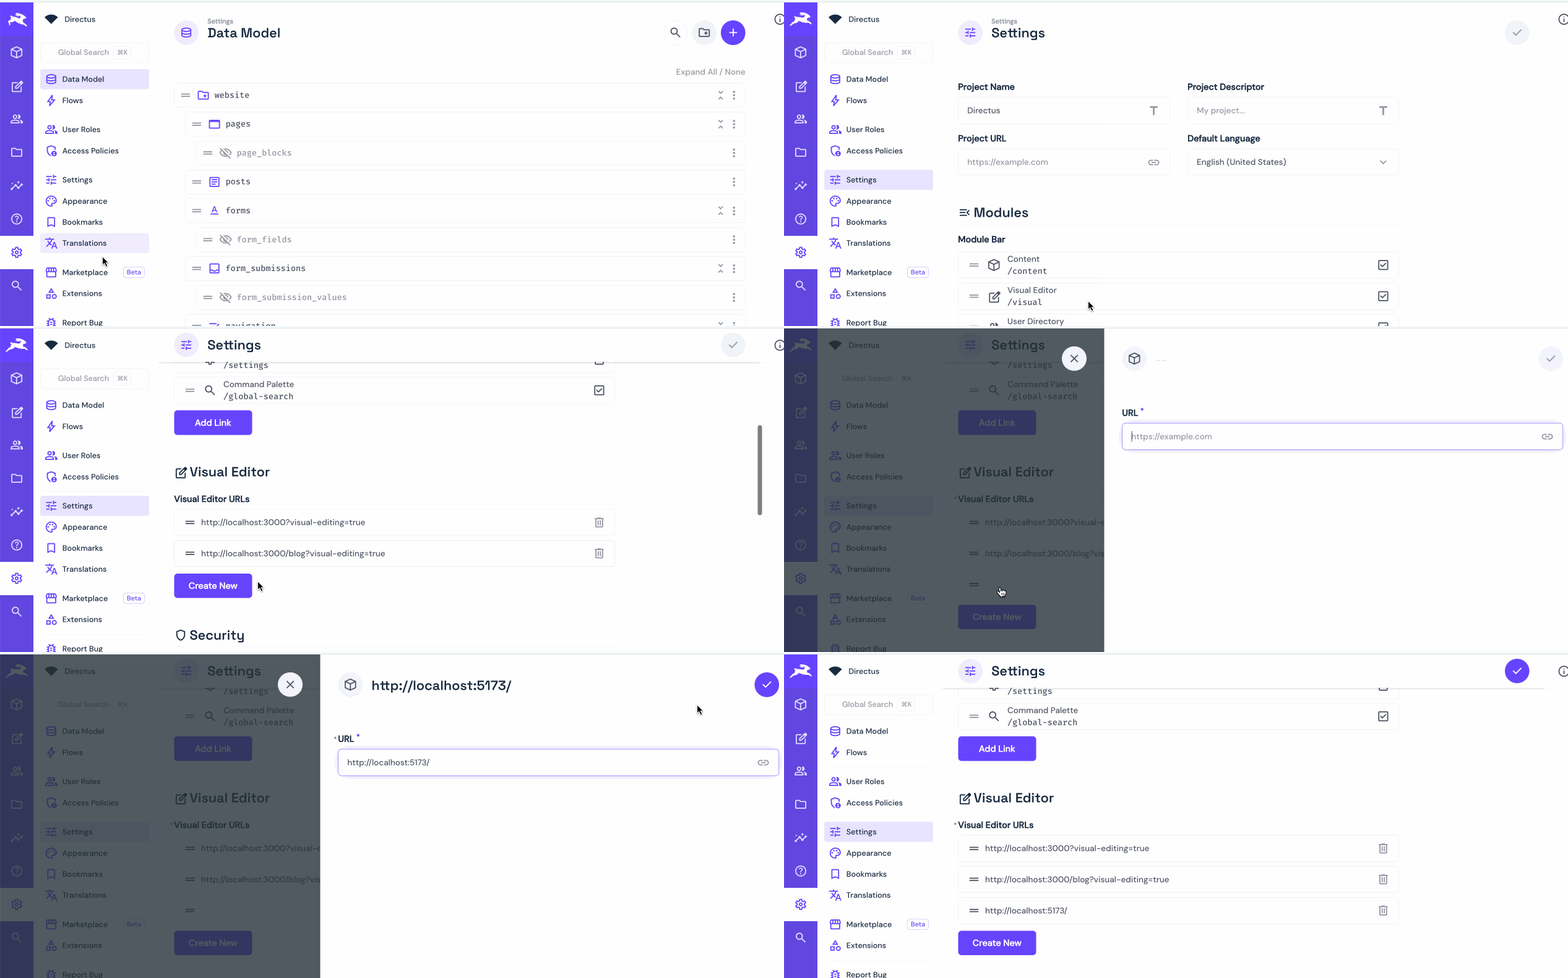
On your Directus dashboard sidebar, click on Settings and scroll down to the Visual Editor section. Then, click on Create New, add http://localhost:5173/, and save it:

Testing the Visual Editor
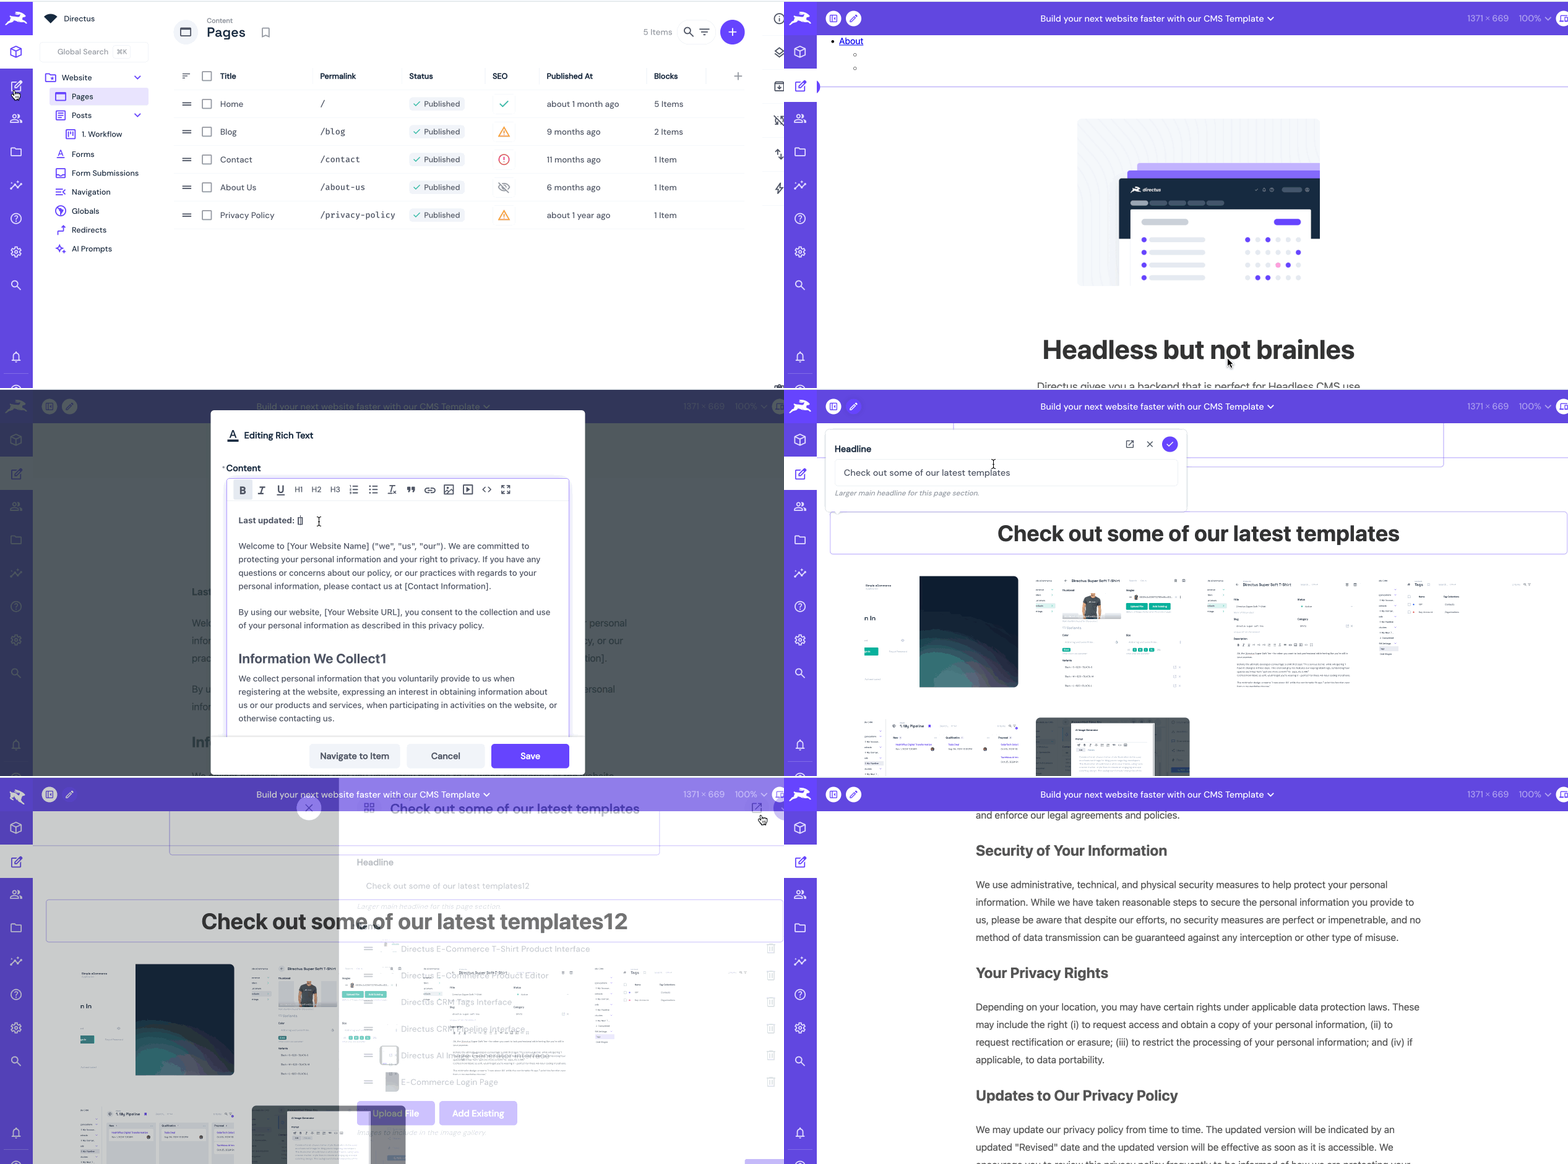
To test the Directus visual editor, click the visual editing icon in the Directus dashboard side menu and select the blog URL. Hover over each component and sub-element, then click the edit icon to explore the editing experience, as shown in the image below.

Conclusion
In this tutorial, you learned how to integrate a visual editor to your Directus project. This setup makes it easier to manage and update content right from the CMS, helping you deliver dynamic content quickly without extra steps like rebuilding or redeploying.