Create a CMS using Directus and SvelteKit
Directus provides a headless CMS, which when combined with SvelteKit will streamline content management. This post covers how to connect them to create a flexible, modern content management system.
Before You Start
You will need:
- A new Directus project with admin access.
Set Up Your Directus Project
You'll need to configure CORS for this project. Update your docker-compose.yml file as follows:
CORS_ENABLED: "true"
CORS_ORIGIN: "http://localhost:5173"
CORS_CREDENTIALS: "true"
Configure Directus with the necessary collections and permissions.
Apply the CMS Template
First, generate a static token for the admin user by going to the Users Directory. Choose the Administrative User or any user of your choice, scroll down to the Token field, and generate a static token. Copy the token and save it. Do not forget to save the user, or you will encounter an "Invalid token" error in the next step.
Next, use the Directus Template CLI to apply the CMS template for your project.
Open your terminal, run the following command, and follow the prompts:
npx directus-template-cli@latest apply
Choose Community templates, and select the CMS template. Fill in your Directus URL, and select Directus Access Token as the authentication method, filling in the token created earlier.
The Directus CLI command will make the required changes to Directus to add the CMS template.
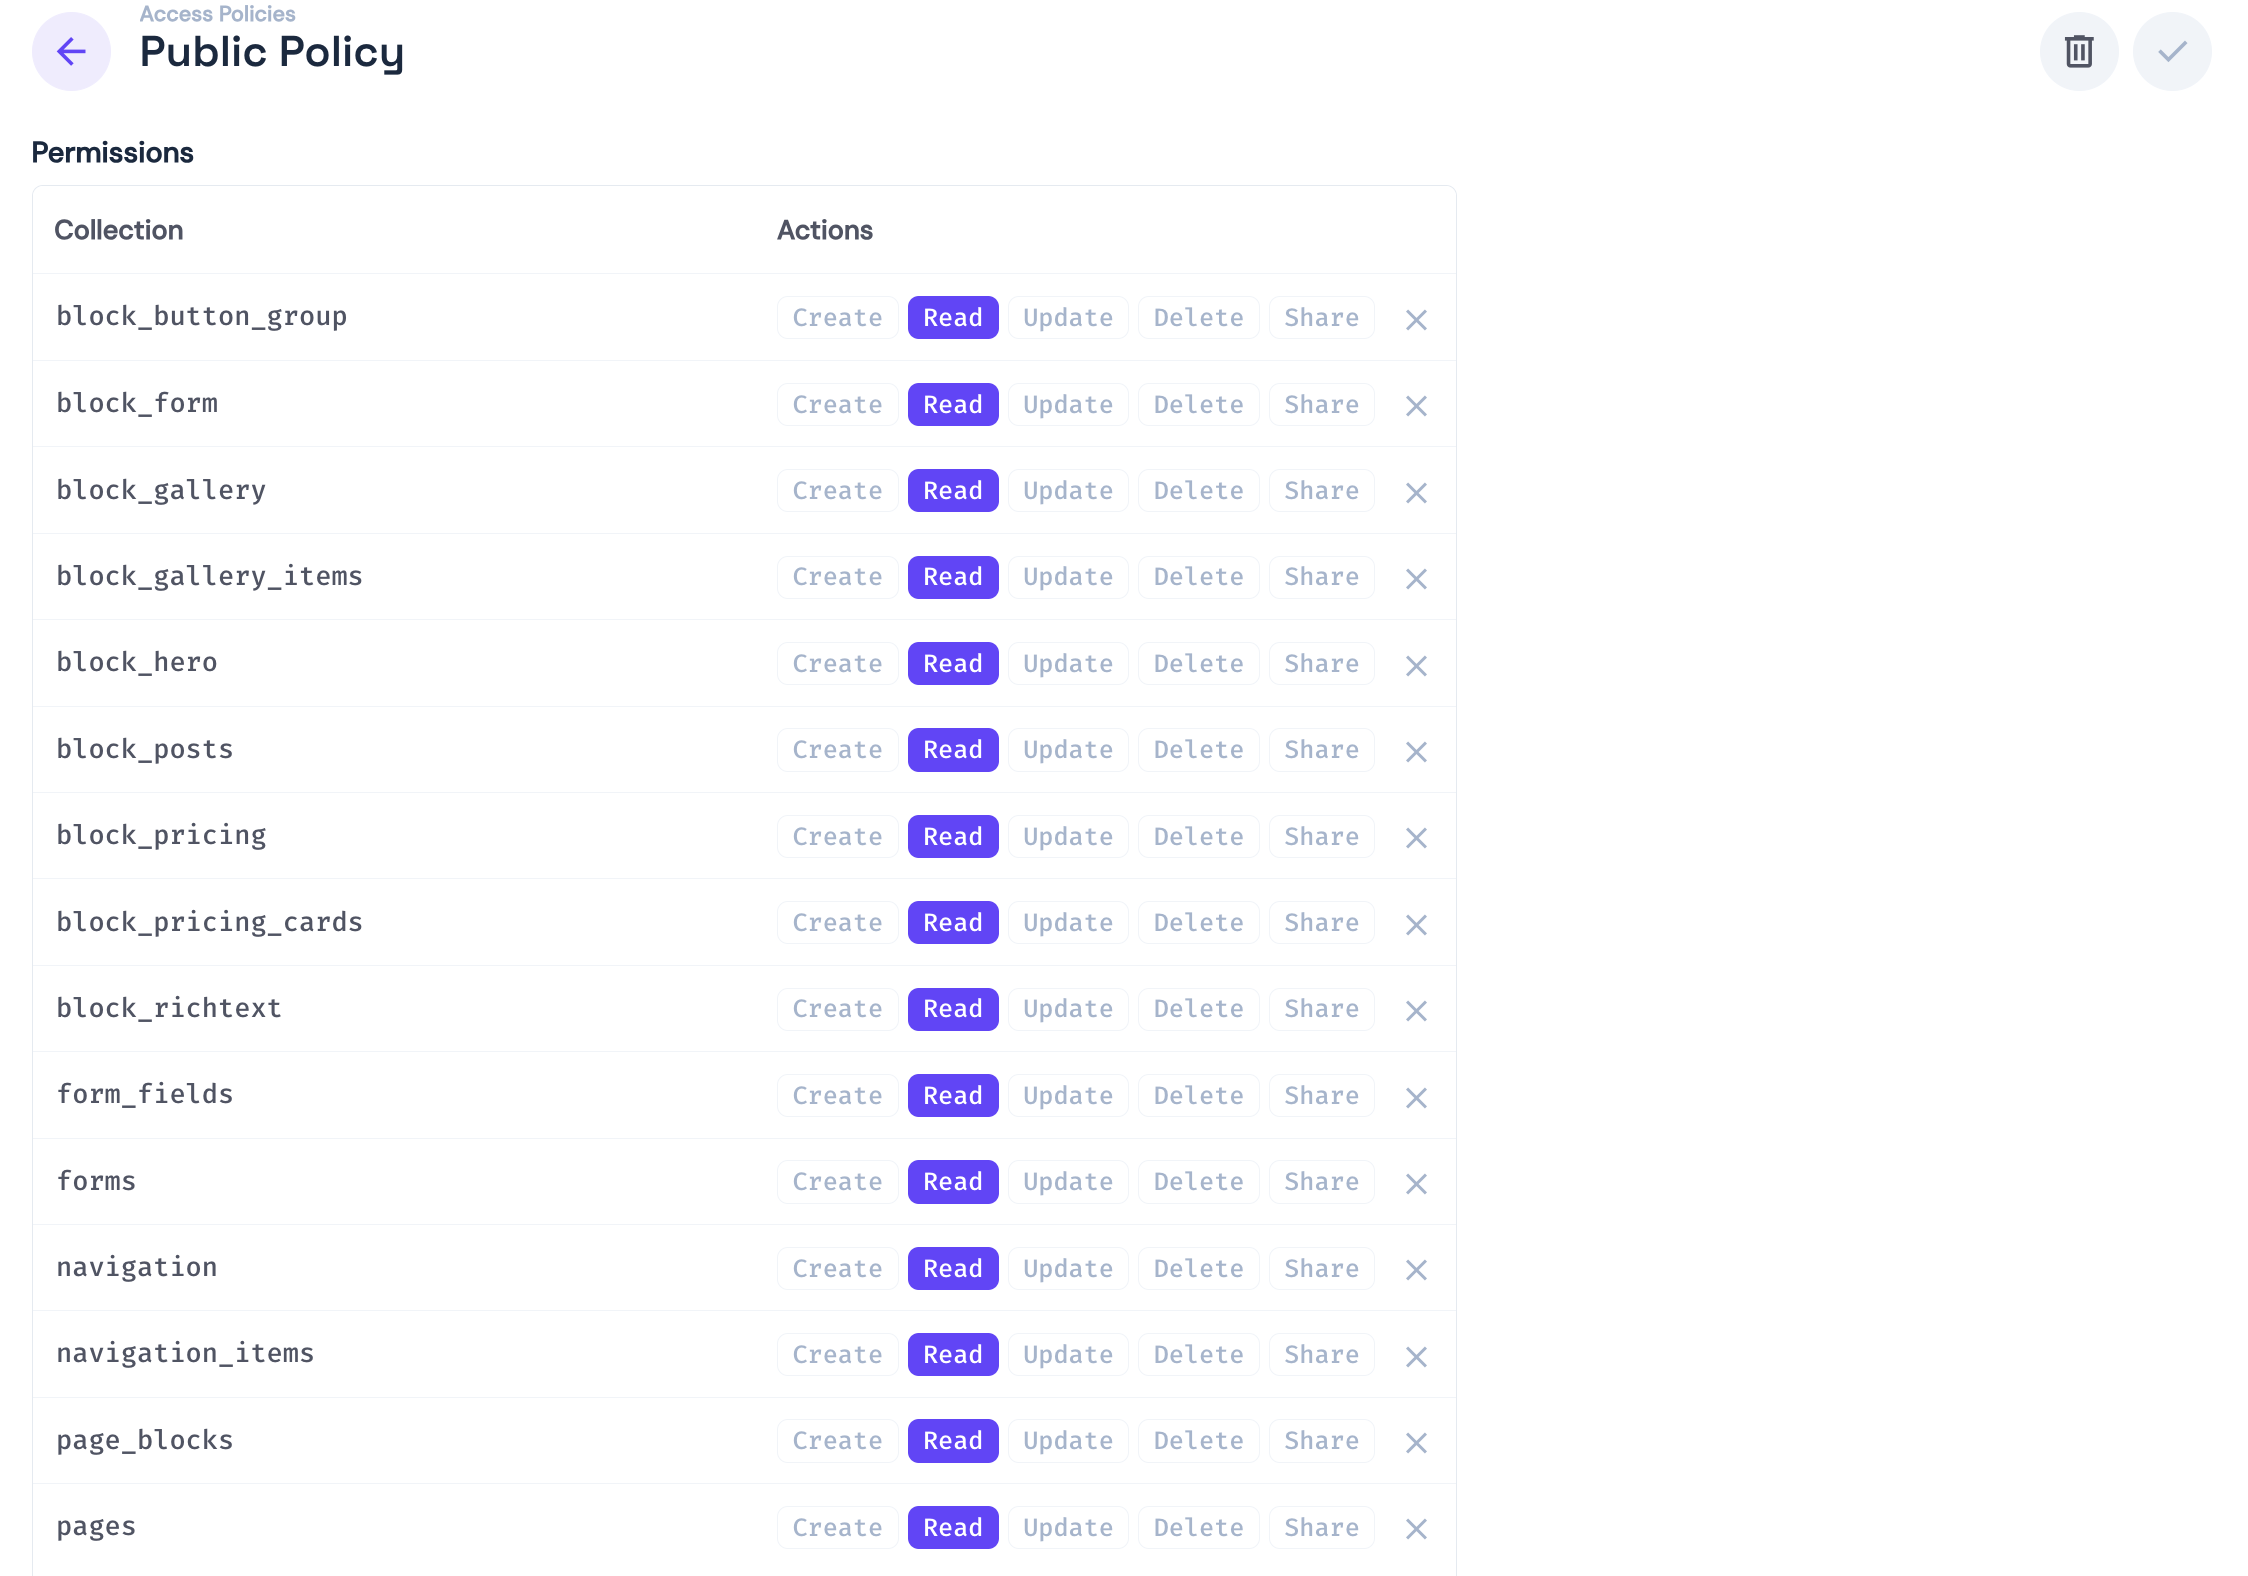
Next, go back your Directus dashboard, navigate to Public policy and ensure read permissions are enabled for most of the collections.
Set Up Your SvelteKit Project
Initialize Your Project
To start building, you need to install SvelteKit and Directus sdk. Run this command to install SvelteKit:
npx sv create dynamic_cms
When prompted, select SvelteKit minimal as the template. Do not add type checking, as this tutorial is implemented in JavaScript. Your output should look like this:
 Welcome to the Svelte CLI! (v0.6.16)
│
◇  Which template would you like?
│  SvelteKit minimal
│
◇  Add type checking with Typescript?
│  No
│
◆  Project created
│
◇  What would you like to add to your project? (use arrow keys / space bar)
│  none
│
◇  Which package manager do you want to install dependencies with?
│  npm
│
◆  Successfully installed dependencies
│
◇  Project next steps ─────────────────────────────────────────────────────╮
│                                                                          │
│  1: cd dynamic-cms                                                       │
│  2: git init && git add -A && git commit -m "Initial commit" (optional)  │
│  3: npm run dev -- --open
Afterward, cd into your project directory and install the Directus SDK by running this command:
npm install @directus/sdk
Configure the Directus SDK
To set up your Directus client with the authentication composable, create a file called directus.js inside the ./src/lib directory. Add the following code:
// src/lib/directus.js
import { createDirectus, rest, readItems } from '@directus/sdk';

const directus = createDirectus('http://localhost:8055').with(rest());

export const getDirectusClient = () => {
  return directus;
};
export { readItems };
Create the Home Page
In this section, you will implement the according parts of the home page, which is already added by the starter template.
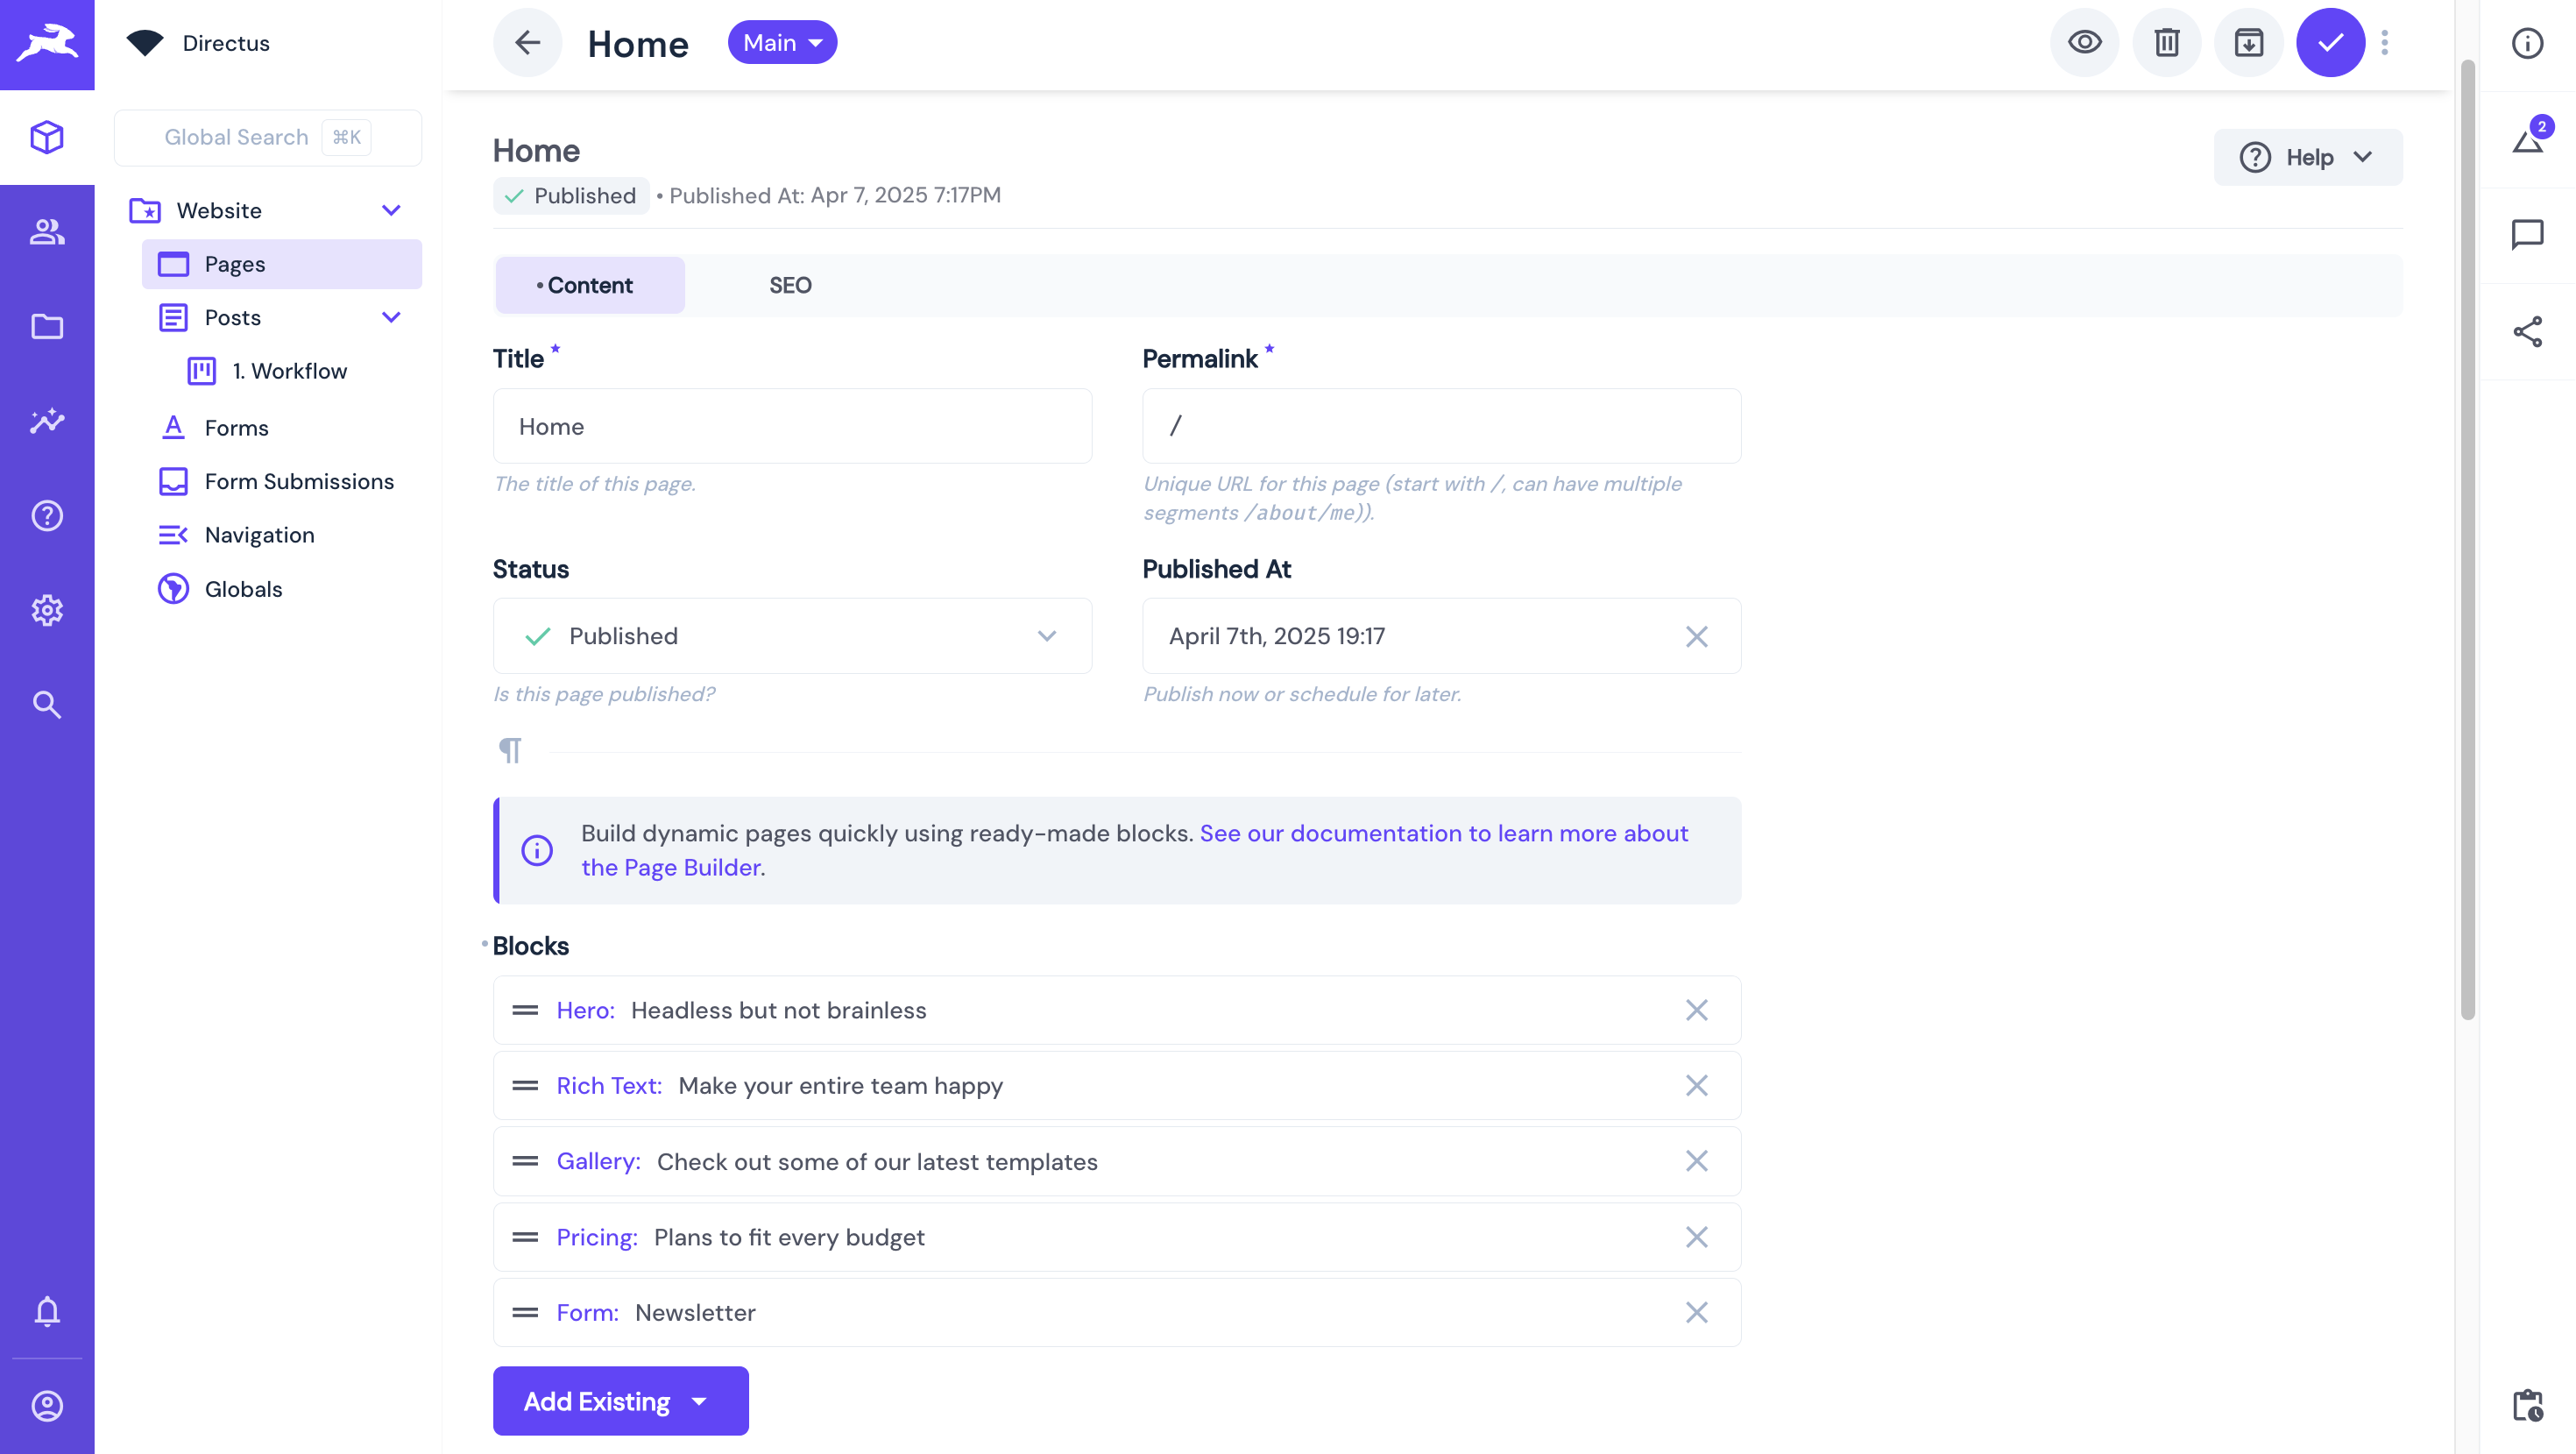
From the Directus dashboard sidebar menu, navigate to Content > Website > Pages. Under Pages, click on the Home option. It should contain the Hero, Rich Text, Gallery, Pricing, and Form blocks, as shown in the screenshot below.
The header and footer can be accessed as shown in the GIF below:
Hero Section
To create the Hero component, navigate to ./src/lib directory and create a subdirectory named components. Inside it, create a file called HeroSection.svelte and add the following code:
<!--  src/lib/componentd/HeroSection.svelte -->
<script>
 export let data = {};
 let buttonGroup = [];
 if (data && data.button_group) {
      try {
        if (typeof data.button_group === 'object') {
          buttonGroup = Array.isArray(data.button_group) ? data.button_group : [data.button_group];
 }
 } catch (error) {
 console.error('Error processing button_group:', error);
        buttonGroup = [];
 }
    }
</script>

  <section class="hero">
    {#if data.image}
      <img
        src={`http://localhost:8055/assets/${data.image}`}
        alt="Hero image"
        class="hero-image"
      />
    {/if}

    {#if data.tagline}
      <p class="tagline">{data.tagline}</p>
    {/if}

    {#if data.headline}
      <h1 class="headline">{data.headline}</h1>
    {/if}

    {#if data.description}
      <div class="description">{data.description}</div>
    {/if}

    {#if buttonGroup && buttonGroup.length > 0}
      <div class="button-group">
        {#each buttonGroup as button}
          <a href={button.url || '#'} class="button">
            {button.label || 'Learn More'}
          </a>
        {/each}
      </div>
    {/if}
  </section>
The code above renders a dynamic Hero section using data from Directus. The data displayed are the hero image, tagline, headline, description, and a set of buttons, if they exist.
Rich Text Section
Inside the ./src/lib/components directory, create a file called RichTextSection.svelte and add the following code:
<!--  src/lib/components/RichTextSection.svelte -->
<script>
 export let data = {};
  </script>

  <section class="rich-text">
    {#if data.tagline}
      <p class="tagline">{data.tagline}</p>
    {/if}

    {#if data.headline}
      <h2 class="headline">{data.headline}</h2>
    {/if}

    {#if data.content}
      <div class="content">
        {@html data.content}
      </div>
    {/if}

  </section>
The code above renders a Rich Text section based on the data it receives. It conditionally displays the tagline, headline, and rich text content if they exist, with the content being injected as raw HTML to preserve formatting from the CMS.
Gallery Section
Inside the ./src/lib/components directory, create a file called GallerySection.svelte and add the following code:
<script>
 export let data = {};
 import { onMount } from 'svelte';

 let galleryItems = [];
 let loading = true;
 let error = null;

 onMount(async () => {
        try {
            loading = true;
            if (!data || !data.items || !Array.isArray(data.items)) {
                galleryItems = [];
                return;
 }

            galleryItems = data.items.map(item => {
                return {
                    id: item.id,
                    image: item.directus_file,
                    title: item.title || item.directus_file?.title || 'Gallery Item',
                    description: item.description || 'Gallery item description',
                    sort: item.sort || 0
 };
 });

 galleryItems.sort((a, b) => a.sort - b.sort);

 } catch (err) {
            error = 'Failed to load gallery items';
 } finally {
            loading = false;
 }
    });
</script>
<section class="gallery">
    {#if data.tagline}
        <p class="tagline">{data.tagline}</p>
    {/if}
    {#if data.headline}
        <h2 class="headline">{data.headline}</h2>
    {/if}
    {#if loading}
        <div class="loading">Loading gallery items...</div>
    {:else if error}
        <div class="error">{error}</div>
    {:else if galleryItems && galleryItems.length > 0}
        <div class="gallery-grid">
            {#each galleryItems as item}
                <div class="gallery-item">
                    {#if item.image}
                        <img
                            src={`http://localhost:8055/assets/${item.image.id}`}
                            alt={item.title || item.image.title || 'Gallery image'}
                            class="gallery-image"
                            loading="lazy"
                        />
                    {:else}
                        <div class="placeholder-image">No Image Available</div>
                    {/if}
                    {#if item.title}
                        <h3 class="item-title">{item.title}</h3>
                    {/if}
                    {#if item.description}
                        <p class="item-description">{item.description}</p>
                    {/if}
                </div>
            {/each}
        </div>
    {:else}
        <p class="no-items">No gallery items available.</p>
    {/if}
</section>
The code above loads and displays a Gallery section from the data provided. It fetches and sorts gallery items on mount, handles loading and error states, and conditionally renders each item with its image, title, and description. If no items are available, a fallback message is displayed to maintain the layout integrity.
Pricing Section
Inside the ./src/lib/components directory, create a file called PricingSection.svelte and add the following code:
<!--  Updated src/lib/components/PricingSection.svelte -->
<script>
 export let data = {};
 import { onMount } from 'svelte';

 let pricingCards = [];
 let loading = true;
 let error = null;

 onMount(async () => {
    try {
      loading = true;
      if (data && data.pricing_cards && Array.isArray(data.pricing_cards)) {
        pricingCards = data.pricing_cards.map(card => {
          let features = [];
          if (card.features) {
            try {
              features = typeof card.features === 'string'
                ? JSON.parse(card.features)
                : (Array.isArray(card.features) ? card.features : []);
 } catch (err) {
              console.warn('Error parsing features:', err);
 }
 }

          return {
            id: card.id,
            title: card.title || 'Plan',
            price: card.price || '0',
            badge: card.badge || '',
            description: card.description || '',
            features: features,
            button: card.button || 'Get Started',
            button_url: card.button_url || '#',
            is_highlighted: card.is_highlighted || false,
            sort: card.sort || 0
 };
 });
        pricingCards.sort((a, b) => a.sort - b.sort);
 }
 } catch (err) {
      error = 'Failed to load pricing plans';
 } finally {
      loading = false;
 }
  });
</script>

<section class="pricing">

  {#if data.tagline}
    <p class="tagline">{data.tagline}</p>
  {/if}

  {#if data.headline}
    <h2 class="headline">{data.headline}</h2>
  {/if}

  {#if loading}
    <div class="loading">Loading pricing plans...</div>
  {:else if error}
    <div class="error">{error}</div>
  {:else if pricingCards && pricingCards.length > 0}
    <div class="pricing-grid">
      {#each pricingCards as card}
        <div class="pricing-card {card.is_highlighted ? 'featured' : ''}">
          {#if card.badge}
            <span class="badge">{card.badge}</span>
          {/if}

          {#if card.title}
            <h3 class="card-name">{card.title}</h3>
          {/if}

          {#if card.price}
            <div class="price">
              <span class="currency">$</span>
              <span class="amount">{card.price}</span>
              {#if card.interval}
                <span class="interval">/{card.interval}</span>
              {:else}
                <span class="interval">/month</span>
              {/if}
            </div>
          {/if}

          {#if card.description}
            <p class="card-description">{card.description}</p>
          {/if}

          {#if card.features && card.features.length > 0}
            <ul class="features">
              {#each card.features as feature}
                <li class="feature">{feature}</li>
              {/each}
            </ul>
          {/if}

          {#if card.button}
            <a href={card.button_url || '#'} class="card-button">
 Get Started
            </a>
          {/if}
        </div>
      {/each}
    </div>
  {:else}
    <p class="no-plans">No pricing plans available. Data received: {JSON.stringify(data)}</p>
  {/if}
</section>
The code above, builds a dynamic Pricing section by loading pricing cards from the provided data. It processes each card, safely parses feature lists, sorts the cards, and handles loading and error states.
Form Section
Inside the ./src/lib/components directory, create a file called FormSection.svelte and add the following code:
<!--  src/lib/components/FormSection.svelte -->
<script>
 export let data = {};

 let formData = {
        name: '',
        email: '',
        message: ''
    };
 let submitting = false;
 let submitted = false;
 let error = null;


</script>

<section class="form-section">
    {#if data.tagline}
        <p class="tagline">{data.tagline}</p>
    {/if}

    {#if data.headline}
        <h2 class="headline">{data.headline}</h2>
    {/if}

    {#if data.description}
        <div class="description">{data.description}</div>
    {/if}

    {#if submitted}
        <div class="success-message">
            <h3>Thank you!</h3>
            <p>Your submission has been received.</p>
            <button
                class="reset-button"
                on:click={() => submitted = false}
            >
 Submit another response
            </button>
        </div>
    {:else}
        <form class="contact-form">
            <div class="form-group">
                <label for="name">Name</label>
                <input
                    type="text"
                    id="name"
                    bind:value={formData.name}
                    required
                    placeholder="Your name"
                />
            </div>

            <div class="form-group">
                <label for="email">Email</label>
                <input
                    type="email"
                    id="email"
                    bind:value={formData.email}
                    required
                    placeholder="Your email address"
                />
            </div>

            <div class="form-group">
                <label for="message">Message</label>
                <textarea
                    id="message"
                    bind:value={formData.message}
                    rows="5"
                    placeholder="Your message"
                ></textarea>
            </div>

            {#if error}
                <div class="error-message">{error}</div>
            {/if}

            <button
                type="submit"
                class="submit-button"
                disabled={submitting}
            >
                {submitting ? 'Submitting...' : (data.button_text || 'Submit')}
            </button>
        </form>
    {/if}
</section>
The code above, builds a CMS-driven contact form that handles user input for name, email, and message.
SEO
Inside the ./src/lib/components directory, create a file called SEO.svelte and add the following code:
<!-- src/lib/components/SEO.svelte -->
<script>
    export let data = {
      title: 'Default Page Title',
      meta_description: 'Default page description',
      no_index: false,
      no_follow: false
    };

    const pageTitle = data?.title || 'Default Title';

    const metaDescription = data?.meta_description || 'Default description';

    let robotsContent = [];
    if (data?.no_index) robotsContent.push('noindex');
    if (data?.no_follow) robotsContent.push('nofollow');
    const robots = robotsContent.length > 0 ? robotsContent.join(', ') : 'index, follow';
  </script>

  <svelte:head>
    <title>{pageTitle}</title>
    <meta name="description" content={metaDescription} />
    <meta name="robots" content={robots} />

    <meta property="og:type" content="website" />
    <meta property="og:title" content={pageTitle} />
    <meta property="og:description" content={metaDescription} />

    <meta name="twitter:card" content="summary_large_image" />
    <meta name="twitter:title" content={pageTitle} />
    <meta name="twitter:description" content={metaDescription} />
  </svelte:head>
This will be used to manage the SEO metadata.
Header Section
Inside the ./src/lib/components directory, create a file called Header.svelte and add the following code:
<!-- src/lib/components/Header.svelte -->
<script>
 export let items = [];

 const processNavItems = (items) => {
      return items.map(item => {
        let url = '#';
        if (item.url) {
          url = item.url;
 } else if (item.page) {
          url = `/pages/${item.page}`;
 } else if (item.post) {
          url = `/blog/${item.post}`;
 }

        return {
 ...item,
          url,
          children: item.children ? processNavItems(item.children) : []
 };
 });
    };

 $: processedItems = processNavItems(items);
</script>

<header class="header">
  <div class="header-container">
    <div class="logo">
      <a href="/">
        <span class="logo-text">Directus</span>
      </a>
    </div>


    <nav class="desktop-nav">
      <ul class="nav-menu">
        {#each processedItems as item}
          <li class="nav-item">
            <a href={item.url} class="nav-link">{item.title}</a>
            {#if item.children && item.children.length > 0}
              <ul class="dropdown-menu">
                {#each item.children as child}
                  <li class="dropdown-item">
                    <a href={child.url} class="dropdown-link">{child.title}</a>
                  </li>
                {/each}
              </ul>
            {/if}
          </li>
        {/each}
      </ul>
    </nav>
  </div>
</header>
Footer Section
Inside the ./src/lib/components directory, create a file named Footer.svelte and add the following code:
<!-- src/lib/components/Footer.svelte -->
<script>
 export let items = [];
 const processNavItems = (items) => {
      return items.map(item => {
        let url = '#';
        if (item.url) {
          url = item.url;
 } else if (item.page) {
          url = `/pages/${item.page}`;
 } else if (item.post) {
          url = `/blog/${item.post}`;
 }

        return {
 ...item,
          url,
          children: item.children ? processNavItems(item.children) : []
 };
 });
    };

 $: processedItems = processNavItems(items);
  </script>

  <footer class="footer">
    <div class="footer-container">
      <div class="footer-content">

        <nav class="footer-navigation">
          <ul class="footer-menu">
            {#each processedItems as item}
              <li class="footer-menu-item">
                <a href={item.url} class="footer-link">{item.title}</a>
                {#if item.children && item.children.length > 0}
                  <ul class="footer-submenu">
                    {#each item.children as child}
                      <li class="footer-submenu-item">
                        <a href={child.url} class="footer-link">{child.title}</a>
                      </li>
                    {/each}
                  </ul>
                {/if}
              </li>
            {/each}
          </ul>
        </nav>
      </div>

    </div>
  </footer>
Create the Application Layout
To create the application base layout, navigate to ./src/routes directory, create a new file name +layout.js and add the code below:
// In src/routes/+layout.js
import { getDirectusClient, readItems } from '$lib/directus';
const directus = getDirectusClient();

async function fetchFooterNavigation() {
  try {
    const response = await directus.request(
      readItems('navigation_items', {
        filter: {
          navigation: {
            id: 'footer'
          }
        },
        fields: [
          'id',
          'title',
          'url',
          'page',
          'post',
          'parent',
          'children'
        ],
        sort: ['sort']
      })
    );
    return response && response.length > 0 ? response : [];
  } catch (error) {
    console.error('Error fetching footer navigation:', error);
    return [];
  }
}

async function fetchMainNavigation() {
  try {
    const response = await directus.request(
      readItems('navigation_items', {
        filter: {
          navigation: {
            id: 'main'
          }
        },
        fields: [
          'id',
          'title',
          'url',
          'page',
          'post',
          'parent',
          'children'
        ],
        sort: ['sort']
      })
    );
    return response && response.length > 0 ? response : [];
  } catch (error) {
    console.error('Error fetching main navigation:', error);
    return [];
  }
}

async function fetchSiteSEO() {
  try {
    const response = await directus.request(
      readItems('pages', {
        limit: 1
      })
    );

    return response && response.length > 0 ? response[0] : null;
  } catch (error) {
    console.error('Error fetching site settings:', error);
    return null;
  }
}

export async function load() {
  const [footerNavigation, mainNavigation, siteSettings] = await Promise.all([
    fetchFooterNavigation(),
    fetchMainNavigation(),
    fetchSiteSEO()
  ]);

  return {
    footerNavigation,
    mainNavigation,
    siteSettings
  };
}
The code above sets up the Directus client and defines async functions to fetch footer links, main navigation links, and site SEO settings. Each function queries specific collections in Directus with filters and field selections. The load function then runs all three fetches in parallel and returns the combined data.
Next, create another file named +layout.svelte inside the ./src/routes directory and add the following code.
<!-- src/routes/+layout.svelte -->
<script>
  import Header from '$lib/components/Header.svelte';
  import Footer from '$lib/components/Footer.svelte';
  import SEO from '$lib/components/SEO.svelte';

  export let data;
</script>

<SEO data={data.siteSettings?.seo} />

<div class="app">
  <Header items={data.mainNavigation} />
  <slot />
  <Footer items={data.footerNavigation} />
</div>

<style>
  .app {
    display: flex;
    flex-direction: column;
    min-height: 100vh;
  }
  :global(body) {
    margin: 0;
    font-family: -apple-system, BlinkMacSystemFont, 'Segoe UI', Roboto,
      Oxygen-Sans, Ubuntu, Cantarell, 'Helvetica Neue', sans-serif;
    line-height: 1.5;
  }
</style>
This is just to set up the basic structure of the app by rendering a dynamic Header, Footer, and SEO based on the navigation data fetched from Directus.
Load the Application Components
Replace the code in +page.js inside the ./src/routes directory and add the following code.
// In src/routes/+page.js
import { getDirectusClient, readItems } from '$lib/directus';
const directus = getDirectusClient();
async function fetchHeroContent() {
  try {
    const response = await directus.request(
      readItems('block_hero', {
        limit: 1,
        sort: ['-id']
 })
 );
    return response && response.length > 0 ? response[0] : null;
 } catch (error) {
    console.error('Error fetching hero content:', error);
    return null;
 }
}

async function fetchRichTextContent() {
  try {
    const response = await directus.request(
      readItems('block_richtext', {
        limit: 1,
        sort: ['-id']
 })
 );
    return response && response.length > 0 ? response[0] : null;
 } catch (error) {
    console.error('Error fetching rich text content:', error);
    return null;
 }
}

async function fetchGalleryContent() {
  try {
    const response = await directus.request(
      readItems('block_gallery', {
        limit: 1,
        sort: ['-id'],
        fields: [
          '*',
          'items.*',
          'items.directus_file.*'
 ]
 })
 );
    return response && response.length > 0 ? response[0] : null;
 } catch (error) {
    console.error('Error fetching gallery content:', error);
    return null;
 }
}

async function fetchPricingContent() {
  try {
    const pricingBlock = await directus.request(
      readItems('block_pricing', {
        limit: 1,
        sort: ['-id']
 })
 );

    const pricingCards = await directus.request(
      readItems('block_pricing_cards', {
        sort: ['sort']
 })
 );

    const result = pricingBlock && pricingBlock.length > 0
      ? { ...pricingBlock[0], pricing_cards: pricingCards }
      : { pricing_cards: pricingCards };

    return result;
 } catch (error) {
    console.error('Error fetching pricing content:', error);
    return null;
 }
}

async function fetchFormContent() {
  try {
    const response = await directus.request(
      readItems('block_form', {
        limit: 1,
        sort: ['-id']
 })
 );
    console.log('form :', response);
    return response && response.length > 0 ? response[0] : null;
 } catch (error) {
    console.error('Error fetching form content:', error);
    return null;
 }
}

export async function load() {
  const [heroContent, richTextContent, galleryContent, pricingContent, formContent] = await Promise.all([
    fetchHeroContent(),
    fetchRichTextContent(),
    fetchGalleryContent(),
    fetchPricingContent(),
    fetchFormContent()
 ]);

  return {
    hero: heroContent,
    richText: richTextContent,
    gallery: galleryContent,
    pricing: pricingContent,
    form: formContent
 };
}
In the code above, multiple async functions fetch different content blocks from Directus. Each block pulls the latest entry based on ID sorting. The load function runs all the fetches in parallel and returns the results, making the page content fully dynamic and driven by the CMS.
Next, create a +page.svelte file in the ./src/routes directory and add the following code:
<!-- src/routes/+page.svelte -->
<script>
 import HeroSection from '$lib/components/HeroSection.svelte';
 import RichTextSection from '$lib/components/RichTextSection.svelte';
 import GallerySection from '$lib/components/GallerySection.svelte';
 import PricingSection from '$lib/components/PricingSection.svelte';
 import FormSection from '$lib/components/FormSection.svelte';

 export let data;
</script>

<main>
  {#if data.hero}
    <HeroSection data={data.hero} />
  {/if}

  {#if data.richText}
    <RichTextSection data={data.richText} />
  {/if}

  {#if data.gallery}
    <GallerySection data={data.gallery} />
  {/if}

  {#if data.pricing}
    <PricingSection data={data.pricing} />
  {/if}

  {#if data.form}
    <FormSection data={data.form} />
  {/if}
</main>
The code above, the page component imports and renders each section, Hero, Rich Text, Gallery, Pricing, and Form, based on the dynamic data passed from Directus.
Test the Application
To test the application, run this command:
npm run dev
Afterward, open http://localhost:5173/ in your browser. You should see your cms displayed:
Feel free to expand on this by styling the application!
Conclusion
In this tutorial, you built a fully functional CMS by setting up a structured content management with Directus, pulled dynamic content into your SvelteKit project, and created flexible, reusable components to render that content cleanly.
As your project grows, you can easily expand it by adding new collections, layouts, or even complex features without being locked into a rigid structure.