Create a CMS using Directus and Next.js
Directus provides a headless CMS, which when combined with Next.js will streamline content management. This post covers how to connect them to create a flexible, modern content management system.
Before You Start
You will need:
- A new Directus project with admin access.
- Fundamental understanding of Next.js and React concepts.
Set Up Your Directus Project
You can use either Directus Cloud or self-hosted Directus instance to follow along. You will find instructions to configure Directus with the necessary collections and permissions below.
Apply the CMS Template
Use the Directus Template CLI to apply the CMS template for your project by opening your terminal and running the following command:
npx directus-template-cli@latest apply
Choose Community templates, and select the CMS template. Fill in your Directus URL, and select Directus Access Token as the authentication method, filling in the token created earlier:
➜  Directus npx directus-template-cli@latest apply
(\   /)
 \\_//
 ( Õ Õ) "Let's apply a template!"
C(")(")
┌  Directus Template CLI - Apply Template
│
◇  What type of template would you like to apply?
│  Community templates
│
◇  Select a template.
│  CMS
│
●  You selected CMS
│
◇  What is your Directus URL?
│  http://localhost:8055
│
◇  How do you want to log in?
│  Directus Access Token
│
◇  What is your Directus Admin Token?
│  HL6bxxxxxxxxxxxxxxxxxxxxzzJ6kS3S
-- Logged in as Admin User
Loading 22 collections and 181 fields... done
Loading 26 relations... done
Loading 4 roles... done
Loading 7 policies... done
Loading 144 permissions... done
Loading 3 users... done
Loading 12 accesses... done
Loading 3 folders... done
Loading 35 files... done
Loading data for 22 collections... done
Updating 27 fields to required... done
Loading 1 dashboards... done
Loading 8 flows... done
Loading settings... done
Loading 1 translations... done
Loading 8 presets... done
Found 17 extensions total: 12 registry extensions (including 2 bundles), and 0 local extensions
-- Installed @directus-labs/ai-image-generation-operation
-- Installed @directus-labs/experimental-m2a-interface
-- Installed @directus-labs/super-header-interface
-- Installed @directus-labs/inline-repeater-interface
-- Installed @directus-labs/seo-plugin
-- Installed directus-extension-wpslug-interface
-- Installed @directus-labs/ai-writer-operation
-- Installed @directus-labs/liquidjs-operation
-- Installed @directus-labs/card-select-interfaces
-- Installed @directus-labs/simple-list-interface
-- Installed @directus-labs/command-palette-module
-- Installed directus-extension-group-tabs-interface
Installing 12 extensions... done
Finished installing extensions
------------------
Template applied successfully.
The Directus Template CLI will make the required changes to Directus to add the CMS template. This includes creating the necessary collections, fields, and relationships to manage your content.
Configure CORS
If you are self-hosting your Directus instance, you might need to configure CORS to enable your Next.js app to interact with it. Since Next.js development server serves the app at http://localhost:3000, you can get started by setting the following environment variables:
environment:
  CORS_ENABLED: "true"
  CORS_ORIGIN: "http://localhost:3000"
In a production environment, you should only allow your app's trusted domains in the CORS_ORIGIN list.
Set Up Your Next.js Project
Once that's done, create a new Next.js app by running the following command:
npx create-next-app \
  directus-next-cms \
  --js \
  --app \
  --eslint \
  --no-src-dir \
  --no-tailwind \
  --turbopack \
  --import-alias "@/*"
Next, change your terminal's working directory into the newly created project directory and install the Directus SDK into it:
cd directus-next-cms
npm i @directus/sdk
Now, open the project directory in your code editor to start building the app. First of all, replace the code in app/page.js with the following:
export default function Home() {
  return <div />
}
Next, replace all the CSS in your app/globals.css file with the following:
/* Reset and base styles */
*, *::before, *::after {
    box-sizing: border-box;
  }

  body, h1, h2, h3, h4, h5, h6, p, ul, ol, li, figure, figcaption, blockquote, dl, dd {
    margin: 0;
    padding: 0;
  }

  body {
    font-family: -apple-system, BlinkMacSystemFont, 'Segoe UI', Roboto, Oxygen, Ubuntu, Cantarell, 'Open Sans', 'Helvetica Neue', sans-serif;
    line-height: 1.5;
    color: #2d3748;
    background-color: #ffffff;
    min-height: 100vh;
    scroll-behavior: smooth;
    text-rendering: optimizeSpeed;
  }

  img {
    max-width: 100%;
    display: block;
  }

  button, input, select, textarea {
    font: inherit;
  }

  /* Remove styling from links */
  a {
    color: inherit;
    text-decoration: none;
  }

  /* Accessibility */
  @media (prefers-reduced-motion: reduce) {
    * {
      animation-duration: 0.01ms !important;
      animation-iteration-count: 1 !important;
      transition-duration: 0.01ms !important;
      scroll-behavior: auto !important;
    }
  }
This sets up some basic baseline styling for the app that you'll build.
You also need to update the next.config.mjs file to include the localhost domain in the list of configured hosts for the Next.js Image component:
/** @type {import('next').NextConfig} */
const nextConfig = {
    // Add the following property to configure the image domains
    images: {
      domains: ['localhost'],
    },
  };

  export default nextConfig;
This will allow you to use the Next.js Image component for optimized image loading. When deploying to production, make sure to update the domains list.
Set up Directus
To make it easy to access the Directus instance through the SDK, you should create a helper file that you can import anywhere in your Next.js app. To do that, create a new directory called lib in the project directory and save the following code snippet in a file called directus.js in it:
import { createDirectus, rest, authentication } from '@directus/sdk';
const BACKEND_URL = "http://localhost:8055/"
const client = createDirectus(BACKEND_URL)
    .with(authentication("json"))
    .with(rest())
export default client;
Important: Because Next.js extends the native fetch API with a force-cache configuration by default, you may sometimes run into scenarios where Next.js returns stale data. To fix this, update the rest() composable to add the following option:
.with(rest({
      onRequest: (options) => ({ ...options, cache: 'no-store' }),
}))
Create the Home Page
The Directus CMS template ships with a bunch of pre-built pages for you to get started with:
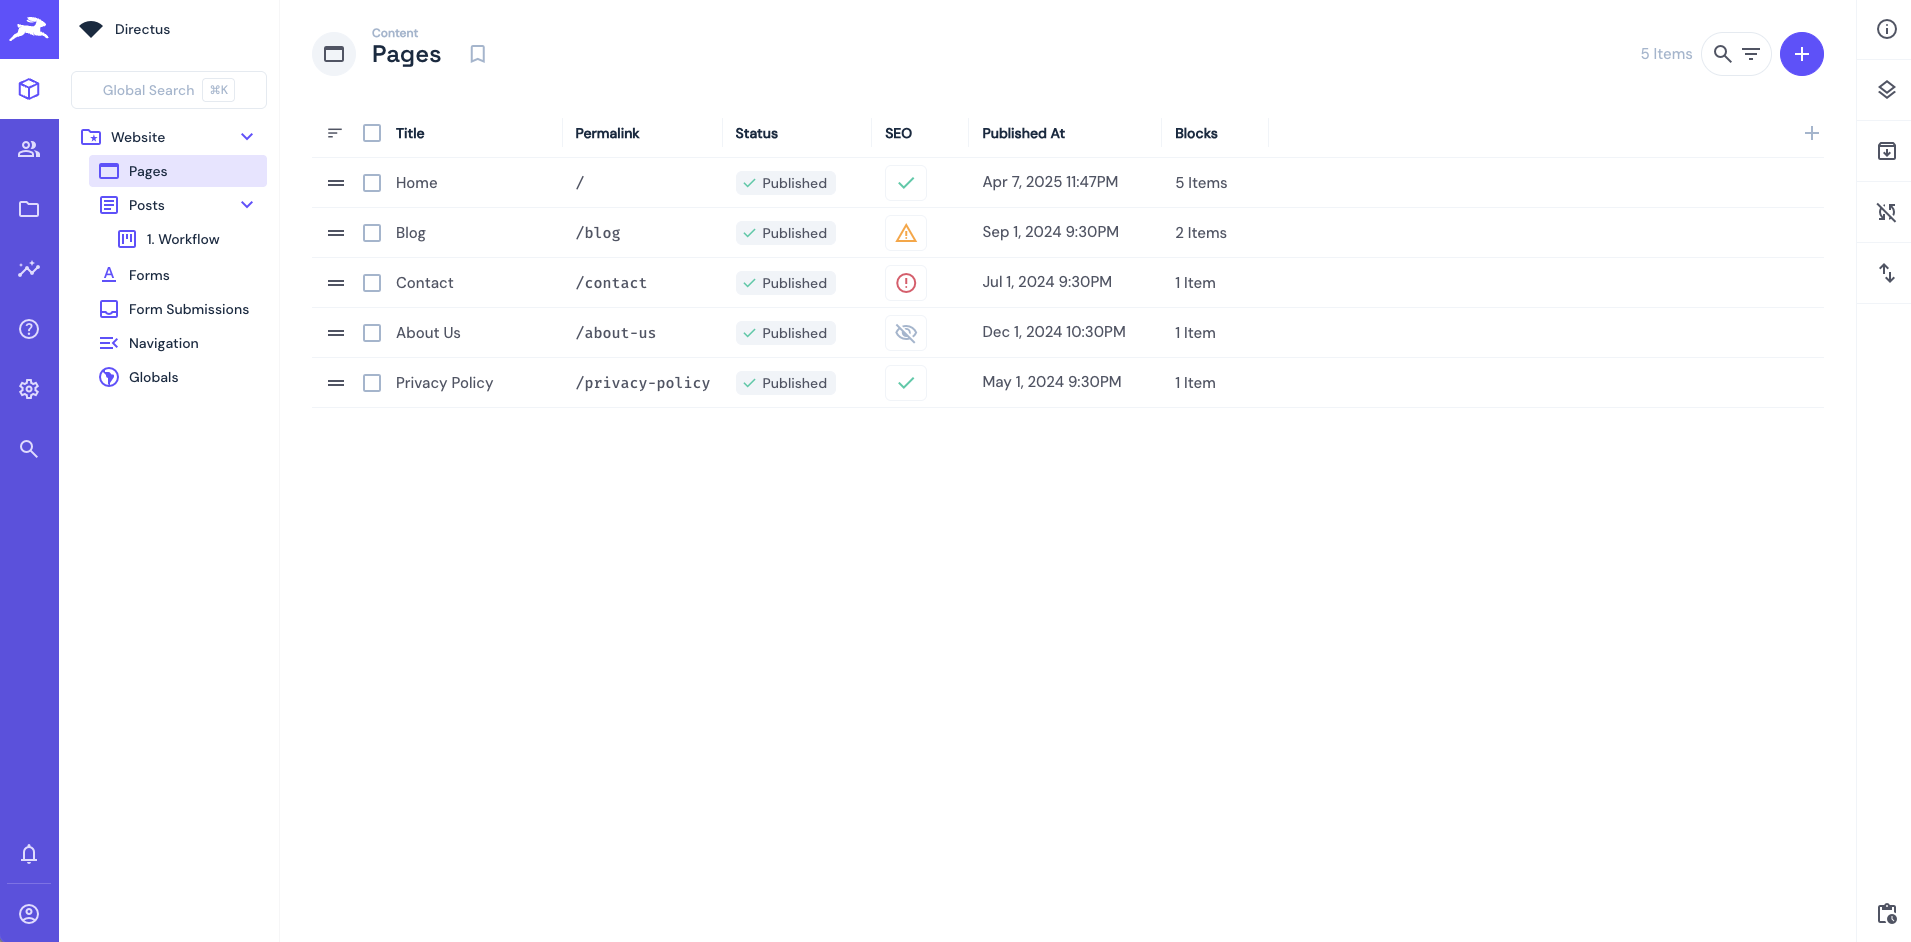
In this section, you will build the components needed to build the home page for your CMS website.
Hero Section
The hero section is the topmost section of a landing page that is used to grab the attention of the visitor and convert them as smoothly as possible. The template defines the following fields in the schema of a hero block that you can use in your Next.js app:
tagline: Smaller text shown above the headlineheadline: The main heading textdescription": Supporting text shown below the headlineimage: The featured image (likely a file ID you’ll have to resolve to an actual image URL)layout: Defines how the image and text are laid out (options like image_left, image_center, image_right)button_group: A linked group of buttons (each button will have fields like label, url, type, variant, etc.)
To implement this, paste the following code into a file app/components/HeroSection.js:
"use client";

import Image from 'next/image';
import Link from 'next/link';

export default function HeroSection({ tagline, headline, description, image, layout, button_group = [] }) {
  return (
    <section className="hero-section">
      <div className="container">
        {layout === 'image_left' && image && (
          <div className="hero-image">
            <Image
              src={`http://localhost:8055/assets/${image.id}`}
              alt={image.filename_download || 'Hero Image'}
              width={600}
              height={400}
              priority
            />
          </div>
        )}

        <div className="hero-content">
          {tagline && <p className="tagline">{tagline}</p>}
          {headline && <h1>{headline}</h1>}
          {description && <p className="description">{description}</p>}

          {button_group.length > 0 && (
            <div className="button-group">
              {button_group.map((button, idx) => (
                <Link
                  key={idx}
                  href={resolveButtonUrl(button)}
                >
                  <button className={`cta-button ${button.variant || 'default'}`}>
                  {button.label}
                  </button>
                </Link>
              ))}
            </div>
          )}
        </div>

        {(layout === 'image_right' || layout === 'image_center' || layout === null) && image && (
          <div className="hero-image">
            <Image
              src={`http://localhost:8055/assets/${image.id}`}
              alt={image.filename_download || 'Hero Image'}
              width={600}
              height={400}
              priority
            />
          </div>
        )}
      </div>

      <style jsx>{`
        .hero-section {
          padding: 80px 0;
          background-color: #f5f7fa;
        }

        .container {
          max-width: 1200px;
          margin: 0 auto;
          padding: 0 20px;
          display: flex;
          align-items: center;
          justify-content: space-between;
          flex-wrap: wrap;
          flex-direction: ${layout === 'image_center' ? 'column' : 'row'};
          text-align: ${layout === 'image_center' ? 'center' : 'left'};
        }

        .hero-content {
          flex: 1;
          min-width: 300px;
          margin: ${layout === 'image_left' ? '0 0 0 40px' : '0 40px 0 0'};
        }

        h1 {
          font-size: 48px;
          font-weight: bold;
          margin-bottom: 20px;
          color: #1a202c;
        }

        .tagline {
          font-size: 18px;
          color: #718096;
          margin-bottom: 10px;
        }

        .description {
          font-size: 20px;
          line-height: 1.6;
          color: #4a5568;
          margin-bottom: 30px;
        }

        .button-group {
          display: flex;
          flex-wrap: wrap;
          gap: 12px;
        }

        .cta-button {
          display: inline-block;
          background-color: #3182ce;
          color: white;
          font-size: 18px;
          padding: 12px 30px;
          border-radius: 6px;
          text-decoration: none;
          font-weight: 600;
          transition: background-color 0.3s;
        }

        .cta-button:hover {
          background-color: #2b6cb0;
        }

        .cta-button.outline {
          background: transparent;
          border: 2px solid #3182ce;
          color: #3182ce;
        }

        .cta-button.soft {
          background: #ebf8ff;
          color: #3182ce;
        }

        .cta-button.ghost {
          background: transparent;
          color: #3182ce;
        }

        .cta-button.link {
          background: none;
          color: #3182ce;
          text-decoration: underline;
        }

        .hero-image {
          flex: 1;
          min-width: 300px;
          display: flex;
          justify-content: center;
          align-items: center;
        }

        @media (max-width: 768px) {
          .container {
            flex-direction: column;
          }

          .hero-content {
            margin: 0 0 30px 0;
          }
        }
      `}</style>
    </section>
  );
}

// Helper function to resolve button link
function resolveButtonUrl(button) {
  if (button.type === 'page' && button.page) return `${button.page.permalink}`;
  if (button.type === 'post' && button.post) return `/posts/${button.post.id}`;
  return button.url || '#';
}
The component implements each of the fields mentioned above through HTML elements and the Next component. It also implements some basic styling via styled-jsx. Here's what the component will look like when built:

Rich Text Section
The rich text section is used to display formatted content such as paragraphs, lists, and headings on a page, making it ideal for storytelling, informational sections, or blog content areas. The template defines the following fields in the schema of a rich text block that you can use in your Next.js app:
tagline: Optional smaller text shown above the headlineheadline: The main heading text for the sectioncontent: The rich HTML content, displayed using dangerouslySetInnerHTMLalignment: Defines the alignment of the text (options like left, center, or right)
To implement this, paste the following code into a file app/components/RichTextSection.js:
"use client";

export default function RichTextSection({ tagline, headline, content, alignment = 'center' }) {
  return (
    <section className="rich-text-section">
      <div className="container" style={{ textAlign: alignment }}>
        {tagline && <p className="tagline">{tagline}</p>}
        {headline && <h2>{headline}</h2>}
        {content && (
          <div className="content" dangerouslySetInnerHTML={{ __html: content }} />
        )}
      </div>

      <style jsx>{`
        .rich-text-section {
          padding: 80px 0;
          background-color: #ffffff;
        }

        .container {
          max-width: 900px;
          margin: 0 auto;
          padding: 0 20px;
        }

        .tagline {
          font-size: 18px;
          color: #718096;
          margin-bottom: 10px;
        }

        h2 {
          font-size: 36px;
          font-weight: bold;
          margin-bottom: 30px;
          color: #1a202c;
        }

        .content {
          font-size: 18px;
          line-height: 1.7;
          color: #4a5568;
        }

        .content p {
          margin-bottom: 20px;
        }

        .content h3 {
          font-size: 24px;
          margin-top: 40px;
          margin-bottom: 20px;
          color: #2d3748;
        }

        .content ul, .content ol {
          margin-bottom: 20px;
          padding-left: 20px;
        }

        .content li {
          margin-bottom: 10px;
        }

        @media (max-width: 768px) {
          h2 {
            font-size: 30px;
          }

          .content {
            font-size: 16px;
          }
        }
      `}</style>
    </section>
  );
}
The component implements each of the fields mentioned above using standard HTML elements and applies dynamic text alignment through an inline style attribute. The content field is rendered safely using React's dangerouslySetInnerHTML to display rich formatted text. Basic styling is handled via styled-jsx to keep the section responsive and visually consistent. Here’s what the component will look like when built:

Gallery Section
The gallery section is used to display a collection of images in a grid layout, making it ideal for showcasing projects, product photos, or portfolio work. The template defines the following fields in the schema of a gallery block that you can use in your Next.js app:
tagline: Optional smaller text shown above the headlineheadline: The main heading text for the gallery sectionitems: A list of image files (each item contains a linkeddirectus_filewith itsidandfilename_download)
To implement this, paste the following code into a file app/components/GallerySection.js:
"use client";

import Image from 'next/image';

export default function GallerySection({ tagline, headline, items = [] }) {
  if (!items || items.length === 0) {
    return null;
  }

  return (
    <section className="gallery-section">
      <div className="container">
        {tagline && <p className="tagline">{tagline}</p>}
        {headline && <h2>{headline}</h2>}

        <div className="gallery-grid">
          {items.map((item, index) => (
            <div className="gallery-item" key={index}>
              {item.directus_file?.id && (
                <Image
                  src={`http://localhost:8055/assets/${item.directus_file.id}`}
                  alt={item.directus_file.filename_download || 'Gallery image'}
                  width={400}
                  height={300}
                  className="gallery-image"
                />
              )}
            </div>
          ))}
        </div>
      </div>

      <style jsx>{`
        .gallery-section {
          padding: 80px 0;
          background-color: #f9fafb;
        }

        .container {
          max-width: 1200px;
          margin: 0 auto;
          padding: 0 20px;
          text-align: center;
        }

        .tagline {
          font-size: 18px;
          color: #718096;
          margin-bottom: 10px;
        }

        h2 {
          font-size: 36px;
          font-weight: bold;
          margin-bottom: 40px;
          color: #1a202c;
        }

        .gallery-grid {
          display: grid;
          grid-template-columns: repeat(auto-fill, minmax(300px, 1fr));
          gap: 30px;
          margin-top: 40px;
        }

        .gallery-item {
          background-color: #ffffff;
          border-radius: 8px;
          overflow: hidden;
          box-shadow: 0 4px 6px rgba(0, 0, 0, 0.1);
          transition: transform 0.3s, box-shadow 0.3s;
        }

        .gallery-item:hover {
          transform: translateY(-5px);
          box-shadow: 0 10px 15px rgba(0, 0, 0, 0.1);
        }

        .gallery-image {
          width: 100%;
          height: auto;
          object-fit: cover;
        }

        @media (max-width: 768px) {
          .gallery-grid {
            grid-template-columns: repeat(auto-fill, minmax(250px, 1fr));
            gap: 20px;
          }
        }
      `}</style>
    </section>
  );
}
The component implements each of the fields mentioned above by mapping through the items array and rendering each image using the Next.js <Image> component for optimized loading. It uses a responsive CSS grid layout via styled-jsx to ensure the gallery adapts cleanly across different screen sizes. Here’s what the component will look like when built:
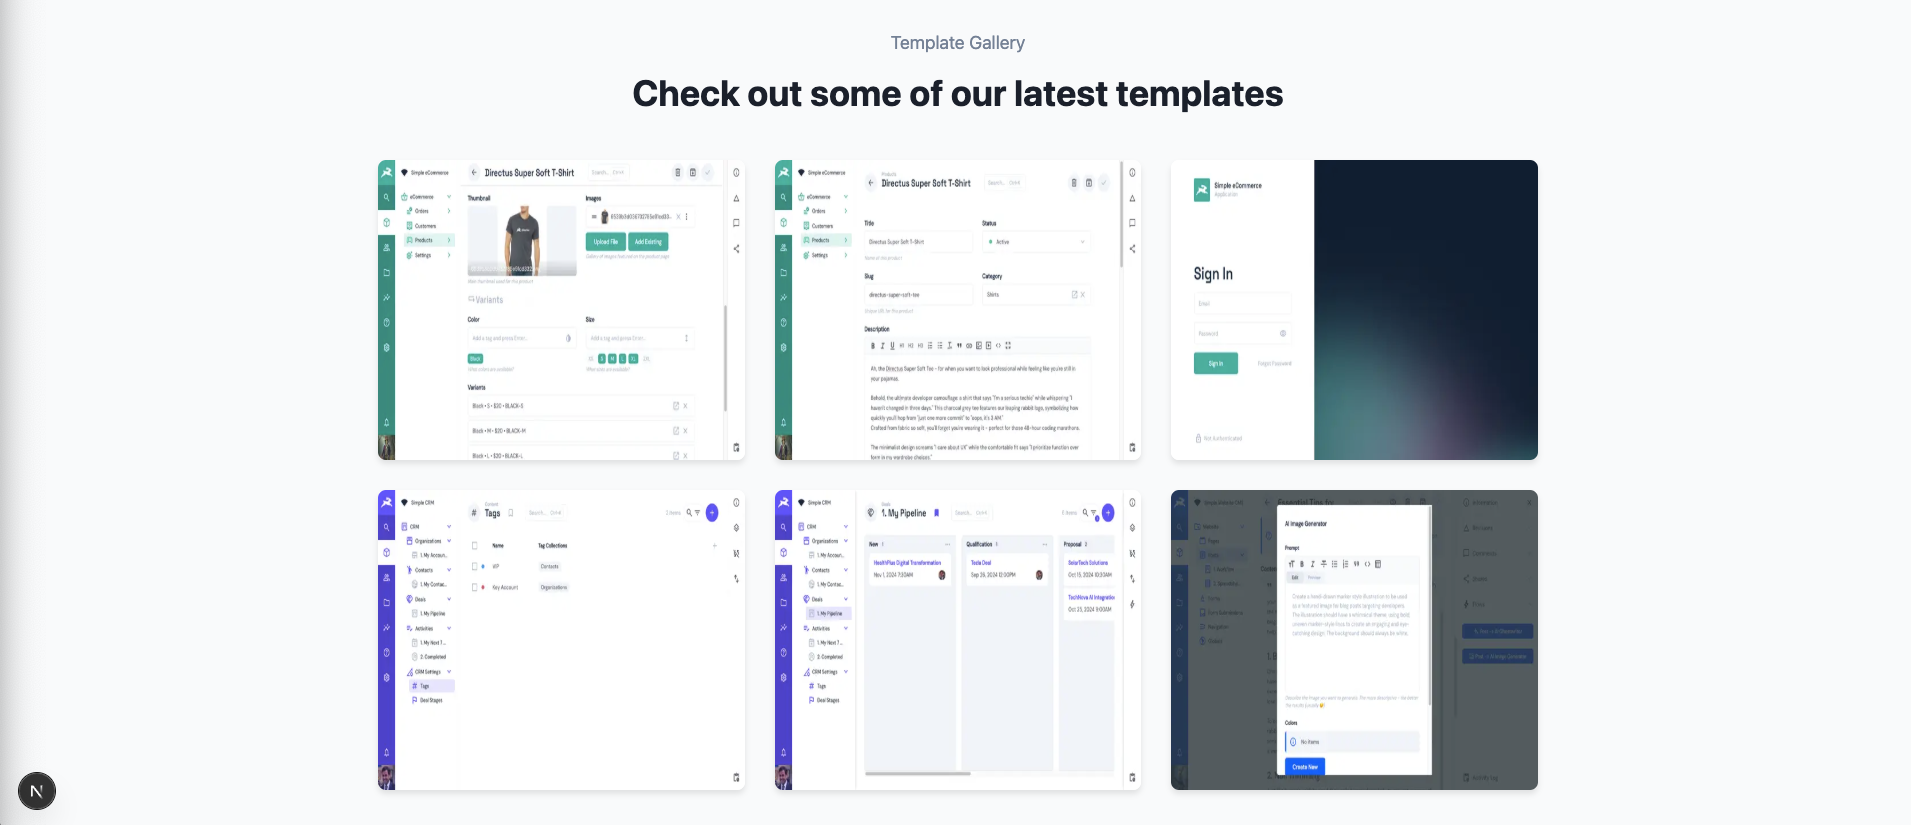
Pricing Section
The pricing section is used to display different service or subscription plans in a clean way, helping users quickly compare options and select the right one. The Directus template defines the following fields in the schema of a pricing block that you can use in your Next.js app:
- tagline: Optional smaller text shown above the headline
- headline: The main heading text for the pricing section
- pricing_cards: A list of pricing plans, each containing:
- title: Title of the plan
- badge: Optional highlight badge text (like "Most Popular")
- price: The cost associated with the plan
- description: Short description of the plan
- features: Features list separated by line breaks
- is_highlighted: Boolean to mark a featured plan
- button: Call-to-action button with fields like label, type, url, page, post, and variant
To implement this, paste the following code into a file app/components/PricingSection.js:
"use client";

import Link from 'next/link';

export default function PricingSection({ tagline, headline, pricing_cards = [] }) {
  if (!pricing_cards || pricing_cards.length === 0) {
    return null;
  }

  return (
    <section className="pricing-section">
      <div className="container">
        <div className="pricing-header">
          {tagline && <p className="tagline">{tagline}</p>}
          {headline && <h2>{headline}</h2>}
        </div>

        <div className="pricing-plans">
          {pricing_cards.map((plan, index) => (
            <div className={`pricing-plan ${plan.is_highlighted ? 'featured' : ''}`} key={index}>
              {plan.badge && <span className="badge">{plan.badge}</span>}
              <h3>{plan.title}</h3>
              <div className="price">{plan.price}</div>
              {plan.description && <p className="plan-description">{plan.description}</p>}

              {plan.features && (
                <ul className="features">
                  {plan.features.map((feature, idx) => (
                    <li key={idx}>{feature.trim()}</li>
                  ))}
                </ul>
              )}

              {plan.button && plan.button.label && (
                <Link
                  href={resolveButtonUrl(plan.button)}
                  className={`cta-button ${plan.is_highlighted ? 'featured-cta' : ''}`}
                >
                  {plan.button.label}
                </Link>
              )}
            </div>
          ))}
        </div>
      </div>

      <style jsx>{`
        .pricing-section {
          padding: 80px 0;
          background-color: #ffffff;
        }

        .container {
          max-width: 1200px;
          margin: 0 auto;
          padding: 0 20px;
        }

        .pricing-header {
          text-align: center;
          margin-bottom: 60px;
        }

        .tagline {
          font-size: 18px;
          color: #718096;
          margin-bottom: 10px;
        }

        h2 {
          font-size: 36px;
          font-weight: bold;
          color: #1a202c;
          margin-bottom: 20px;
        }

        .pricing-plans {
          display: flex;
          flex-wrap: wrap;
          justify-content: center;
          gap: 30px;
        }

        .pricing-plan {
          background-color: #f7fafc;
          border-radius: 8px;
          padding: 40px;
          width: 300px;
          box-shadow: 0 4px 6px rgba(0, 0, 0, 0.05);
          transition: transform 0.3s;
          position: relative;
        }

        .pricing-plan:hover {
          transform: translateY(-10px);
        }

        .pricing-plan.featured {
          background-color: #ebf8ff;
          box-shadow: 0 8px 30px rgba(0, 0, 0, 0.1);
          border: 2px solid #3182ce;
          z-index: 1;
        }

        .badge {
          position: absolute;
          top: 20px;
          right: 20px;
          background-color: #3182ce;
          color: #ffffff;
          font-size: 12px;
          font-weight: 600;
          padding: 4px 8px;
          border-radius: 4px;
          text-transform: uppercase;
        }

        h3 {
          font-size: 24px;
          font-weight: 600;
          color: #2d3748;
          margin-bottom: 15px;
        }

        .price {
          font-size: 48px;
          font-weight: 700;
          color: #1a202c;
          margin-bottom: 20px;
        }

        .plan-description {
          font-size: 16px;
          color: #4a5568;
          margin-bottom: 30px;
          line-height: 1.5;
        }

        .features {
          list-style-type: none;
          padding: 0;
          margin: 0 0 30px;
        }

        .features li {
          padding: 8px 0;
          font-size: 16px;
          color: #4a5568;
          display: flex;
          align-items: center;
        }

        .features li:before {
          content: "✓";
          color: #38a169;
          font-weight: bold;
          margin-right: 10px;
        }

        .cta-button {
          display: block;
          width: 100%;
          background-color: #e2e8f0;
          color: #2d3748;
          text-align: center;
          padding: 12px 0;
          border-radius: 6px;
          font-weight: 600;
          text-decoration: none;
          transition: background-color 0.3s;
        }

        .cta-button:hover {
          background-color: #cbd5e0;
        }

        .featured-cta {
          background-color: #3182ce;
          color: white;
        }

        .featured-cta:hover {
          background-color: #2b6cb0;
        }

        @media (max-width: 768px) {
          .pricing-plan {
            width: 100%;
            max-width: 400px;
          }
        }
      `}</style>
    </section>
  );
}

// Helper function to resolve button URLs
function resolveButtonUrl(button) {
  if (button.type === 'page' && button.page) return `/pages/${button.page}`;
  if (button.type === 'post' && button.post) return `/posts/${button.post}`;
  return button.url || '#';
}
The component implements each of the fields mentioned above by rendering pricing cards dynamically and highlighting featured plans. It supports badge labels, dynamically splits features into list items, and safely handles CTA button links through a URL resolver function. Basic styling is applied through styled-jsx to maintain a modern, responsive layout across devices. Here’s what the component will look like when built:
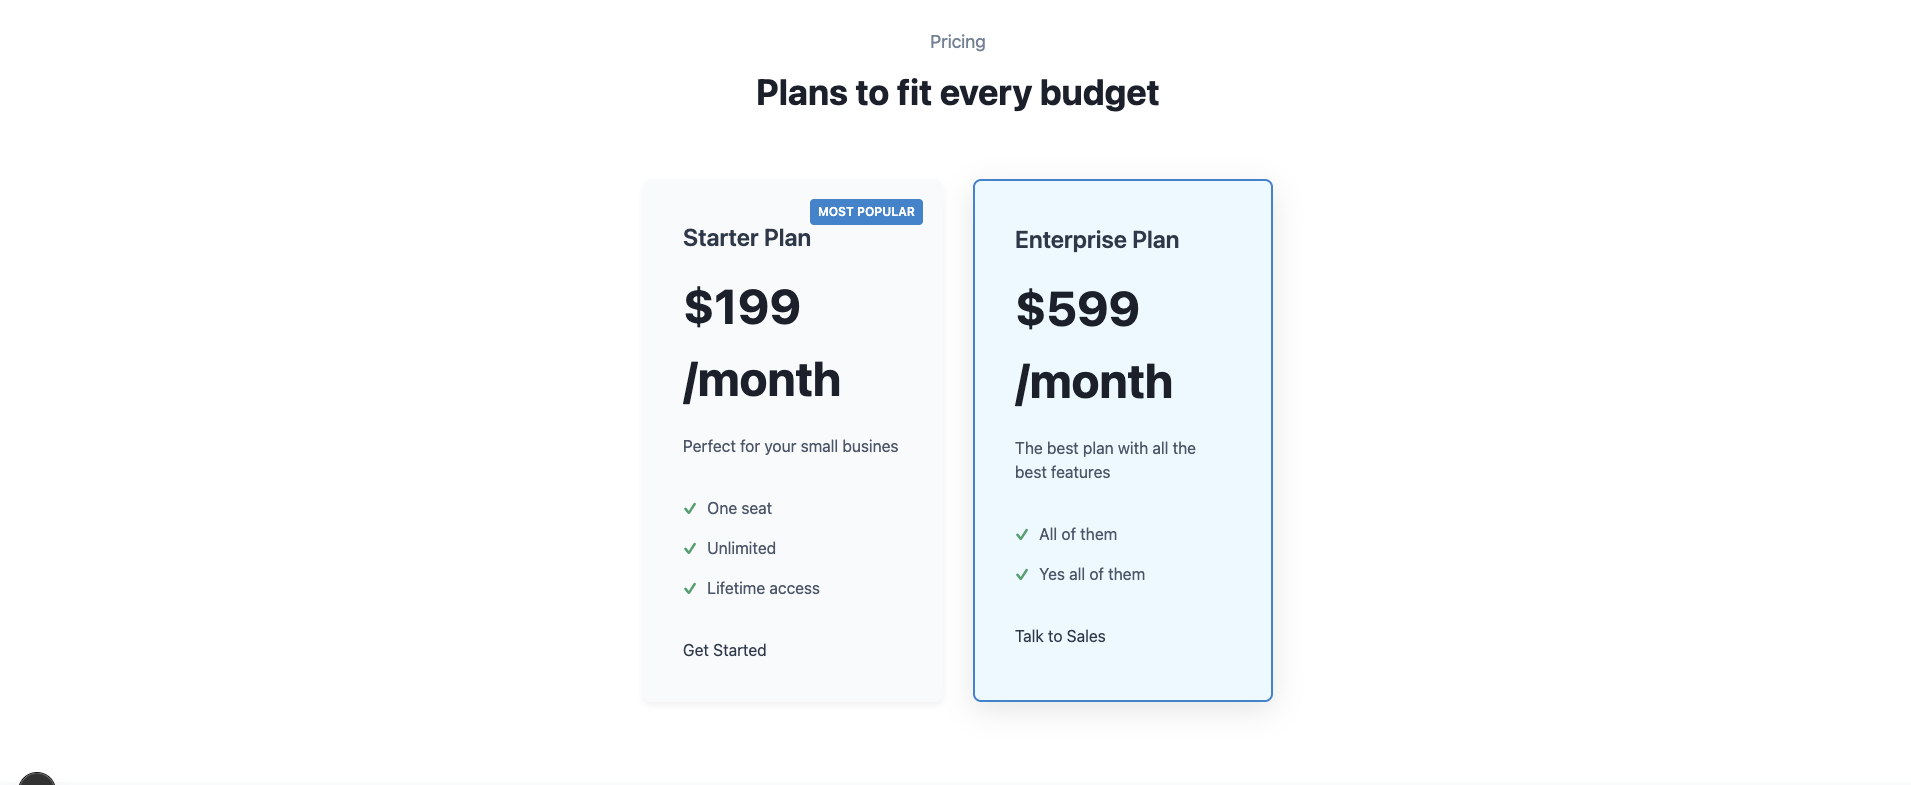
Posts Section
The posts section is used to display a list of blog posts or articles dynamically pulled from the CMS, making it ideal for a blog homepage, news feed, or article listing. The template defines the following fields in the schema of a post that you can use in your Next.js app:
tagline: Optional smaller text shown above the posts gridheadline: The main heading text for the posts sectionposts: Dynamically fetched list of posts, where each post contains:title: The post titleslug: URL-friendly identifier for the postauthor: Nested object with the author's first_name and last_namepublished_at: The publication date of the postimage: Linked image file with fields like id and titledescription: A short excerpt of the postcontent: (optional) Full HTML content of the post
To implement this, paste the following code into a file app/components/Posts.js:
"use client";

import Image from 'next/image';
import Link from 'next/link';
import { useState, useEffect } from 'react';
import { readItems } from '@directus/sdk';
import client from '../../lib/directus';

export default function Posts({ tagline, headline, limit = 6 }) {

    const [posts, setPosts] = useState(null);

    useEffect(() => {
        async function fetchPosts() {
            const data = await client.request(
                readItems('posts', {
                    limit,
                    fields: ['id', 'title', 'slug', {'author': ["first_name", "last_name"]}, 'published_at', 'image.title', 'image.id', 'description'],
                    filter: { published_at: { _empty: false } },
                })
            );
            setPosts(data);
        }

        fetchPosts();
    }, [limit])

    console.log('posts', posts);

    return (
        <section className="posts-section">
            <p>{tagline}</p>
            <h1>{headline}</h1>
            <div className="posts-container">
            {posts ? (
                <div className="posts-grid">
                    {posts.map((post) => (
                        <div key={post.id}>
                            <Post {...post} />
                        </div>
                    ))}
                </div>
            ) : (
                <div>Loading...</div>
            )}
            </div>
            <style jsx>{`
                .posts-section {
                    padding: 40px;
                }
                .posts-container {
                    display: flex;
                    flex-wrap: wrap;
                    gap: 3rem;
                }
                .posts-grid {
                    display: flex;
                    gap: 1rem;
                    width: 100%;
                    flex-direction: row;
                    justify-content: flex-start;
                }
                h1 {
                    font-size: 48px;
                    font-weight: bold;
                    margin-bottom: 20px;
                    color: #1a202c;
                    margin-left: 20px;
                }
                p {
                    margin-left: 20px;
                    margin-top: 20px;
                }
            `}</style>
        </section>
    );
}

function Post({ id, title, author, slug, description, image, content, published_at }) {
    return (
        <div className={'card'}>
            <Image
                src={`http://localhost:8055/assets/${image.id}`}
                alt={image.title}
                width={400}
                height={300}
                className="gallery-image"
            />
            <h2>{title}</h2>
            <p className="author">by {author.first_name} {author.last_name}</p>
            {content ? (
                <>
                    <p>Published on {new Date(published_at).toDateString()}</p>
                    <hr />
                    <div dangerouslySetInnerHTML={{ __html: content }} />
                </>
            ) : (
                <div>
                    <p>{description}</p>
                    <Link href={`/posts/${slug}`}><div className="link">Read more</div></Link>
                </div>
            )}

            <style jsx>{`
                .card {
                    border-radius: 8px;
                    box-shadow: 0 4px 8px rgba(0, 0, 0, 0.1);
                    overflow: hidden;
                    transition: transform 0.3s ease;
                    background-color: #fff;
                    max-width: 400px;
                    height: 580px;
                    margin: 1rem;
                    position: relative;
                }
                .card:hover {
                    box-shadow: 0 6px 12px rgba(0, 0, 0, 0.15);
                }
                .card img {
                    width: 100%;
                    height: 200px;
                    object-fit: cover;
                    display: block;
                }
                .article img {
                    width: 100%;
                    height: 500px;
                    object-fit: cover;
                    display: block;
                }
                .article .author {
                    font-style: italic;
                }
                .card h2 {
                    margin: 1rem;
                    font-size: 1.5rem;
                    color: #333;
                }
                .card p {
                    margin: 0 1rem 1rem;
                    color: #666;
                    line-height: 1.4;
                    text-overflow: ellipsis;
                    display: box;
                    overflow: hidden;
                    max-height: 4rem;
                }
                .link {
                    margin: 1rem;
                    color: #0000EE;
                }
            `}</style>
        </div>
    );
}
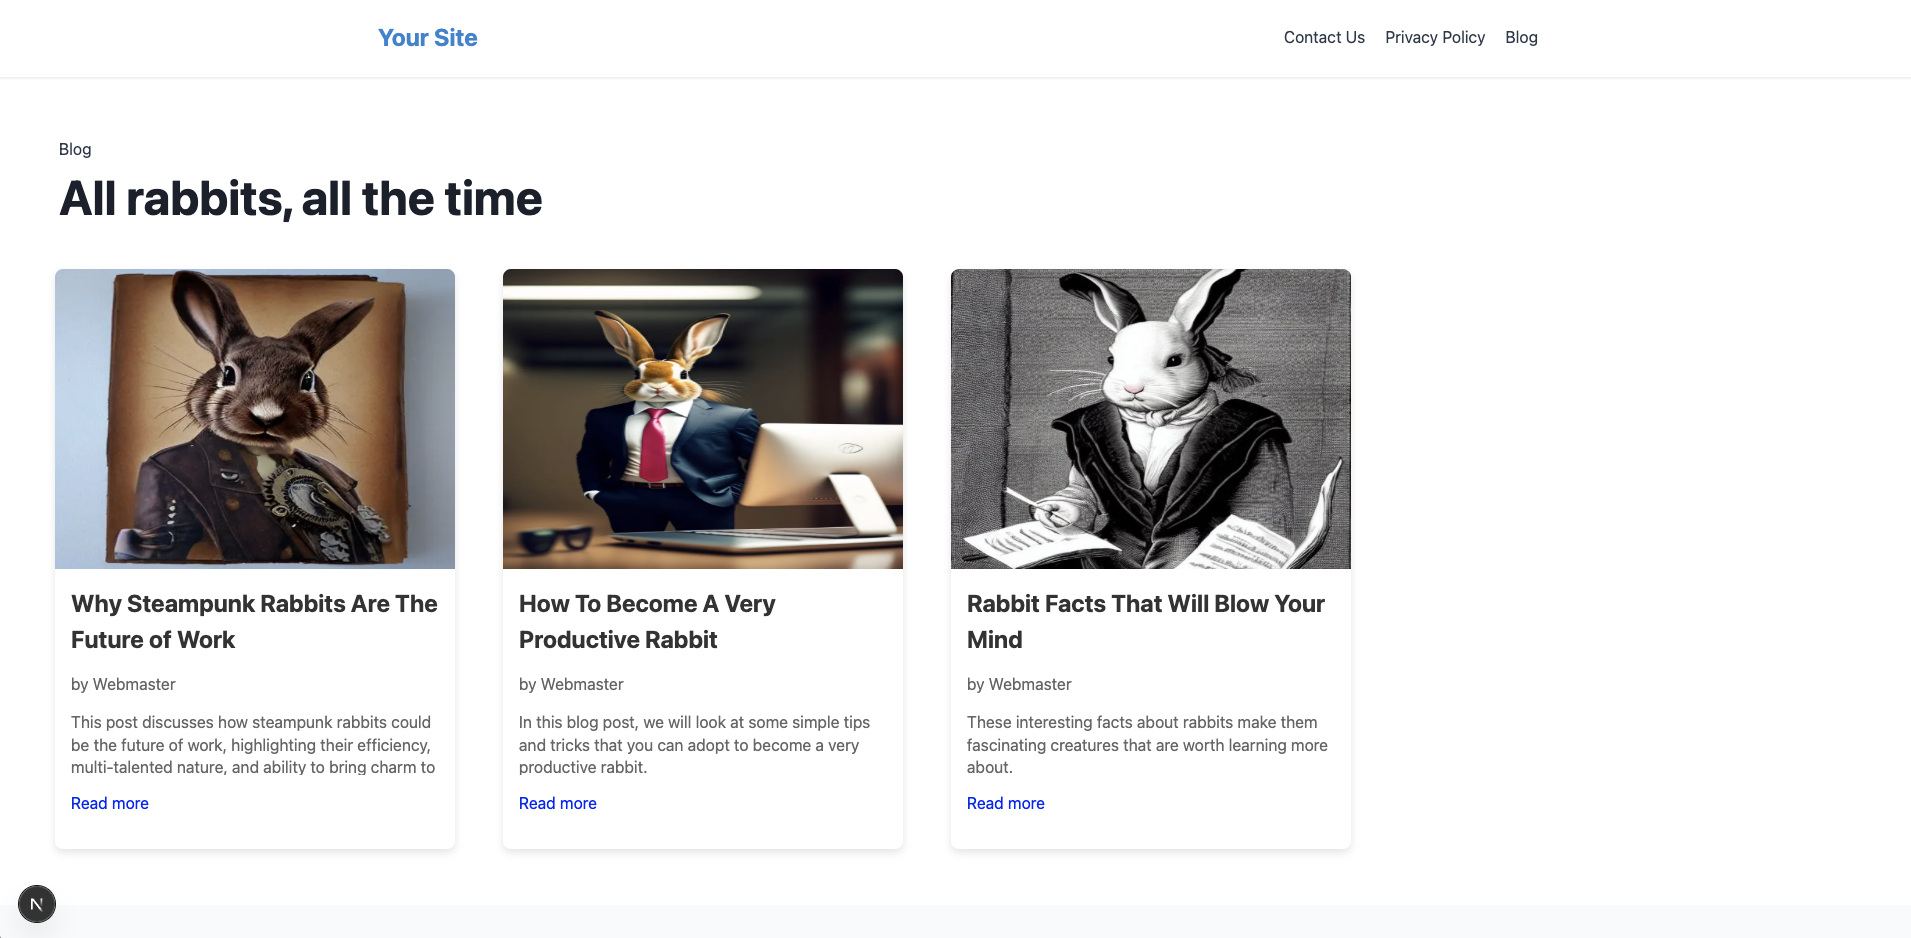
The component fetches posts from the CMS at runtime using the Directus SDK and dynamically displays them as a responsive grid of cards. Each card shows the post’s image, title, author, and either the content or a short description with a “Read more” link. Styling is handled with styled-jsx to create a clean, modern layout with hover effects and responsive behavior. Here’s what the component will look like when built:
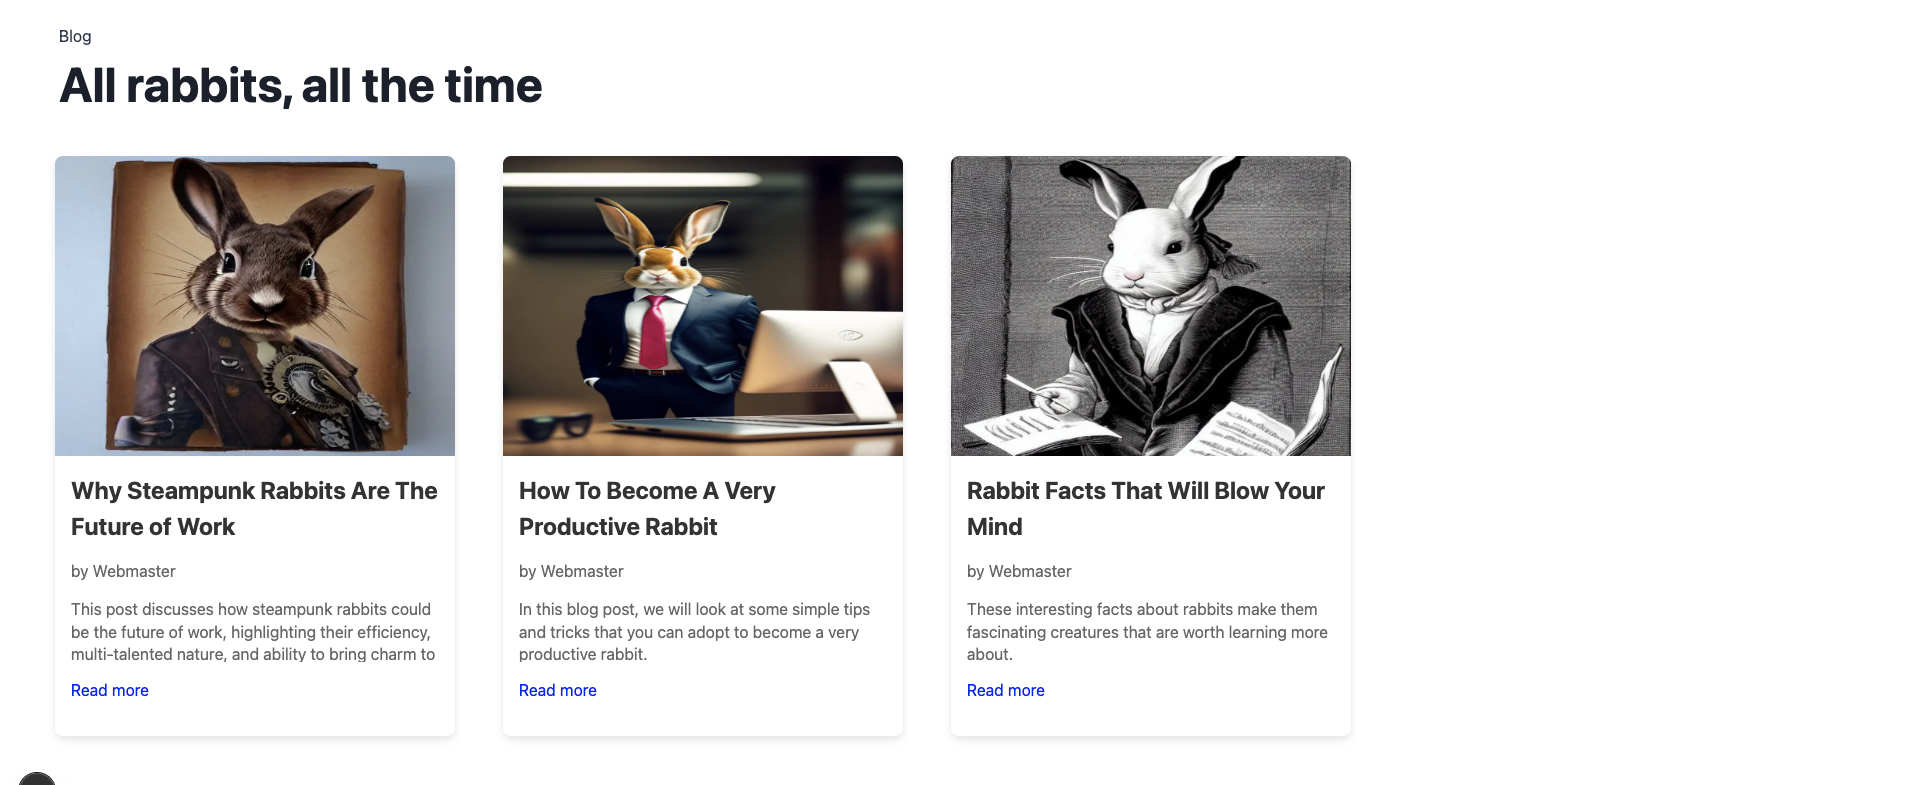
Form Section
The form section is used to collect user information, feedback, or inquiries through a customizable form that can be adapted to different use cases. The template defines the following fields in the schema of a form block that you can use in your Next.js app:
tagline: Optional smaller text shown above the formheadline: The main heading text for the form sectionform: A linked form definition containing:fields: A dynamic list of form fields (each with name, type, and required attributes)submit_label: The label for the submit buttonsuccess_message: The message displayed after successful submission
To implement this, paste the following code into a file app/components/FormSection.js:
'use client';

import { useState } from 'react';

export default function FormSection({ tagline, headline, form }) {
  const [formData, setFormData] = useState(
    () => form.fields.reduce((acc, field) => ({ ...acc, [field.name]: '' }), {})
  );

  const [isSubmitting, setIsSubmitting] = useState(false);
  const [isSubmitted, setIsSubmitted] = useState(false);
  const [error, setError] = useState('');

  const handleChange = (e) => {
    const { name, value } = e.target;
    setFormData(prev => ({
      ...prev,
      [name]: value
    }));
  };

  const handleSubmit = async (e) => {
    e.preventDefault();
    setIsSubmitting(true);
    setError('');

    try {
      const response = await fetch('http://localhost:8055/items/form_submissions', {
        method: 'POST',
        headers: { 'Content-Type': 'application/json' },
        body: JSON.stringify(formData),
      });

      if (!response.ok) {
        throw new Error('Submission failed');
      }

      setIsSubmitted(true);
      setFormData(form.fields.reduce((acc, field) => ({ ...acc, [field.name]: '' }), {}));
    } catch (err) {
      console.error(err);
      setError('There was an error submitting your form. Please try again.');
    } finally {
      setIsSubmitting(false);
    }
  };

  if (!form || !form.fields) return null;

  return (
    <section className="form-section">
      <div className="container">
        <div className="form-header">
          {tagline && <p className="tagline">{tagline}</p>}
          {headline && <h2>{headline}</h2>}
        </div>

        {isSubmitted ? (
          <div className="success-message">
            <h3>Thank you!</h3>
            <p>{form.success_message || 'Your form has been successfully submitted.'}</p>
            <button onClick={() => setIsSubmitted(false)} className="reset-button">
              Submit another response
            </button>
          </div>
        ) : (
          <form onSubmit={handleSubmit} className="contact-form">
            {error && <div className="error-message">{error}</div>}

            {form.fields.map((field) => (
              <div className="form-group" key={field.id}>
                <label htmlFor={field.name}>{field.label}</label>
                {field.type === 'textarea' ? (
                  <textarea
                    id={field.name}
                    name={field.name}
                    value={formData[field.name]}
                    onChange={handleChange}
                    rows="5"
                    required={field.required}
                  />
                ) : (
                  <input
                    id={field.name}
                    type={field.type || 'text'}
                    name={field.name}
                    value={formData[field.name]}
                    onChange={handleChange}
                    required={field.required}
                  />
                )}
              </div>
            ))}

            <button
              type="submit"
              className="submit-button"
              disabled={isSubmitting}
            >
              {isSubmitting ? 'Submitting...' : (form.submit_label || 'Submit')}
            </button>
          </form>
        )}
      </div>

      <style jsx>{`
        .form-section {
          padding: 80px 0;
          background-color: #f7fafc;
        }

        .container {
          max-width: 700px;
          margin: 0 auto;
          padding: 0 20px;
        }

        .form-header {
          text-align: center;
          margin-bottom: 40px;
        }

        h2 {
          font-size: 36px;
          font-weight: bold;
          color: #1a202c;
          margin-bottom: 20px;
        }

        .description {
          font-size: 18px;
          color: #4a5568;
          line-height: 1.6;
        }

        .contact-form {
          background-color: #ffffff;
          padding: 40px;
          border-radius: 8px;
          box-shadow: 0 4px 6px rgba(0, 0, 0, 0.05);
        }

        .form-group {
          margin-bottom: 20px;
        }

        label {
          display: block;
          font-size: 16px;
          font-weight: 600;
          color: #2d3748;
          margin-bottom: 8px;
        }

        input, textarea {
          width: 100%;
          padding: 12px;
          font-size: 16px;
          border: 1px solid #e2e8f0;
          border-radius: 4px;
          color: #2d3748;
          transition: border-color 0.3s;
        }

        input:focus, textarea:focus {
          outline: none;
          border-color: #3182ce;
        }

        .submit-button {
          display: block;
          width: 100%;
          background-color: #3182ce;
          color: white;
          border: none;
          padding: 12px;
          font-size: 16px;
          font-weight: 600;
          border-radius: 4px;
          cursor: pointer;
          transition: background-color 0.3s;
        }

        .submit-button:hover:not(:disabled) {
          background-color: #2b6cb0;
        }

        .submit-button:disabled {
          background-color: #90cdf4;
          cursor: not-allowed;
        }

        .error-message {
          background-color: #fed7d7;
          color: #c53030;
          padding: 12px;
          border-radius: 4px;
          margin-bottom: 20px;
          font-size: 14px;
        }

        .success-message {
          text-align: center;
          background-color: #c6f6d5;
          padding: 40px;
          border-radius: 8px;
          box-shadow: 0 4px 6px rgba(0, 0, 0, 0.05);
        }

        .success-message h3 {
          font-size: 24px;
          font-weight: 600;
          color: #2f855a;
          margin-bottom: 10px;
        }

        .success-message p {
          font-size: 16px;
          color: #276749;
          margin-bottom: 30px;
        }

        .reset-button {
          background-color: #38a169;
          color: white;
          border: none;
          padding: 10px 20px;
          font-size: 16px;
          font-weight: 500;
          border-radius: 4px;
          cursor: pointer;
          transition: background-color 0.3s;
        }

        .reset-button:hover {
          background-color: #2f855a;
        }
      `}</style>
    </section>
  );
}
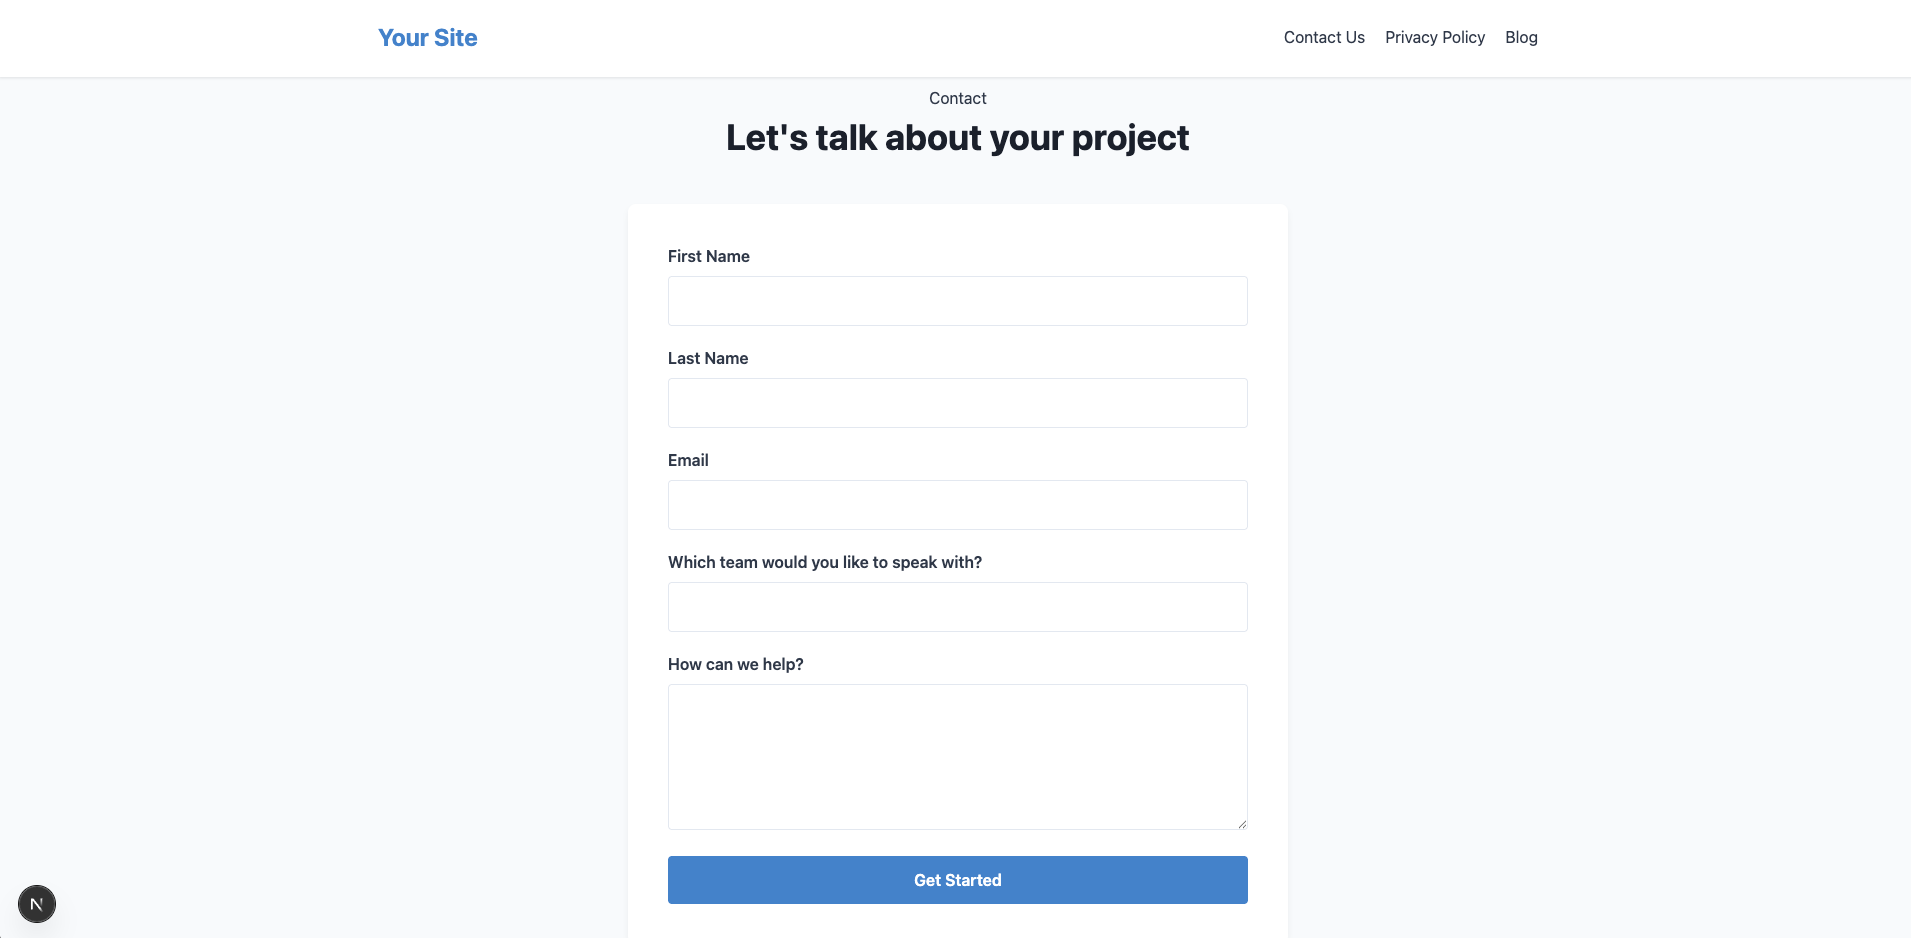
The component dynamically generates form fields based on the provided schema and safely handles form state using React’s useState. It implements form submission via a POST request to Directus and displays appropriate success or error messages. Basic styling is applied using styled-jsx to create a clean and mobile-friendly form layout. Here’s what the component will look like when built:

Header and Footer Sections
The header and footer components are used to display site-wide navigation links at the top and bottom of a webpage, guiding users to key sections of the site. Both components pull structured navigation data from the CMS and dynamically render links and grouped menus. The template defines the following fields in the schema of a navigation block that you can use in your Next.js app:
title: The name of the navigation group (e.g., "Main Navigation" or "Footer Navigation")navigation_items: A dynamic list of navigation items, each containing:type: The type of link (page, post, url, or group)label: The display text for the link or groupurl: The external URL for url type linkstarget: Link target (e.g., _blank for external links)page: Linked page (for internal navigation)post: Linked blog post (for internal navigation)children: Nested navigation items if the type is group
To implement the Header, paste the following code into the file app/components/Header.js:
"use client";

import Link from 'next/link';

export default function Header({ navigation }) {
    // Find the Main Navigation set by title
    const headerNavigation = navigation.filter((nav) => nav.title === 'Main Navigation')[0];

    if (!headerNavigation || headerNavigation.items?.length === 0) {
        return null;
    }

    return (
        <header className="site-header">
            <div className="container">
                <div className="logo">
                    <Link href="/">
                        <span className="logo-text">Your Site</span>
                    </Link>
                </div>

                <div className="main-nav">
                    {headerNavigation.items.map((item) => (
                        <NavigationItem key={item.id} item={item} />
                    ))}
                </div>
            </div>

            <style jsx>{`
        .site-header {
          background-color: #ffffff;
          box-shadow: 0 1px 3px rgba(0, 0, 0, 0.1);
          position: sticky;
          top: 0;
          z-index: 100;
        }

        .container {
          max-width: 1200px;
          margin: 0 auto;
          padding: 0 20px;
          height: 80px;
          display: flex;
          align-items: center;
          justify-content: space-between;
        }

        .logo {
          font-size: 24px;
          font-weight: 700;
        }

        .logo-text {
          color: #3182ce;
          text-decoration: none;
        }

        .main-nav {
            display: flex;
            align-items: center;
            list-style: none;
            margin: 0;
            padding: 0;
            gap: 20px;
        }

        .main-nav a {
          color: #4a5568;
          text-decoration: none;
          font-size: 16px;
          font-weight: 500;
          transition: color 0.3s;
        }

        .main-nav a:hover {
          color: #3182ce;
        }

        @media (max-width: 768px) {
          .container {
            flex-direction: column;
            height: auto;
            padding: 20px;
          }

          .logo {
            margin-bottom: 20px;
          }

        }
      `}</style>
        </header>
    );
}

// Recursive navigation item renderer
function NavigationItem({ item }) {
    if (item.type === 'group') {
        return (
            item.children?.map((child) => (
                <NavigationItem key={child.id} item={child} />
            ))
        );
    }

    return (
        <div>
            <Link
                href={resolveItemUrl(item)}
                target={item.target === '_blank' ? '_blank' : undefined}
                rel={item.target === '_blank' ? 'noopener noreferrer' : undefined}
            >
                {item.title}
            </Link>
        </div>
    );
}

// Helper to resolve link destination properly
function resolveItemUrl(item) {
    if (item.type === 'page' && item.page) {
        return `${item.page.permalink}`;
    }
    if (item.type === 'post' && item.post) {
        return `/posts/${item.post}`;
    }
    if (item.type === 'url' && item.url) {
        return item.url;
    }
    return '#';
}
To implement the Footer, paste the following code into the file app/components/Footer.js:
"use client";
import Link from 'next/link';
export default function Footer({ navigation }) {
// Find the Footer Navigation set by title
const footerNavigation = navigation?.filter((nav) => nav.title === 'Footer Navigation')[0];
if (!footerNavigation || !footerNavigation.items?.length) {
return null;
}
return (
<footer className="site-footer">
<div className="container">
<div className="footer-content">
{footerNavigation.items.map((item) => (
<FooterNavigationItem key={item.id} item={item} />
))}
</div>
<div className="footer-bottom">
<p>© {new Date().getFullYear()} Your Site. All rights reserved.</p>
</div>
</div>
<style jsx>{`
.site-footer {
background-color: #2d3748;
color: #e2e8f0;
padding: 60px 0 30px;
}
.container {
max-width: 1200px;
margin: 0 auto;
padding: 0 20px;
}
.footer-content {
display: flex;
flex-wrap: wrap;
justify-content: center;
margin-bottom: 40px;
gap: 20px;
}
.footer-bottom {
text-align: center;
padding-top: 20px;
border-top: 1px solid #4a5568;
font-size: 14px;
color: #a0aec0;
}
@media (max-width: 768px) {
.footer-content {
flex-direction: column;
}
}
`}</style>
</footer>
);
}
// Recursively render footer items
function FooterNavigationItem({ item }) {
if (item.type === 'group') {
return (
item.children?.map((child) => (
<Link
href={resolveItemUrl(child)} key={child.id}
target={child.target === '_blank' ? '_blank' : undefined}
rel={child.target === '_blank' ? 'noopener noreferrer' : undefined}
>
{child.label}
</Link>
))
);
}
// If not a group, treat it as a single link section
return (
<Link
href={resolveItemUrl(item)}
target={item.target === '_blank' ? '_blank' : undefined}
rel={item.target === '_blank' ? 'noopener noreferrer' : undefined}
>
{item.title}
</Link>
);
}
// Helper to resolve URL for page, post, or url types
function resolveItemUrl(item) {
if (item.type === 'page' && item.page) {
return `${item.page.permalink}`;
}
if (item.type === 'post' && item.post) {
return `/posts/${item.post}`;
}
if (item.type === 'url' && item.url) {
return item.url;
}
return '#';
}
Both the components dynamically render links based on the type of each navigation item, supporting external URLs, internal pages, blog posts, and nested groups. Groups are displayed as dropdowns in the header and as section headings with links underneath in the footer. Both components safely handle external links and maintain responsive layouts using styled-jsx.
Put the Home Page Together
Now that you have built all the components, it is time to put the home page together. To do that, replace the contents of the app/page.js with the following:
import client from '../lib/directus';
import { readItems } from '@directus/sdk';
import HeroSection from './components/HeroSection';
import RichTextSection from './components/RichTextSection';
import GallerySection from './components/GallerySection';
import PricingSection from './components/PricingSection';
import FormSection from './components/FormSection';
import Header from './components/Header';
import Footer from './components/Footer';

export default async function Home() {
  // Fetch homepage data from Directus
  const homepageData = await client.request(
    readItems('pages', {
      filter: {
        permalink: {
          _eq: '/'
        }
      },
      fields: [
        "*",
        "blocks.*",
        "blocks.item.*.*.*.*",
      ]
    })
  );

  const hero_data = homepageData[0].blocks?.filter(block => block.collection === 'block_hero')?.[0];
  const rich_text_data = homepageData[0].blocks?.filter(block => block.collection === 'block_richtext')?.[0];
  const gallery_data = homepageData[0].blocks?.filter(block => block.collection === 'block_gallery')?.[0];
  const pricing_data = homepageData[0].blocks?.filter(block => block.collection === 'block_pricing')?.[0];
  const form_data = homepageData[0].blocks?.filter(block => block.collection === 'block_form')?.[0];

  const navigationData = await client.request(
    readItems('navigation', {
      fields: [
        "*.*.*.*",
      ]
    })
  );

  return (
    <main>
      <Header
        navigation={navigationData}
      />

      <>
        {hero_data && <HeroSection
          tagline={hero_data.item.tagline}
          headline={hero_data.item.headline}
          description={hero_data.item.description}
          image={hero_data.item.image}
          layout={hero_data.item.layout}
          button_group={hero_data.item.button_group.buttons}
        />}

        {rich_text_data && <RichTextSection
          {...(rich_text_data.item)}
        />}

        {gallery_data && <GallerySection
          {...(gallery_data.item)}
        />}

        {pricing_data && <PricingSection
          {...(pricing_data.item)} />}

        {form_data && <FormSection
          {...(form_data.item)}
        />}

      </>

      <Footer
        navigation={navigationData}
      />

    </main>
  );
}
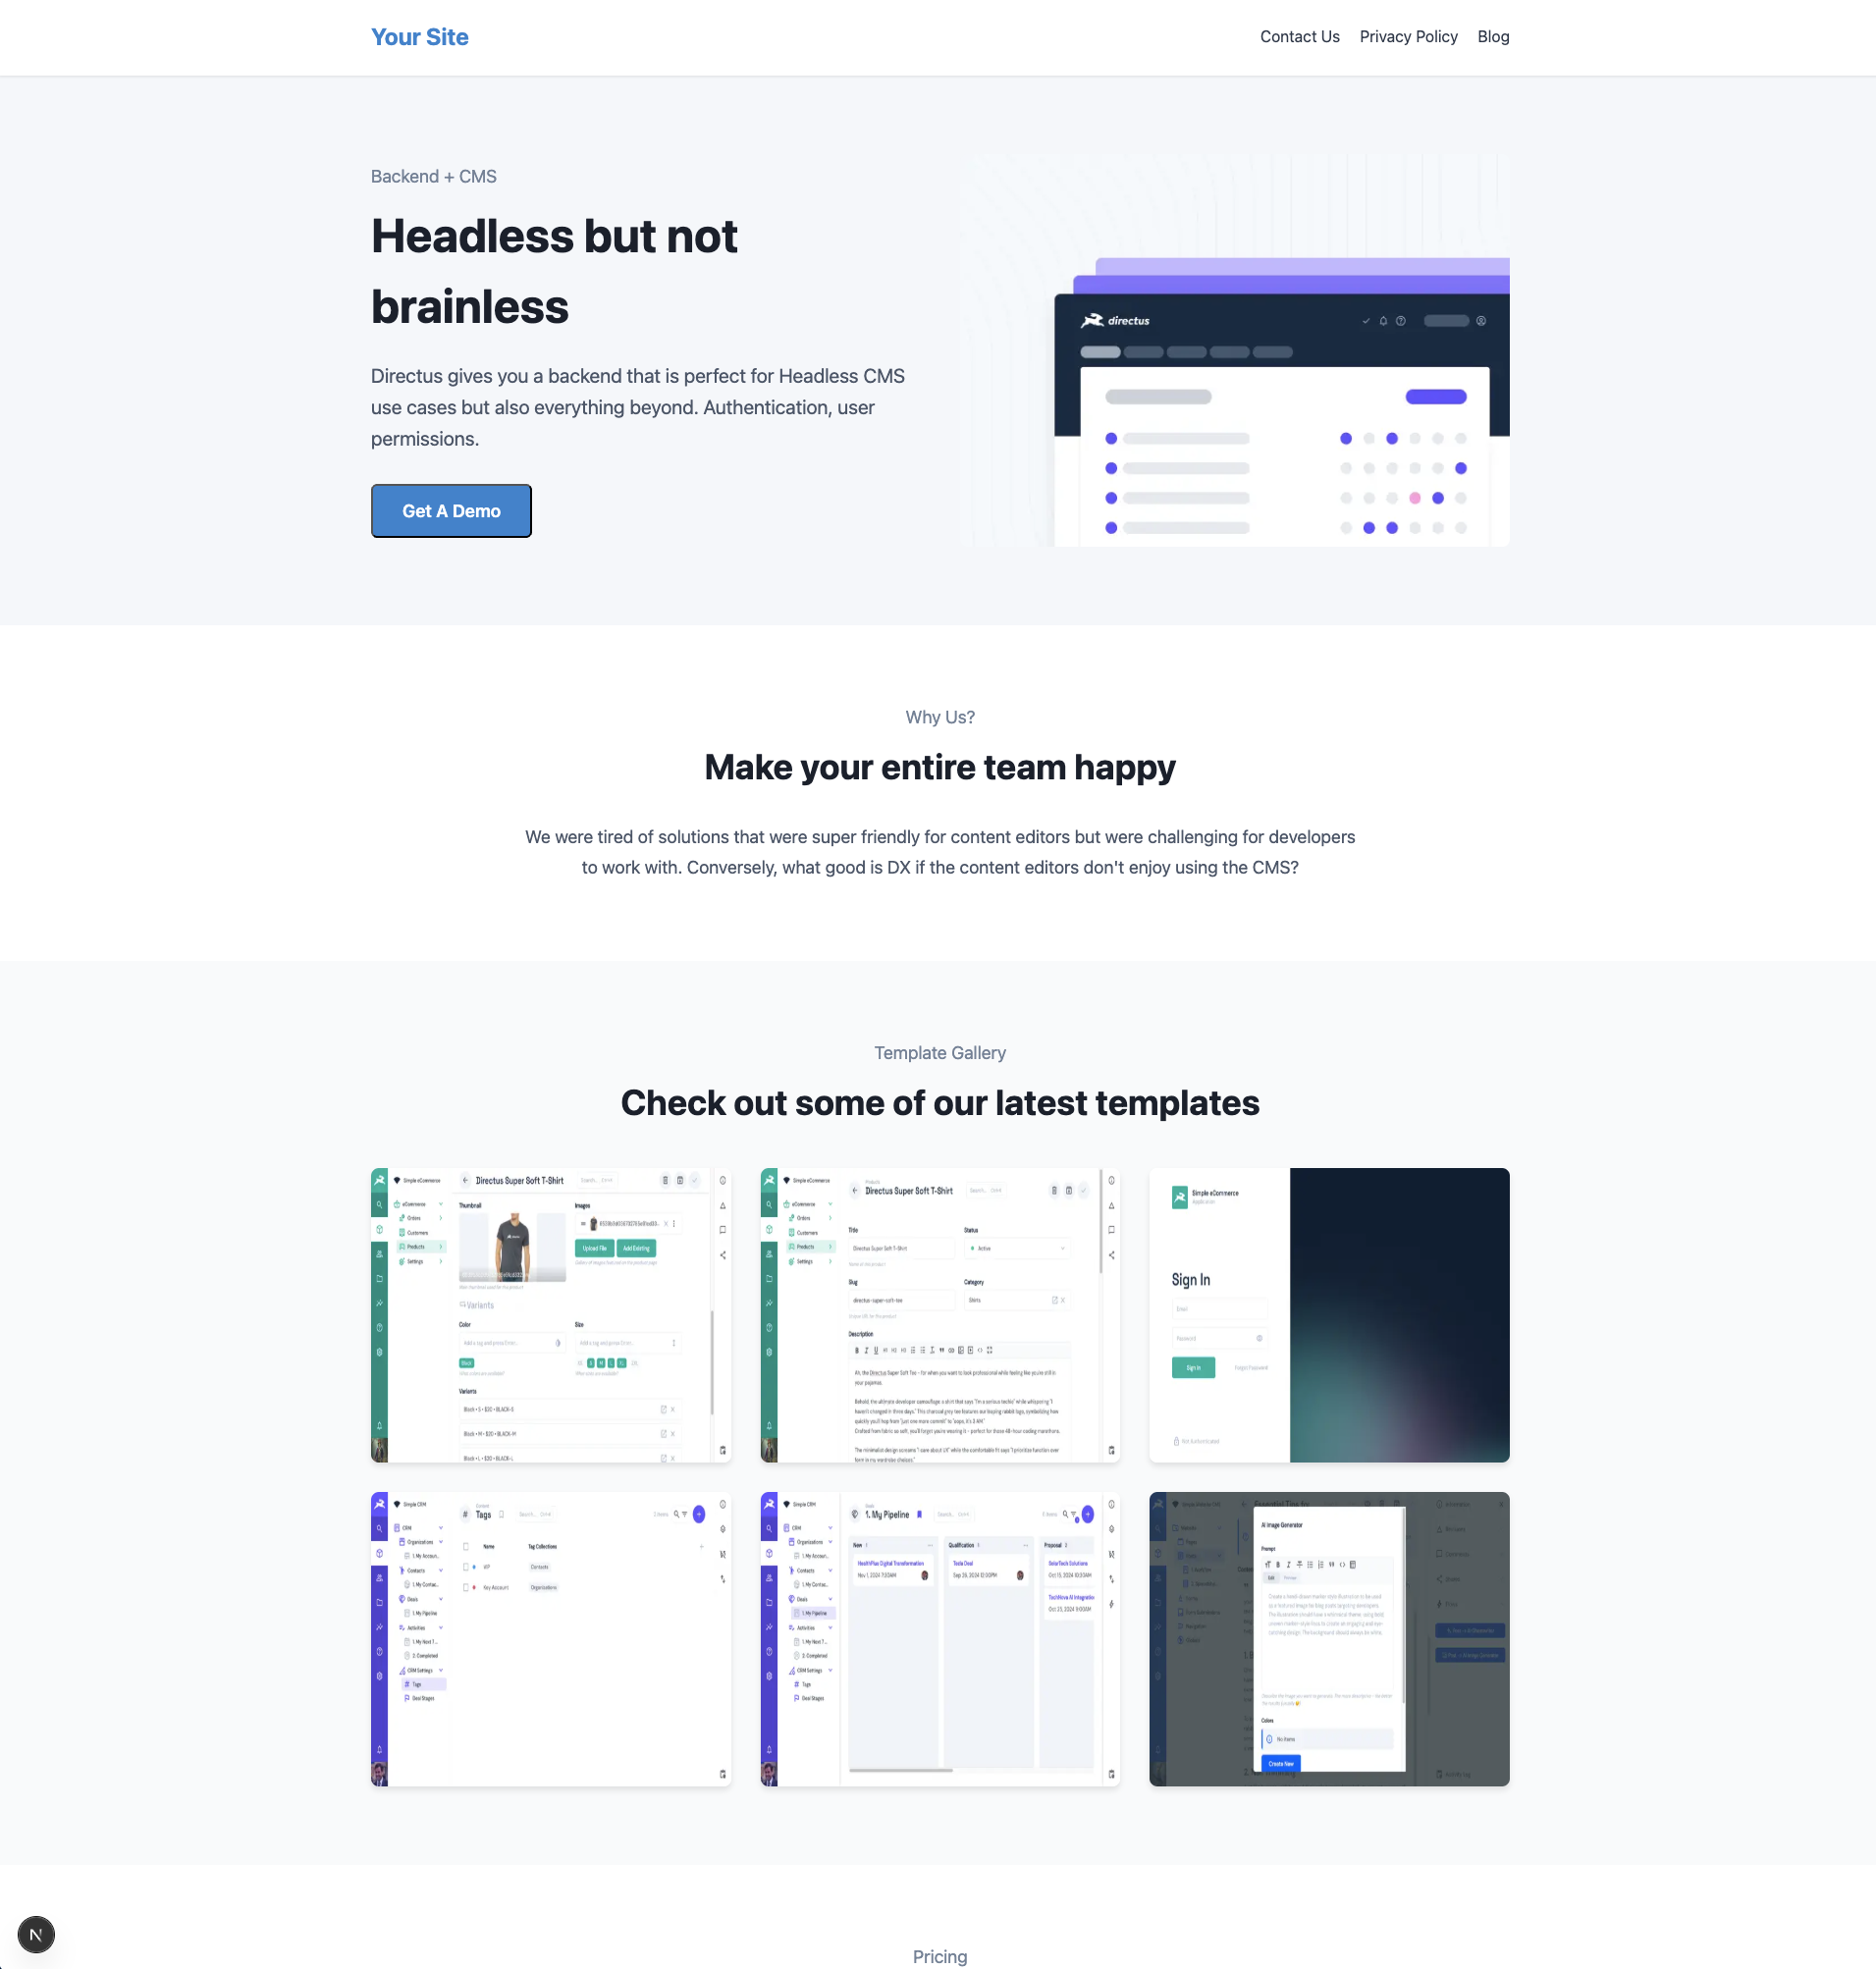
This component uses the Directus SDK to fetch the page with the permalink value / for the homepage and then renders a list of components you created earlier based on the blocks data it receives from Directus.
Since the header and footer data is stored in a different collection (named navigation), another Directus SDK call is used to retrieve that information.
You can now try running the app using the command npm run dev and view the app at http://localhost:3000
Add SEO
The Directus CMS template also comes with support for SEO metadata configuration out of the box. You can add the following function to your app/page.js file to retrieve the SEO details for the page and apply them to the app:
export async function generateMetadata() {
  // Fetch homepage data for SEO
  const seoData = await client.request(
    readItems('pages', {
      filter: {
        permalink: {
          _eq: '/'
        }
      },
      fields: [
        "seo"
      ]
    })
  );

  if (!seoData || seoData.length === 0) {
    return {
      title: 'Default Title',
      description: 'Default Description',
    };
  }

  const pageData = seoData[0];

  return {
    title: pageData.seo.title,
    description: pageData.seo.description,
  };
}
For now, the code only sets the page title and SEO description using the data it receives from Directus. You can configure other SEO metadata fields based on your requirements here.
Create Other Pages
At this point, you can use the existing components to create a template to render all the pages listed in the Directus instances without having to code them manually. To do that, save the following code in the file app/[slug]/page.js:
import client from '../../lib/directus';
import { readItems } from '@directus/sdk';
import HeroSection from '../components/HeroSection';
import RichTextSection from '../components/RichTextSection';
import GallerySection from '../components/GallerySection';
import PricingSection from '../components/PricingSection';
import FormSection from '../components/FormSection';
import Header from '../components/Header';
import Footer from '../components/Footer';
import Posts from '../components/Posts';

export async function generateMetadata({params}) {
  // Instead of using `/`, this code uses the slug to retrieve the page details
  const { slug } = await params
  const seoData = await client.request(
    readItems('pages', {
      filter: {
        permalink: {
          _eq: `/${slug}`
        }
      },
      fields: [
        "seo"
      ]
    })
  );

  if (!seoData || seoData.length === 0) {
    return {
      title: 'Default Title',
      description: 'Default Description',
    };
  }

  const pageData = seoData[0];

  return {
    title: pageData.seo.title,
    description: pageData.seo.description,
  };
}

export default async function Page({params}) {

  // Instead of using `/`, this code uses the slug to retrieve the page details
  const { slug } = await params;

  const homepageData = await client.request(
    readItems('pages', {
      filter: {
        permalink: {
          _eq: `/${slug}`
        }
      },
      fields: [
        "*",
        "blocks.*",
        "blocks.item.*.*.*",
      ]
    })
  );

  const hero_data = homepageData[0].blocks?.filter(block => block.collection === 'block_hero')?.[0];
  const rich_text_data = homepageData[0].blocks?.filter(block => block.collection === 'block_richtext')?.[0];
  const gallery_data = homepageData[0].blocks?.filter(block => block.collection === 'block_gallery')?.[0];
  const pricing_data = homepageData[0].blocks?.filter(block => block.collection === 'block_pricing')?.[0];
  const form_data = homepageData[0].blocks?.filter(block => block.collection === 'block_form')?.[0];
  const posts = homepageData[0].blocks?.filter(block => block.collection === 'block_posts')?.[0];

  const navigationData = await client.request(
    readItems('navigation', {
      fields: [
        "*.*.*.*",
      ]
    })
  );

  return (
    <main>
      <Header
        navigation={navigationData}
      />

      <>
        {hero_data && <HeroSection
          tagline={hero_data.item.tagline}
          headline={hero_data.item.headline}
          description={hero_data.item.description}
          image={hero_data.item.image}
          layout={hero_data.item.layout}
          button_group={hero_data.item.button_group.buttons}
        />}

        {rich_text_data && <RichTextSection
          {...(rich_text_data.item)}
        />}

        {gallery_data && <GallerySection
          {...(gallery_data.item)}
        />}

        {pricing_data && <PricingSection
          {...(pricing_data.item)} />}

        {posts && <Posts
          {...(posts.item)}
        />}

        {form_data && <FormSection
          {...(form_data.item)}
        />}

      </>

      <Footer
        navigation={navigationData}
      />

    </main>
  );
}
Instead of using the homepage path / to retrieve the page, this component uses the slug of the current webpage to retrieve the page details. You can try saving this and re-running the app to view other pages of the CMS website.
Here's what the contact us page looks like:
Here's what the blog page looks like:
You can find the complete code for the Next.js app built in this tutorial here.
Conclusion
In this article, you learned how to use the Directus Template CLI to set up a full-fledged CMS using Directus and Next.js. With the components that you have built above, you can experiment creating more variations of pages as per your liking. You can even try implementing multiple design variants using Directus' out-of-the-box support for background variants, or go a step further and implement conditional display based on the "hide block" field of the blocks.