Build Forms Dynamically using Directus and Astro
Directus' data studio allows you to create data for your collections. You can then leverage these collections with Astro to generate dynamic and interactive forms for your application.
Before You Start
You will need:
- A Directus project with admin access.
- Fundamental understanding of Astro concepts.
- Optional but recommended: Familiarity with data modeling in Directus.
Set Up Your Directus Project
To get started, you will need to set up a Directus project. You can use Directus either by self-hosting it or using Directus Cloud.
Create a Collection
Create a new collection called posts with the following fields:
title(Type: String)content(Type: markdown)slug(Type: String)category(Type: Dropdown with options ofblog post,tutorialandannouncement)published(Type: datetime)
On the data model page for the posts collection, click the three dots next to the slug field and pick half-width to reduce the field's width to half that of the form. Also do the same for the category field.
Edit Public Policy
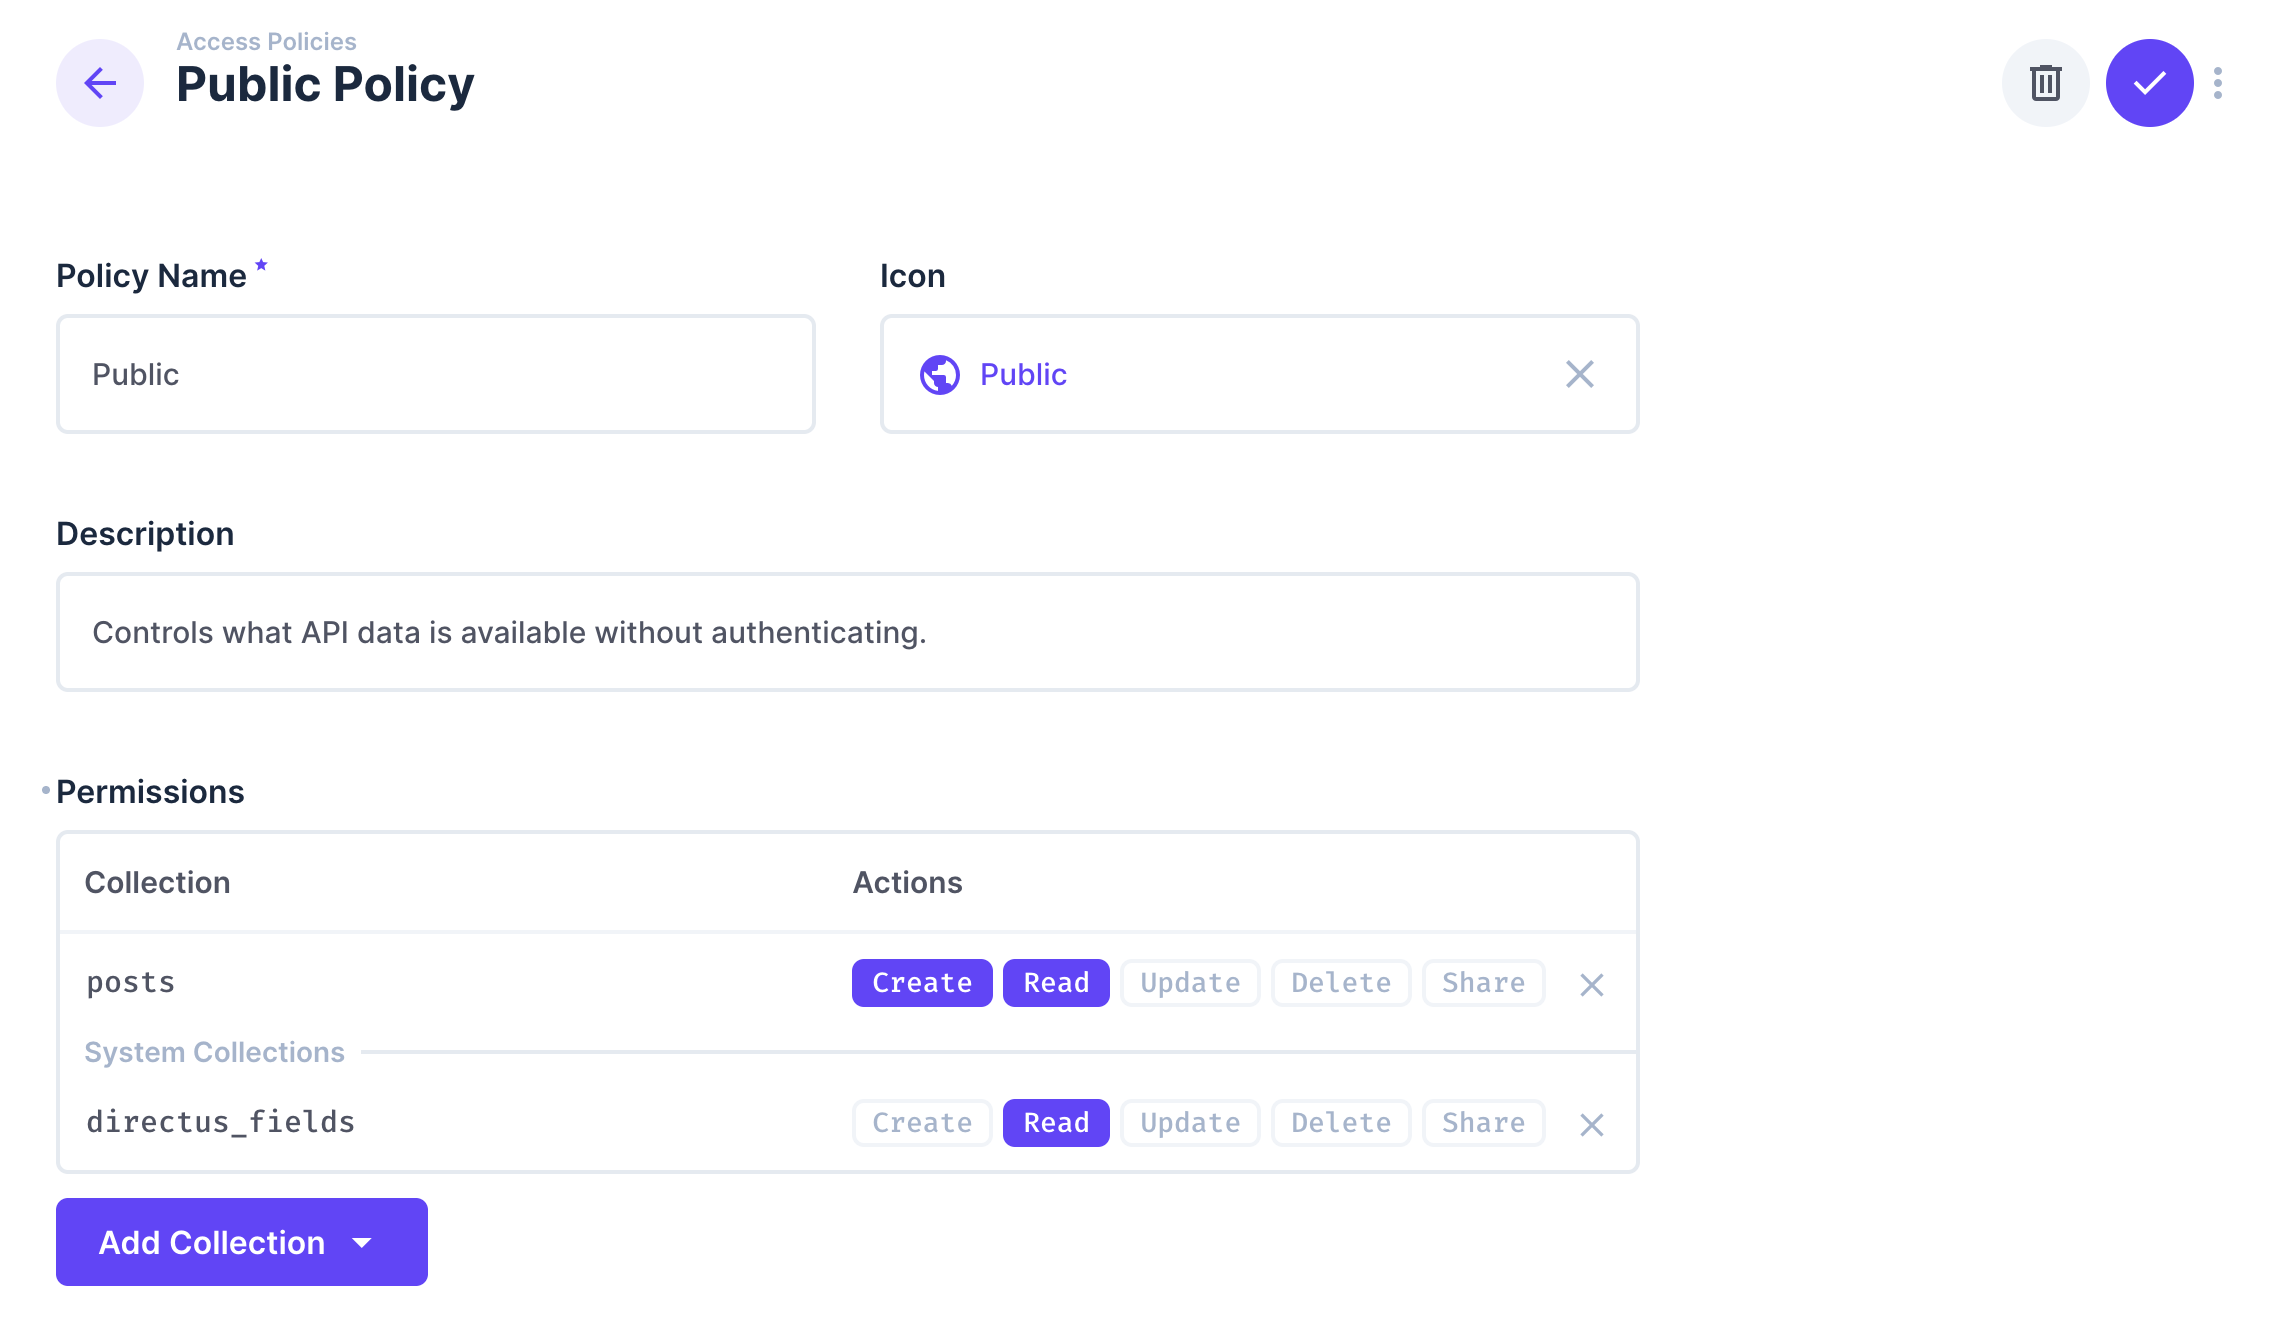
To allow public access to the collection, you will need to edit the public policy for the posts collection. To do this, navigate to Settings -> Access Policies -> Public grant Create and Read permissions for the posts collection.
You also need to grant full access to directus_fields collection so your public policy looks like the image below:

Add Slug Validation
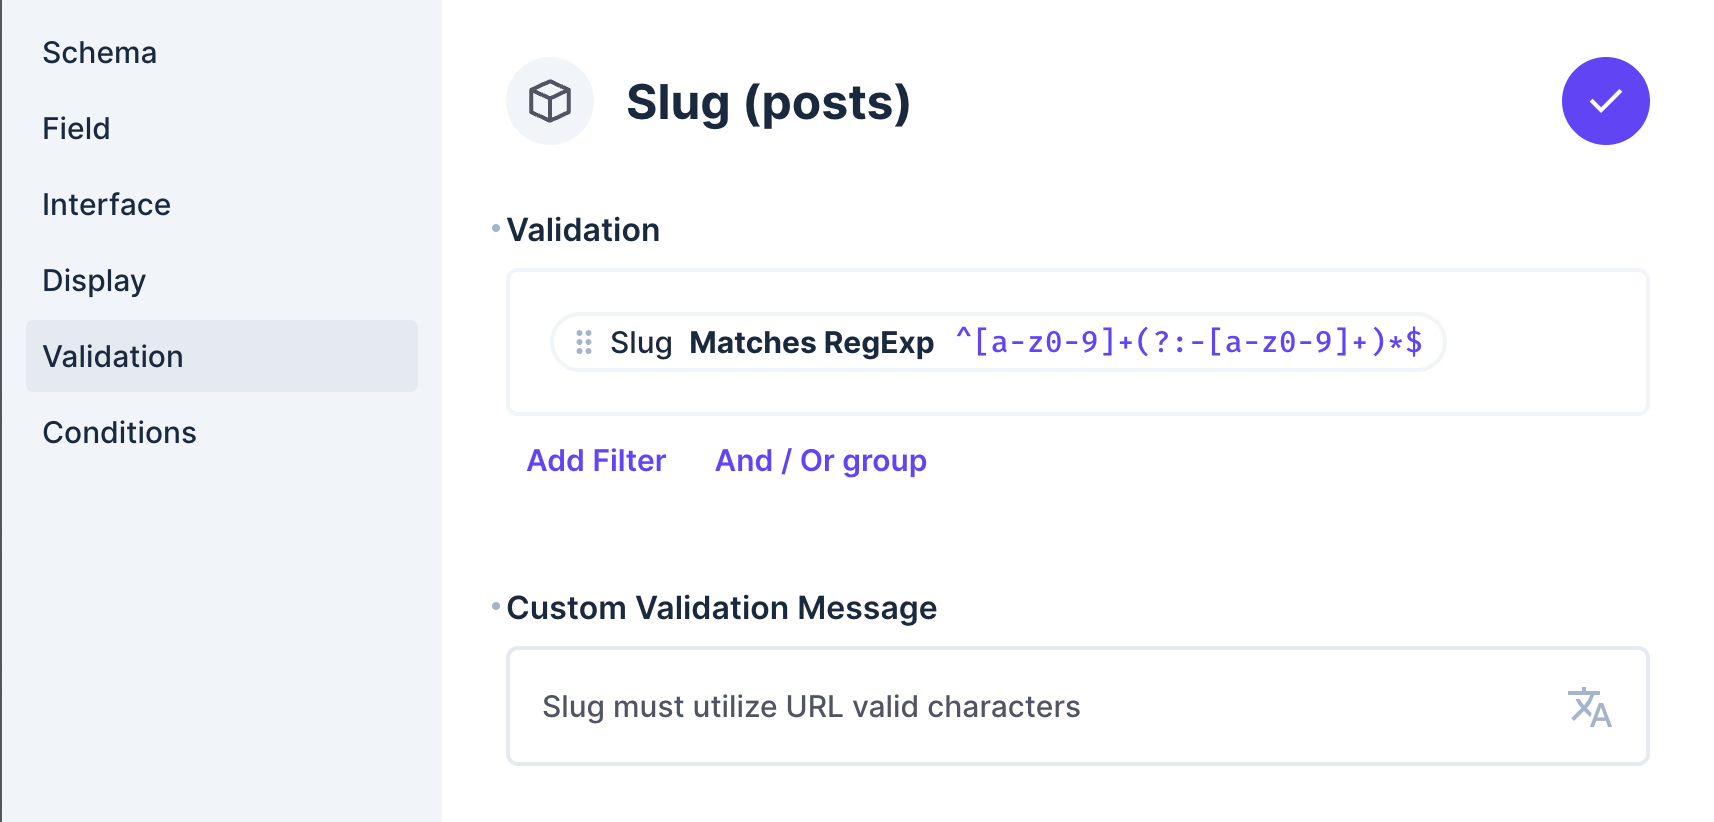
Directus includes a default option that can be applied to the slug field to ensure that only URL-safe characters are used. However, for the purposes of this tutorial, you'll add a custom validation to this field, which can then be shared with Astro on the frontend.
To validate the slug field, select Validation and enter the Regex expression ^[a-z0-9]+(?:-[a-z0-9]+)*$. Add the custom validation message Slug must utilize URL valid characters and save.

Set Up Your Astro Project
Initialize Your Project
Create a new Astro project by running the command:
npx create-astro@latest astro-dynamic-form
When prompted, select the following configurations:
How would you like to start your new project? A basic, minimal starter (recommended)
Install dependencies? (recommended) Yes
Initialize a new git repository? (optional) No
Navigate into the project directory and install the Directus SDK by running the command:
npm install @directus/sdk
Next, run the command npm run dev to start the development server and you should have the Astro project running on http://localhost:4321/ in your browser.
Configure the Directus SDK
First, create a .env file in the root of your project and add the following environment variables:
DIRECTUS_URL=https://your-directus-project-url.com
Next, update the astro.config.mjs file to render the application on the server as an SSR application:
// @ts-check
import { defineConfig } from 'astro/config';

// https://astro.build/config
export default defineConfig({
  output: "server",
});
In the src directory, create a lib directory and inside of it, create a directus.ts file to set up your Directus client instance and create a function called getCollectionFields to fetch the fields of a particular collection:
/// <reference types="vite/client" />
import { createDirectus, readFieldsByCollection, rest } from "@directus/sdk";

const DIRECTUS_URL = import.meta.env.DIRECTUS_URL;

export async function getCollectionFields(collection: string) {
  try {
    const response = await client.request(readFieldsByCollection(collection));
    return response;
  } catch (error) {
    console.error(`Error fetching fields for collection ${collection}:`, error);
    return [];
  }
}

const client = createDirectus(DIRECTUS_URL).with(rest());

export default client;
The code above does the following:
- Imports the necessary functions from the Directus SDK.
- Creates a Directus client instance using the URL from the environment variable.
- Defines a function
getCollectionFieldsthat takes a collection name as an argument and fetches the fields for that collection using thereadFieldsByCollectionfunction from the SDK.
Build a form from the data
Before moving forward, take a moment to review the data structure returned by the getCollectionFields function.
Create a new file named Form.astro inside the src/components directory, and insert the following code:
---
import { getCollectionFields } from '../lib/directus'

if (Astro.request.method === "POST") {
  // Handle form submission logic
}

const data = await getCollectionFields('posts');

console.log(data);
---

<form method="POST">
<p>dynamic form based on data from Directus</p>
</form>
Then, update the src/pages/index.astro file to import and use the Form component:
---
import Layout from '../layouts/Layout.astro';
import Form from '../components/Form.astro';

---

<Layout>
    <h1>Directus Dynamic form in Astro</h1>
    <Form />
</Layout>
Now, when you run the Astro project with npm run dev and navigate to http://localhost:4321/, you should see the console log of the data returned from the getCollectionFields function.
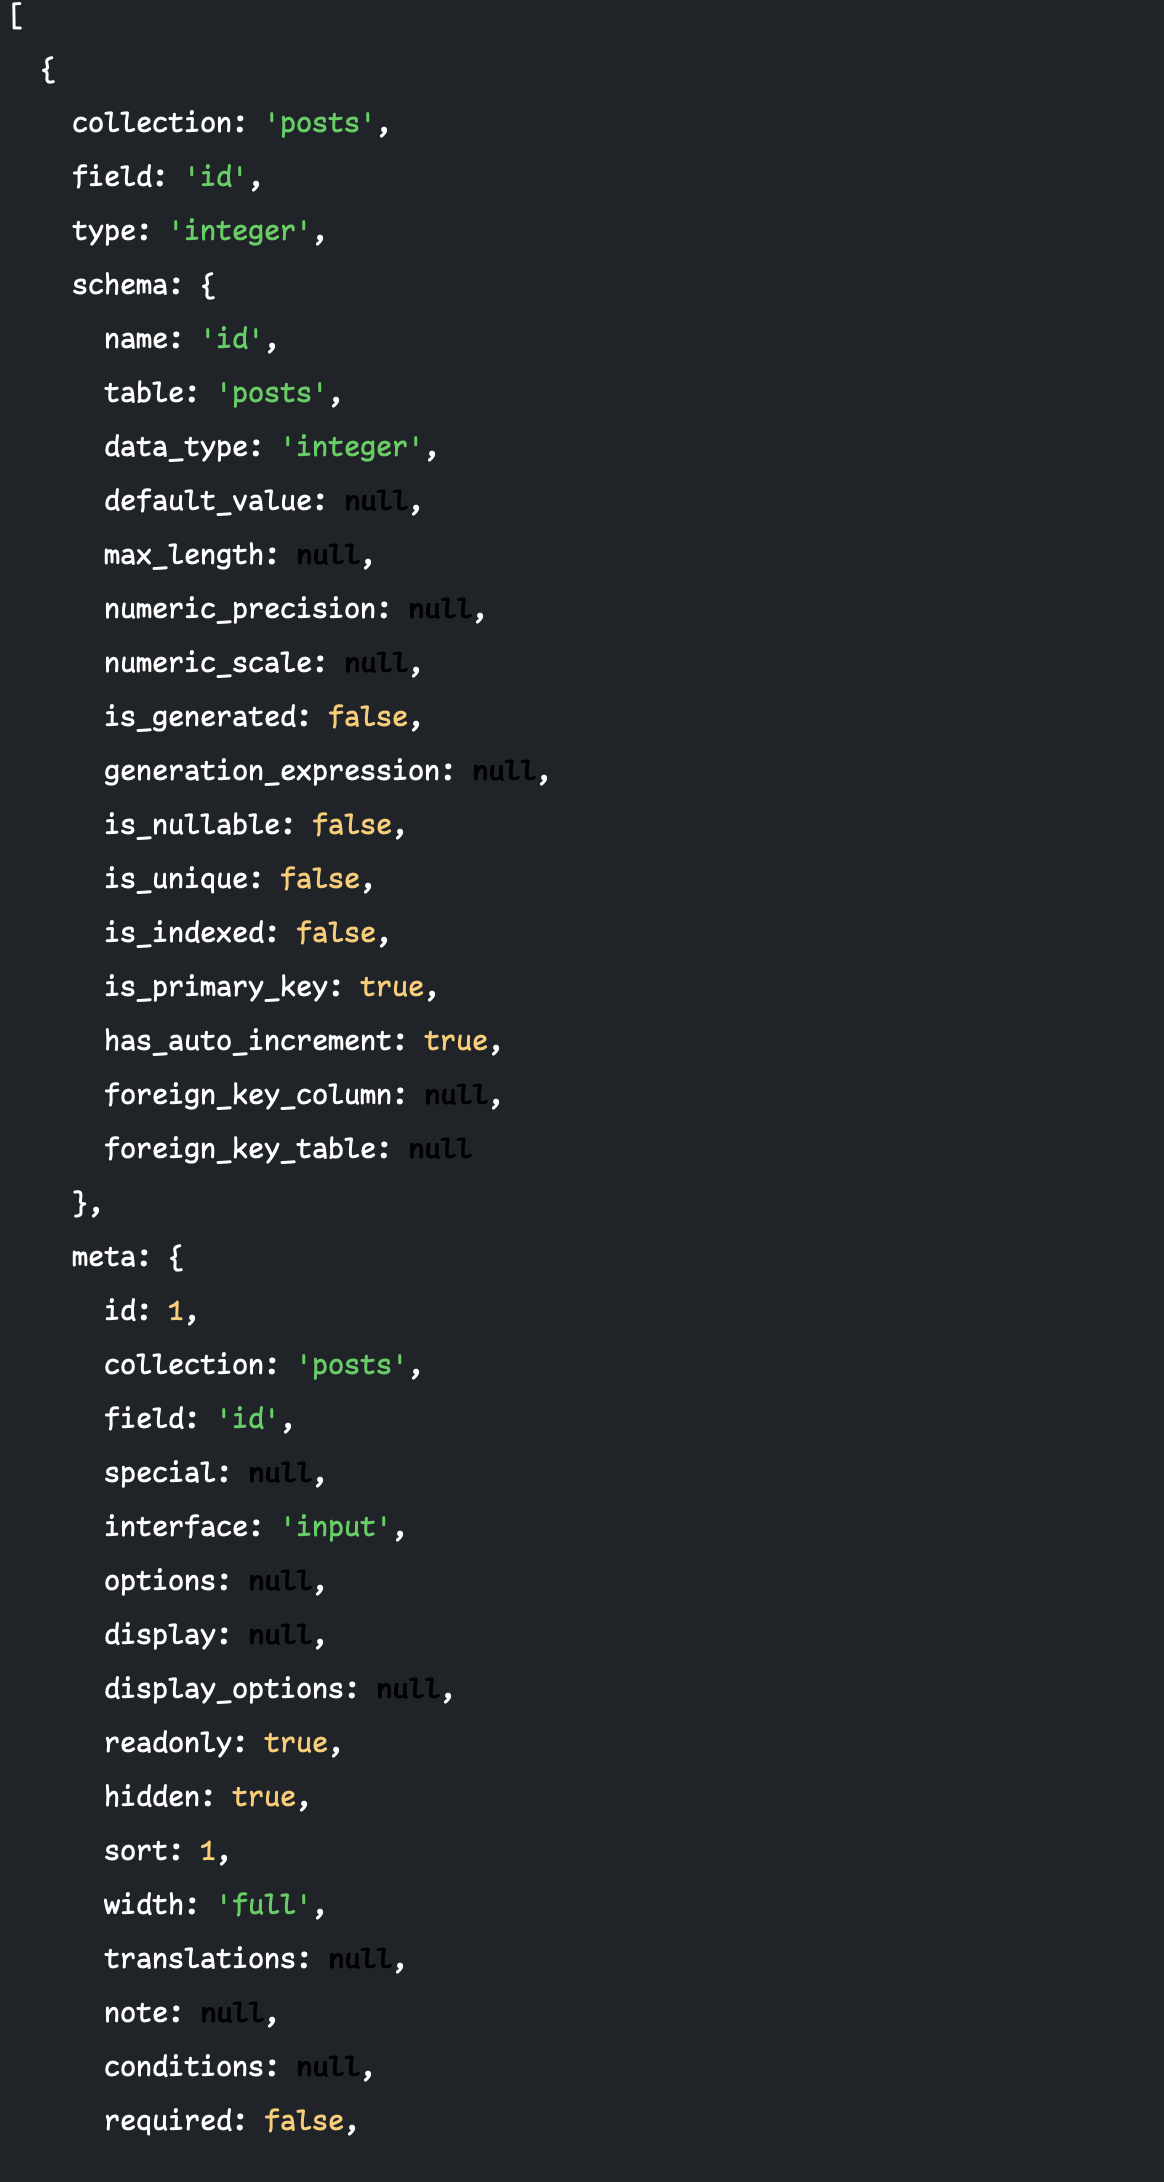
This would provide you with a data structure that looks like this:

This response contains all the information about the fields in the collection. Make sure to look at the meta field interface which identifies the form element to be used to manage the field. In this example, there are 4 different interfaces:
- input
- input-rich-text-md
- select-dropdown
- datetime
Using each interface, you will build a component for each of these form input interfaces and display them based on the configurations of the fields.
To build the form, you need to create a component that would map each of the fields to a form input. Create a new file called FieldsToComponents.astro in the src/components directory and add the following code:
---
import Input from './Input.astro';
import Select from './Select.astro';
import Textarea from './Textarea.astro';
import DateTime from './DateTime.astro';


const { fields } = Astro.props;
---

{fields.map((field: any) => {
  if (field.meta.hidden) return null;
  const View = (
  field.meta.interface === 'input' ? Input :
  field.meta.interface === 'input-rich-text-md' ? Textarea :
  field.meta.interface === 'select-dropdown' ? Select :
  field.meta.interface === 'datetime' ? DateTime  : () => null
  )
  return View && <View {...field} />
})}
The code above:
- Imports the necessary components for each of the field types.
- Maps through the fields and checks if the field is hidden. If it is, it returns null.
- Based on the field's interface, it selects the appropriate component to render.
- Passes the field data as props to the selected component.
With this component in place, you can now render the fields dynamically based on the data returned from Directus.
Now, create the components for each of the field types.
Create the input Component
Create a new file called Input.astro in the src/components directory and add the following code:
---

interface Props {
  field: string;
  [key: string]: any;
  meta: {
    interface: string;
    hidden: boolean;
    readonly: boolean;
    required: boolean;
    width: string;
    [key: string]: any;
  };
}

const {
  field,
  meta
} = Astro.props;


const fieldWidth = meta?.width === 'full' ? '100%' : '50%';
---

<div style={`width: ${fieldWidth};`}>
  <label for={field}>
    <span>{field}:</span>
  </label>
  <input
  type="text"
    name={field}
    id={field}
    required={meta.required}
    readonly={meta.readonly}
    style={`width: ${fieldWidth};`}
  />
</div>
input-rich-text-md component
Use a textarea element to handle the markdown content. In a real-world application, you would typically use a markdown WYSIWYG component. Create a new file called TextArea.astro and add the following code:
---
interface Props {
  field: string;
  type: string;
  meta: {
    interface: string;
    hidden: boolean;
    readonly: boolean;
    required: boolean;
    width: string;
    [key: string]: any;
  };
}

const {
  field,
  meta
} = Astro.props;

---

<div>
  <label for={field}>
    <span>{field}</span>
  </label>
  <textarea
    name={field}
    id={field}
    required={meta.required}
    readonly={meta.readonly}
    rows={5}
  ></textarea>
</div>
Create the select-dropdown component
This component will handle the dropdown field using the options properties that would be coming from the data. Create a new file called Select.astro and add the following code:
---
interface Option {
  text: string;
  value: string | number;
}

interface Props {
  field: string;
  [key: string]: any;
  meta: {
    interface: string;
    hidden: boolean;
    readonly: boolean;
    required: boolean;
    width: string;
    options: {
      choices: Option[];
    };
    [key: string]: any;
  };
}

const {
  field,
  meta
} = Astro.props;

const fieldWidth = meta?.width === 'full' ? '100%' : '50%';
---

<div style={`width: ${fieldWidth};`}>
  <label for={field}>
    <span>{field} : </span>
  </label>
  <select
    name={field}
    id={field}
    required={meta.required}
    style="width: 100%;"
    readonly={meta.readonly}
  >
    {meta.options.choices.map((option) => (
      <option value={option.value}>{option.text}</option>
    ))}
  </select>
</div>
Create the datetime component
This component will handle the datetime field. Create a new file called DateTime.astro and add the following code:
---
interface Props {
  field: string;
  [key: string]: any;
  meta: {
    interface: string;
    hidden: boolean;
    readonly: boolean;
    required: boolean;
    width: string;
    [key: string]: any;
  };
}
const {
  field,
  meta
} = Astro.props;

const fieldWidth = meta?.width === 'full' ? '100%' : '50%';
---

<div style={`width: ${fieldWidth};`}>
  <label for={field}>
    <span>{field}</span>
  </label>
  <input
    type="datetime-local"
    name={field}
    id={field}
    required={meta.required}
    readonly={meta.readonly}
    style="width: 100%;"
  />
</div>
To show the fields, update the Form.astro file with the following code:
---
import FieldsToComponents from '../components/FieldsToComponents.astro';
import { getCollectionFields } from '../lib/directus';

if (Astro.request.method === "POST") {

// Handle form submission logic
  // You will add this logic in the next section

}

const data = await getCollectionFields('posts');
---

<form method="POST">

  <FieldsToComponents fields={data} />
  <div>
    <button type="submit">Submit</button>
  </div>
</form>
Visiting http://localhost:4321/ should now show the form with the fields rendered based on the data returned from Directus.
Validate and Save the Data
While Directus validates data on the server-side, you can also use the validations from the field data to validate on the client side as well. You can see from the component code above that the components are already checking the Directus required property and adding this to the form element to use default HTML validation.
Also, when you created the posts collection you added a regular expression validation to the slug field. You can now use this validation on the client side to ensure the entered slug is URL-safe before submitting it to Directus.
To do this, you will need to make changes to the components/Form.astro file to add the validation and submission logic. Update the component with the following code:
---
import FieldsToComponents from '../components/FieldsToComponents.astro';
import { getCollectionFields } from '../lib/directus';
import { createItem } from '@directus/sdk';


import client from '../lib/directus';

let formData: Record<string, string> = {};
let message = '';
let error = false;

if (Astro.request.method === "POST") {
  try {
    const data = await Astro.request.formData();

    // Convert FormData to object
    for (const [key, value] of data.entries()) {
      formData[key] = value.toString();
    }

    const postsFields = await getCollectionFields('posts');

    // Validate form data
    for (const field of postsFields) {
      const value = formData[field.field];
      const validation = field.meta?.validation;

      if (validation?._and) {
        try {
          for (const rule of validation._and) {
            const fieldName = Object.keys(rule)[0];
            if (rule[fieldName]?._regex) {
              const regex = new RegExp(rule[fieldName]._regex);
              if (!regex.test(value)) {
                const msg = field.meta?.validation_message || `${field.meta?.field} failed validation`;
                error = true;
                message = msg;
                break;
              }
            }
          }
        } catch (err) {
          console.error(`Error parsing validation for ${field.field}:`, err);
          error = true;
          message = `Error validating ${field.field}`;
          break;
        }
      }
    }

    // If validation passes, submit to Directus
    if (!error) {
      await client.request(createItem('posts', formData));
      message = 'Post created successfully';
    }
  } catch (error: any) {
    console.error('Error creating post:', error);
    error = true;
    message = error.message || 'Failed to create post';
  }
}

const data = await getCollectionFields('posts');
---

<form method="POST">
  {message && (
    <div class={`message ${error ? 'error' : 'success'}`}>
      {message}
    </div>
  )}

  <FieldsToComponents fields={data} />

  <div>
    <button type="submit">Submit</button>
  </div>
</form>
The form will now allow submission of the data to Directus but will first go through a validation process before submission. The validation loops through each field looking for Directus validation rules and then executes them. If any validation fails the form will not submit and an error message will be displayed.
This example is limited to the regex validation added to the slug field. You can expand this to include other validation rules from Directus.
Summary
In this tutorial, you learned how to create a dynamic form in Astro using data from Directus. You set up a Directus project, created a collection, and then built an Astro project that fetches the fields from the collection and renders them as form inputs. You also added validation and submission logic to handle the form data.
The readFieldsByCollection method from the Directus SDK allows you to query the fields of a collection and dynamically generate fully validated forms in Astro. This is a great way to create forms that are flexible and can adapt to changes in your Directus collections without needing to hard-code the form structure in your Astro project.
From here you could expand the example to include more complex validation rules, custom form elements, an edit form or dynamically display and handle relational data.