Using Authentication in Nuxt
Introduction
Authentication is a critical part of any modern web application, ensuring that users can securely access their data and perform authorized actions. In this tutorial, you will learn how to implement authentication in your Nuxt application using Directus' built-in authentication system.
Before You Start
You will need:
- A Directus project with admin access.
- Fundamental understanding of Nuxt concepts.
- Optional but recommended: Familiarity with data modeling in Directus.
Set Up Your Directus Project
Before building your authentication system, configure Directus with the necessary collections and permissions.
Configure CORS
You may need set your content security policy to allow access to your Nuxt project. For example if you are self-hosting, or in development, and using Docker, then this is achieved by updating your docker-compose.yml file as follows:
environment:
  CONTENT_SECURITY_POLICY_DIRECTIVES__FRAME_SRC: your-website-url
Replace
your-website-urlwith your Nuxt URL and the port. eg. If your Nuxt URL ishttp://localhost:3000, replaceyour-website-urlwithlocalhost:3000.
Create a Collection
Create a new collection called 'posts' with the user_created optional field and the following custom fields:
title(Type: String)content(Type: Markdown)author(Type: Collection -> Directus Users)
Configure Roles, Policies, and Permissions
Create a new role called 'Authenticated User'. In this role, you will create a number of policies.
Create a 'Can Read and Create Posts' policy with the following permissions for the posts collection:
- Read: Allow
- Create: Custom
- In Field Permissions, check all fields except
user_createdandauthorso the user cannot set any user values. - In Field Presets, add the following value to set the value automatically:
- In Field Permissions, check all fields except
{
    "author": "$CURRENT_USER"
}
Create a 'Can Edit and Delete Own Posts' policy with the following permissions for the posts collection:
- Update: Custom
- In Item Permissions, set
user_createdto$CURRENT_USERto only allow update actions for items created by the currently-authenticated user.
- In Item Permissions, set
- Delete: Custom (use the same Item Permissions as Update)
Create a 'Can View and Edit Own Profile' policy with the following permissions for the directus_users collection:
- Read: Custom
- In Item Permissions, set
idto$CURRENT_USERto only allow users to view their own profile.
- In Item Permissions, set
- Update: Custom (use the same Item Permissions as Read)
Create a 'Can access Directus App' policy with the 'App Access' checkbox ticked. Leave all the other permissions as they are for this policy. This will give any user created in the front in access to add posts in the Directus app. This may or may not be what is desired in a real application but it gives the ability to quickly add example posts.
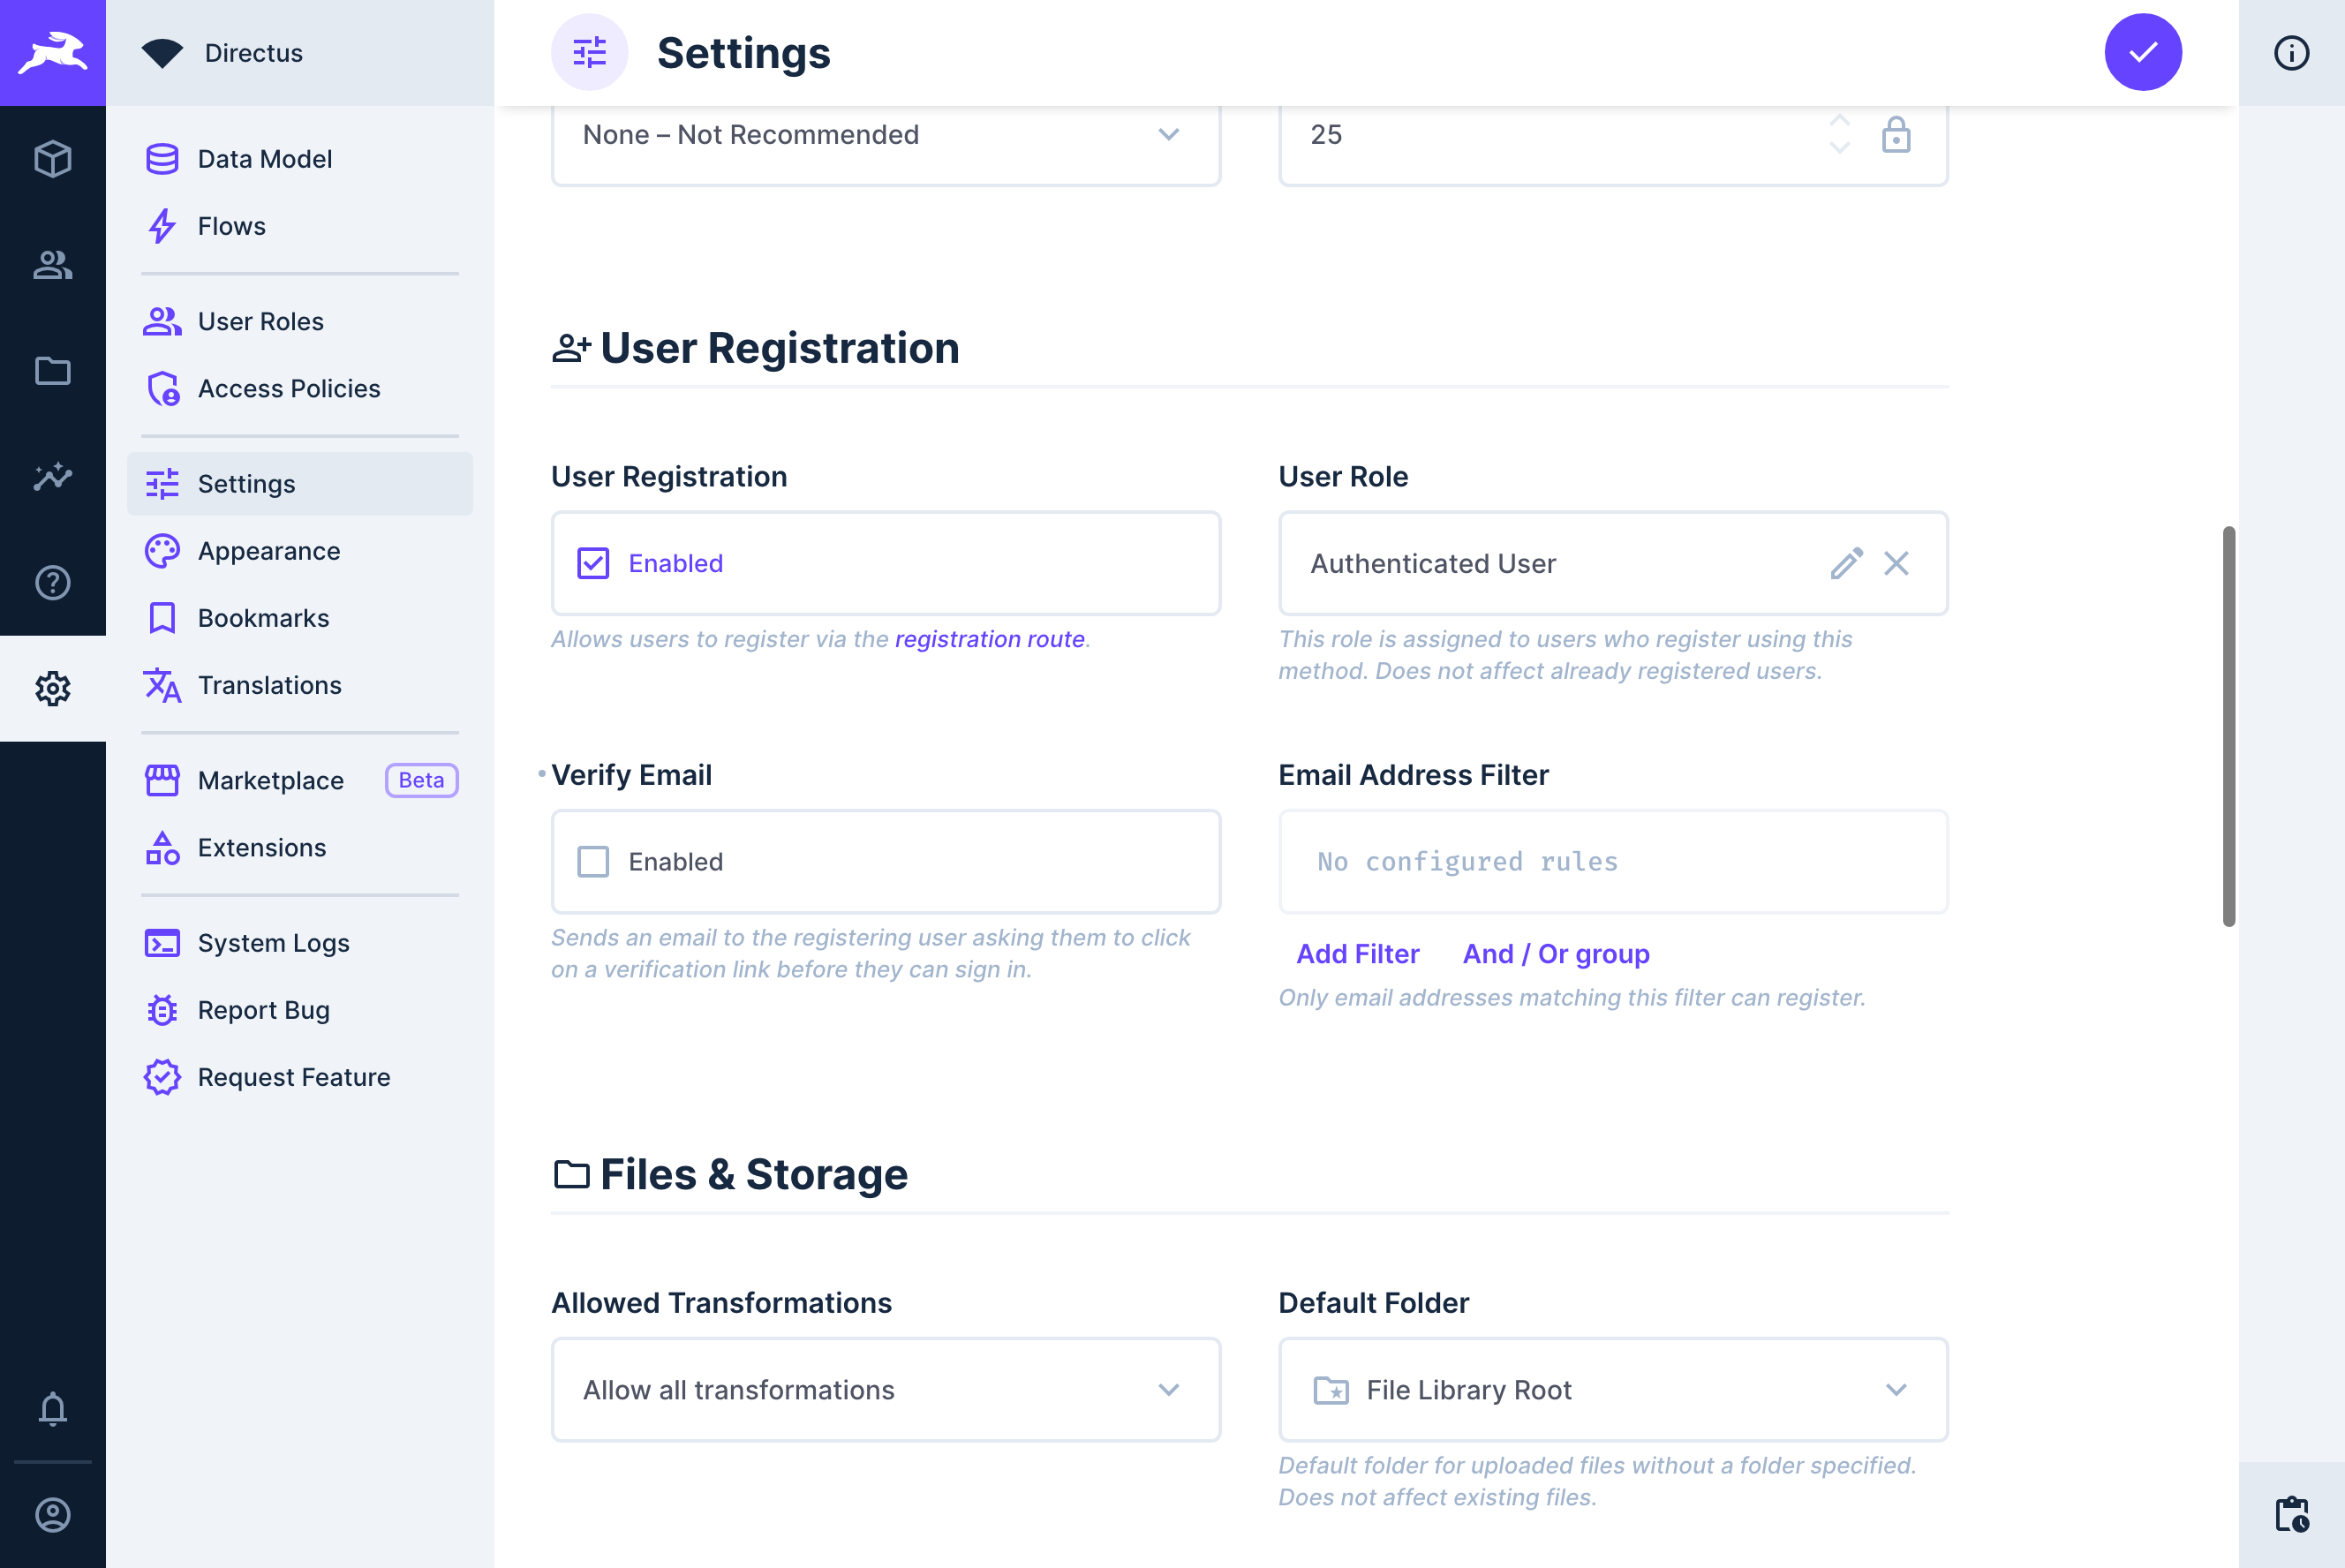
Enable Public Registration
Public registration allows any user to create a user in your Directus project directly from the Data Studio or via API.
Navigate to Project Settings → User Registration and enable the setting. Set the default role to 'Authenticated User'. New users will automatically be given this role, which gives them all of the permissions you set up in the previous step.
Also make sure Verify email is unchecked - in a production environment you would want to enable this, but it won't be implemented in this tutorial.
Your settings should look like the image below:
Set Up Your Nuxt Project
Initialize Your Project
Create a new Nuxt project using Nuxi:
npx nuxi@latest init directus-auth
cd directus-auth
Inside our Nuxt project install the Directus SDK package by running:
npm install @directus/sdk
Remove <NuxtWelcome /> from app.vue and replace with <NuxtPage /> so this it looks like as follows:
<template>
  <div>
    <NuxtRouteAnnouncer />
    <NuxtPage />
  </div>
</template>
Create a pages folder in the root of your project.
Configure Nuxt
Configure Nuxt so that it is able to communicate with the (external) Directus API.
Create a .env file with the Directus URL:
API_URL="http://0.0.0.0:8055/**"
Add a type definition for our new environment variable by creating an env.d.ts file with the following content:
/// <reference types="vite/client" />
interface ImportMetaEnv {
    readonly API_URL: string;
}

interface ImportMeta {
    readonly env: ImportMetaEnv;
}
Depending on your project configuration and if you are in development or production you may need to configure a Nuxt proxy to allow access between your Nuxt project and Directus in your nuxt.config.ts:
routeRules: {
  "/directus/**": {
    proxy: {
      to: import.meta.env.API_URL + "/**"
    }
  },
},
This will allow your Nuxt project to access directus via your Nuxt URL, eg. http://localhost:3000/directus
Define a Directus Schema
Typescript needs to know what the structure of our Directus data will be. To achieve this create a directus.d.ts file in the root of our project which defines our schema:
/// <reference types="@directus/extensions/api.d.ts" />

interface DirectusSchema {
  posts: Post[];
}

interface Post {
  id: number;
  title: string;
  content: string;
  user_created: string;
}
Configure the Directus SDK
Create a new plugin file in the plugins directory called directus.ts:
import { createDirectus, rest, readItems, registerUser } from "@directus/sdk";

const directus = createDirectus("http://localhost:3000/directus").with(rest());

export default defineNuxtPlugin(() => {
    return {
        provide: { directus, readItems, registerUser },
    };
});
Implement User Registration
Create a new page for registration pages/register.vue, this will allow users to enter their email and password to create a new account:
<script setup lang="ts">
const { $directus, $registerUser } = useNuxtApp()

const email = ref('')
const password = ref('')
const result = ref(false)

const register = async () => {
    try {
        await $directus.request($registerUser(email.value, password.value))
        result.value = true
        password.value = ''
    } catch (error) {
        console.error(error)
        result.value = false
        password.value = ''
    }
}
</script>
<template>
    <form @submit.prevent="register">
        <h1>Register</h1>
        <div v-if="result">
            <p>Successfully registered</p>
        </div>
        <div>
            <input required type="text" v-model="email" name="email" placeholder="Email" />
        </div>
        <div>
            <input required type="password" v-model="password" name="password" placeholder="Password" />
        </div>
        <button type="submit">Register</button>
    </form>
</template>
This form is ready to by used. Visit http://your-website-url/register to test it out. Enter some user credentials and click Register, you should see a "Successfully registered" message appear. To confirm a user was created go back to Directus and click "User Directory", you should see the user you just created.
Implement User Login
To give users the ability to log in to their account create a new page for login pages/login.vue:
<script setup lang="ts">
const { $directus } = useNuxtApp()

const email = ref('')
const password = ref('')
const result = ref(false)

const login = async () => {
    // We will implement login logic here
}
</script>
<template>
    <form @submit.prevent="login">
        <h1>Login</h1>
        <div v-if="result">
            <p>Successfully logged in</p>
        </div>
        <div>
            <input required type="text" v-model="email" name="email" placeholder="Email" />
        </div>
        <div>
            <input required type="password" v-model="password" name="password" placeholder="Password" />
        </div>
        <button type="submit">Login</button>
    </form>
</template>
JSON Authentication Mode
You now have a way to collect user log in credentials. Let's use Directus' JSON authentication mode to implement the log in logic.
Back in our directus.ts plugin file tell Directus to use authentication by replacing the entire file with the following:
import {
    createDirectus,
    rest,
    readItems,
    registerUser,
    authentication,
} from "@directus/sdk";

const directus = createDirectus<DirectusSchema>(
    "http://localhost:3000/directus",
)
    .with(authentication("json"))
    .with(rest());

export default defineNuxtPlugin(() => {
    return {
        provide: { directus, readItems, registerUser },
    };
});
Now implement the login function in the login.vue file:
<script setup lang="ts">
const { $directus } = useNuxtApp()

const email = ref('')
const password = ref('')
const result = ref(false)

const login = async () => {
    const response = await $directus.login({ email: email.value, password: password.value })
    localStorage.setItem('directus_auth', JSON.stringify(response))
    result.value = true
}
</script>
<template>
    <form @submit.prevent="login">
        <h1>Login</h1>
        <div v-if="result">
            <p>Successfully logged in</p>
        </div>
        <div>
            <input required type="text" v-model="email" name="email" placeholder="Email" />
        </div>
        <div>
            <input required type="password" v-model="password" name="password" placeholder="Password" />
        </div>
        <button type="submit">Login</button>
    </form>
</template>
Notice our login function now logs in and stores the response in local storage. You can test your login form by visiting http://your-website-url/login and entering the user credentials of the user you created above. You should see a "Successfully logged in" message and that a directus_auth object is set in local storage (you can verify this using your browser's developer tools).

Session Cookie Authentication Mode
Rather than manually managing authentication in local storage Directus also provides an option to use session cookies. This requires a change to our directus.ts plugin file:
-- .with(authentication("json"))
++ .with(authentication("cookie"))
Log in again and note that local storage no longer contains any tokens. Instead, you can see a cookie named directus_session_token in your browser's developer tools.
Check if the User is Authenticated
Having manually proven that the application is working we can create a isAuthenticated function that programmatically checks if a user is authenticated. Back in our directus.ts plugin file we can add readMe to the list of imports create a new isAuthenticated function. The new file looks like this:
import {
    createDirectus,
    readMe,
    rest,
    readItems,
    registerUser,
    authentication,
} from "@directus/sdk";

const directus = createDirectus<DirectusSchema>(
    "http://localhost:3000/directus",
)
    .with(authentication("cookie"))
    .with(rest());

const isAuthenticated = async () => {
    try {
        const me = await directus.request(readMe());
        return me;
    } catch (error) {
        console.error(error)
        return false;
    }
};

export default defineNuxtPlugin(() => {
    return {
        provide: { directus, readItems, registerUser, isAuthenticated },
    };
});
So that user authentication checking isn't required on every page, create a Nuxt middleware to handle this check. By creating a global middleware you'll ensure it applies to every page of your application, while manually excluding the login and register pages. If you require more complex logic you may prefer to implement named route middleware and manually apply middleware using definePageMeta in each page. You can read more on this in the Nuxt documentation.
Create a new file/folder middleware/authenticated.global.ts:
export default defineNuxtRouteMiddleware(async (to, from) => {
    const { $isAuthenticated, $directus } = useNuxtApp();

    // Login and register pages are not protected
    if (to.path.startsWith("/login") || to.path.startsWith("/register")) {
        return;
    }

    const authenticated = await $isAuthenticated();

    if (!authenticated) {
        return navigateTo("/login");
    }

    return;
});
Authenticate Requests
Create a new page to display a list of posts. For the sake of our application, only authenticated users will be able to access this list. Create a new page pages/posts/index.vue:
<script setup lang="ts">
const { $directus, $readItems } = useNuxtApp()

const { data, error } = await useAsyncData('post', async () => {
    return await $directus.request(
        $readItems('posts')
    )
})
</script>
<template>
    <div v-for="post in data">
        <h2>{{ post.title }}</h2>
    </div>
</template>
When we log in we want to redirect to this page, so update login.vue to redirect to /posts:
<script setup lang="ts">
const { $directus } = useNuxtApp()
const router = useRouter()

const email = ref('')
const password = ref('')
const errorMsg = ref(null)

const login = async () => {
    try {
        errorMsg.value = null
        await $directus.login({ email: email.value, password: password.value })
        router.push('/posts') // Redirect to /posts
    } catch (error) {
        errorMsg.value = error.message || 'An unexpected error occurred'
    }
}
</script>
<template>
    <form @submit.prevent="login">
        <h1>Login</h1>
        <div v-if="errorMsg">
            <p>{{ errorMsg }}</p>
        </div>
        <div>
            <input required type="text" v-model="email" name="email" placeholder="Email" />
        </div>
        <div>
            <input required type="password" v-model="password" name="password" placeholder="Password" />
        </div>
        <button type="submit">Login</button>
    </form>
</template>
Go into Directus (you should still be logged in as an administrator) and add 2 example posts. Log out and then log back in as a user created using the register form. Add 2 more example posts.
Visit http://your-website-url/posts and you will be redirected to /login. Login and you will be taken to /posts containing a list of your posts.
Note: You may notice a 401 error in the Directus console at this point. This will be resolved in the next section.
Handling Server-Side Rendering (SSR)
This will work well from the client side but if you refresh the page the user will be asked to log in again. This is because authentication has only been handled on the client side, not the server side.
Rectify this in our plugins/directus.ts file by using cookies instead of session:
import {
    createDirectus,
    rest,
    readItems,
    registerUser,
    authentication,
    readMe,
    type AuthenticationStorage
} from "@directus/sdk";

export default defineNuxtPlugin(() => {
    class NuxtCookieStorage {
        cookie = useCookie('directus-data')
        get() {
        return this.cookie.value
        }
        set(data: any) {
        this.cookie.value = data
        }
    }

    const storage = new NuxtCookieStorage() as AuthenticationStorage

    const directus = createDirectus<DirectusSchema>(
        "http://localhost:3000/directus",
    )
    .with(authentication("cookie", { credentials: "include", storage }))
    .with(rest({ credentials: "include" }));

    const isAuthenticated = async () => {
        try {
            const me = await directus.request(
                readMe(),
            );
            return me
        } catch (error) {
            console.error(error);
            return false;
        }
    };

    return {
        provide: { directus, readItems, registerUser, isAuthenticated },
    };
});
You will notice two changes.
- A custom
AuthenticationStorageclass which uses Nuxt'suseCookiecomposable to store the authentication token in a cookie that can be used by the server and the client. - The
authenticationfunction is updated to use cookie storage instead of session.
Now try logging in again and then reload the /posts page in your browser. The page retains the authentication and will display the posts you created earlier.
Content Permissions
While user authentication is handled Directus also provides us with the ability to control access to collections and items. Directus has been configured with some policies to allow "Authenticated User" to delete and update their own posts it just needs implementing in the application.
Update our pages/posts/index.vue file with delete functionality:
<script setup lang="ts">
const { $directus, $readItems, $isAuthenticated } = useNuxtApp()
import { deleteItem } from '@directus/sdk'
const deleteSuccessful = ref(false)

const { data, error } = await useAsyncData('post', async () => {
    try {
        return await $directus.request(
            $readItems('posts', {
                fields: ['id', 'title', 'content', 'user_created']
            })
        )
    } catch (error) {
        console.error(error)
    }
})

const authUser = await $isAuthenticated()
if (authUser === false) {
    throw new Error('Not authenticated')
}

const deletePost = async (id: number | string) => {
    try {
        await $directus.request(
            deleteItem('posts', id)
        )
        data.value = data.value?.filter(post => post.id !== id)
        deleteSuccessful.value = true
    } catch (error) {
        console.error(error)
    }
}
</script>
<template>
    <h1>Posts</h1>
    <p v-if="deleteSuccessful">Post deleted successfully</p>
    <div v-for="post in data">
        <h2>{{ post.title }}</h2>
        <button v-if="authUser.id === post.user_created" @click="deletePost(post.id)">Delete</button>
        <hr />
    </div>
</template>
Visit the posts page in your browser. You will notice that the delete button is only visible on some posts. This is due to the v-if condition on the delete button which shows it only when the currently logged in user matches the user who created the particular post.
For posts that were created by the logged in user, clicking the delete button will delete the post.
Refreshing Tokens
For security reasons, temporary tokens expire after a period of time, use the refresh function to request a new token from Directus in the plugins/directus.ts plugin file:
import {
    createDirectus,
    rest,
    readItems,
    registerUser,
    authentication,
    readMe,
    refresh,
    type AuthenticationStorage
} from "@directus/sdk";

export default defineNuxtPlugin(() => {
    class NuxtCookieStorage {
        cookie = useCookie('directus-data')
        get() {
            return this.cookie.value
        }
        set(data: any) {
            this.cookie.value = data
        }
    }

    const storage = new NuxtCookieStorage() as AuthenticationStorage

    const directus = createDirectus<DirectusSchema>(
        "http://localhost:3000/directus",
    )
    .with(authentication("cookie", { credentials: "include", storage }))
        .with(rest({ credentials: "include" }));

    const isAuthenticated = async () => {
        try {
            const me = await directus.request(
                readMe(),
            );
            return me
        } catch (error) {
            console.error(error);
            return false;
        }
    };

    const refreshToken = async () => {
        return directus.request(
            refresh({ mode: 'cookie' })
        );
    };

    return {
        provide: { directus, readItems, registerUser, isAuthenticated, refreshToken },
    };
});
Here the refresh function has been imported from the SDK (using the cookie mode) and a function has been written to request a new token. No further logic is required as Directus will use your custom storage class to update the token in a cookie.
Logging Out
The final feature needed to provide our user is the ability to log out. In the directus plugin (plugins/directus.ts) add a logout function (just after the refreshToken function):
const logout = async () => {
    await directus.logout()
    navigateTo('/login')
}
This will handle the logout process and redirect the user back to the login page. Don't forget to add it to the list of provided functions:
return {
    provide: { directus, readItems, registerUser, isAuthenticated, refreshToken, logout },
};
To use it you would call $logout() from your .vue files. Here is an example of the post listing page with a logout button added:
<script setup lang="ts">
const { $directus, $readItems, $logout, $isAuthenticated } = useNuxtApp()
import { deleteItem } from '@directus/sdk'
const deleteSuccessful = ref(false)

const { data, error } = await useAsyncData('post', async () => {
    try {
        return await $directus.request(
            $readItems('posts', {
                fields: ['id', 'title', 'content', 'user_created']
            })
        )
    } catch (error) {
        console.error(error)
    }
})

const authUser = await $isAuthenticated()
if (authUser === false) {
    throw new Error('Not authenticated')
}

const deletePost = async (id: number | string) => {
    try {
        await $directus.request(
            deleteItem('posts', id)
        )
        data.value = data.value?.filter(post => post.id !== id)
        deleteSuccessful.value = true
    } catch (error) {
        console.error(error)
    }
}
</script>
<template>
    <h1>Posts</h1>
    <p v-if="deleteSuccessful">Post deleted successfully</p>
    <div v-for="post in data">
        <h2>{{ post.title }}</h2>
        <button v-if="authUser.id === post.user_created" @click="deletePost(post.id)">Delete</button>
        <hr />
    </div>
    <button @click="$logout()">Logout</button>
</template>
Summary
In this tutorial you have implemented Directus authentication in a Nuxt application including user registration, login, content permissions and logout. The provided code leans heavily on the functionality of the Directus SDK and the Nuxt framework to keep custom logic to a minimum.
You can access the final code for this tutorial here and extend it to create your own solution.