Rendering Dynamic Blocks Using Next.js
Having used Directus as a Headless CMS to create individual blocks that can be re-used on different pages, let's integrate them into a Next.js application.
Before You Start
You will need:
- A Directus project with the collections defined in our Create Reusable Blocks with Many-to-Any Relationships tutorial.
- Your public policy should have read permission on the
pages, x, y collections. - Fundamental understanding of Next.js concepts.
Set Up Your Directus Project
Set Permissions
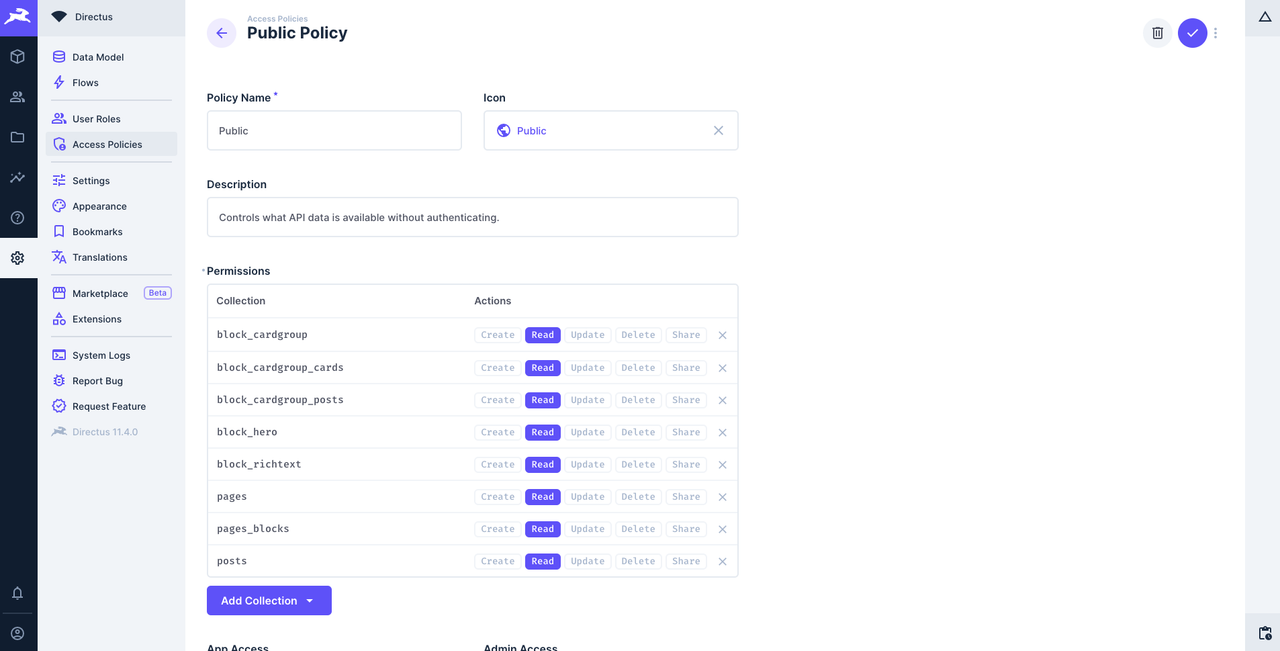
Continuing on from the Create Reusable Blocks with Many-to-Any Relationships tutorial requires that we make the created collections readable by the public. To do this go to Settings -> Access Policies -> Public and add read permissions to all the collections created in the previous tutorial.
Configure CORS
You may need set your content security policy to allow your Next.js app to access the Directus instance. For example if you are self-hosting, or in development, and using Docker, then you can do this by adding the following environment variable to your docker-compose.yml file:
environment:
  CONTENT_SECURITY_POLICY_DIRECTIVES__FRAME_SRC: your-website-url
Replace
your-website-urlwith your Next.js app's URL and the port. eg. if your app URL is in development ishttp://localhost:3000, replaceyour-website-urlwithlocalhost:3000.
Set Up Your Next.js Project
Next, create a new Next.js app by running the following command:
npx create-next-app \
  directus-next-dynamic-blocks \
  --js \
  --app \
  --eslint \
  --no-src-dir \
  --no-tailwind \
  --turbopack \
  --import-alias "@/*"
Next, change your terminal's working directory into the newly created project directory and install the Directus SDK into it:
cd directus-next-dynamic-blocks
npm i @directus/sdk
Now, open the project directory in your code editor to start building the app. First of all, clear out the CSS in app/globals.css and replace the code in app/page.js with the following:
export default function Home() {
  return <div />
}
Set up Directus
To make it easy to access the Directus instance through the SDK, you should create a helper file that you can import anywhere in your Next.js app. To do that, create a new directory called lib in the project directory and save the following code snippet in a file called directus.js in it:
import { createDirectus, rest, authentication } from '@directus/sdk';

const BACKEND_URL = "http://localhost:8055/"

const client = createDirectus(BACKEND_URL)
    .with(authentication("json"))
    .with(rest())

export default client;
Important: Because Next.js extends the native fetch API with a force-cache configuration by default, you may sometimes run into scenarios where Next.js returns stale data. To fix this, update the rest() composable to add the following option:
.with(
  rest({
    onRequest: (options) => ({ ...options, cache: 'no-store' }),
  })
)
Creating the Frontend Components
Going by the structure of our reusable blocks, let's create a single component for each individual collection.
Hero Component
Create a new file ./app/components/Hero.js and add the following code snippet in it:
import React from "react";
import Image from "next/image";

export default function Hero({ id, headline, content, buttons, image }) {
    return (
        <section id={id} className="hero">
            <div className="hero_content">
                <h2>{headline}</h2>
                <Image src={`http://localhost:8055/assets/${image}`} alt="" width={700} height={350} />
                <div dangerouslySetInnerHTML={{ __html: content }} />
                <div className="hero_buttons">
                    {buttons?.map((button, index) => (
                        <button key={index}>{button.label}</button>
                    ))}
                </div>
            </div>
        </section>
    );

}
This component displays an H2 headline, an <Image/> component with the image ID coming from the Directus API, some HTML content, and the buttons configured in the CMS.
In order to make the images load successfully, you will need to go to Settings > Access Policies > Public and add directus_files to the Permissions list with a public read policy. In production use-cases, you would want to use more fine-grained permissions with your files.
Rich Text Component
Next, create a new file ./app/components/RichText.js and add the following code snippet in it:
import React from "react";

export default function RichText({ id, headline, content }) {

    return (
        <section id={id} className="rich-text">
            <div className="rich-text_content">
                <h2>{headline}</h2>
                <div dangerouslySetInnerHTML={{ __html: content }} />
            </div>
        </section>
    );
}
This is a barebones component with an H2 headline and a HTML content section.
Card Group Component
Next, create a new file ./app/components/CardGroup.js and add the following code snippet in it:
import Image from "next/image";

export default function CardGroup({ id, headline, content, group_type, posts, cards }) {
    return (
        <div className="card-group">
            <h2>{headline}</h2>
            <div dangerouslySetInnerHTML={{ __html: content }} />

            {(group_type === 'posts' && (
                <div className="card-group__posts" style={{ display: 'flex' }}>
                    {posts?.map((post, index) => (
                        <div key={index} style={{ margin: "8px"}}>
                        <Image src={`http://localhost:8055/assets/${post.posts_id.image}`} alt="" width={128} height={72} />
                            <p>{post.posts_id.content}</p>
                        </div>
                    ))}
                </div>
            ))}
            {(group_type === 'custom' && <div className="card-group__cards">
                {cards?.map((card, index) => (
                    <div key={index}>
                        <Image src={`http://localhost:8055/assets/${card.cards_id.image}`} alt="" width={70} height={35} />
                        <p>{card.cards_id.content}</p>
                    </div>
                ))}
            </div>)}
        </div>
    );
}
This component renders an H2 headline and an HTML content section, and then depending on the value of the group_type, it renders either a list of cards or a list of posts with the images configured to load correctly.
Page Component
Next, create a new file ./app/[slug]/page.js and add the following code snippet in it:
import React from "react";
import Hero from "../components/Hero";
import CardGroup from "../components/CardGroup";
import RichText from "../components/RichText";
import client from "@/lib/directus";
import { readItems } from "@directus/sdk";

const blockToComponent = (collectionName) => {
    switch (collectionName) {
        case "block_hero":
            return Hero;
        case "block_richtext":
            return RichText;
        case "block_cardgroup":
            return CardGroup;
        default:
            return null;
    }
}


export default async function Page({ params }) {
    const { slug } = await params;

    let page

    return (
        <div>
            <h1>{page[0].title}</h1>
            {page[0]?.blocks?.map((block, index) => {
                const Component = blockToComponent(block.collection);
                return <Component key={index} {...(block.item)} />;
            })}
        </div>
    );
}
This is where you put it all together. The blockToComponent function helps to translate the collection names to their respective components. The page receives the slug through the URL parameters, and you will use the slug to retrieve the page data and supply it to the components in the next section.
Dynamically Fetch Page Data
To fetch page data from Directus, you will need to use the Directus client you created earlier. To do that, add the two imports and the client.request call to the ./app/[slug]/page.js file as shown below:
import React from "react";
import Hero from "../components/Hero";
import CardGroup from "../components/CardGroup";
import RichText from "../components/RichText";

// Add the following imports
import client from "@/lib/directus";
import { readItems } from "@directus/sdk";

const blockToComponent = (collectionName) => {
    switch (collectionName) {
        case "block_hero":
            return Hero;
        case "block_richtext":
            return RichText;
        case "block_cardgroup":
            return CardGroup;
        default:
            return null;
    }
}


export default async function Page({ params }) {
    const { slug } = await params;

    let page

    // Add the following line
    page = await client.request(readItems('pages', {
        filter: {
            slug: { _eq: slug },
        },
        fields: ['title', 'slug', 'blocks.id', 'blocks.collection', 'blocks.item.*', 'blocks.item.posts.*.*', 'blocks.item.cards.*.*'],
        limit: 1
    }))

    return (
        <div>
            <h1>{page[0].title}</h1>
            {page[0]?.blocks?.map((block, index) => {
                const Component = blockToComponent(block.collection);
                return <Component key={index} {...(block.item)} />;
            })}
        </div>
    );


}
The Directus SDK call retrieves the page title, slug, and blocks from the Directus instance. For the blocks, it retrieves the ID, the collection name, and the item details. For each item containing posts and cards (i.e. the card groups), it retrieves all items from those collections as well.
Once you save this and run the app using the npm run dev command, here's what you should see:

You can try updating the blocks data in Directus to watch the page update without having to change the code!
Summary
In this post, you learned how to create dynamic content blocks in Next.js and use Directus to control the structure of your Next.js page through them. Using Next.js dynamic routing and Directus' relations and nested queries, you learned how to retrieve the required content easily and display it to the user.